Send data from ESP8266 or EPS32 to Raspberry Pi via MQTT
In this tutorial we create a WiFi MQTT communication between an ESP8266 or ESP32 microcontroller and a Raspberry Pi.
With this article you learn
- the basics of MQTT communication
- how to publish data to a MQTT broker
- how to setup an MQTT broker
- validate the published data as subscriber
In my last article I wrote a tutorial how to send data from an Arduino to a Raspberry Pi via the serial USB communication. But the better solution to create a smart home is of course to send the data via WiFi communication.
If we want to send data via WiFi we need a transportation protocol. The most popular transportation protocol I know is MQTT which stands for Message Queuing Telemetry Transport and is suitable for microcontrollers like ESP8266, ESP32 or Raspberry Pi that are able to use WiFi.
Table of Contents
What is MQTT?
In this section I want to give a summary how MQTT works. If you are interested in more details about how MQTT works please visit my detailed tutorial about MQTT.
In the MQTT message chain are 3 parties involved:
- Publisher who generate and send data to the MQTT broker. In case of a smart home the publisher could be a weather station which sends temperature and humidity every 5 minutes to the broker.
- Broker which is like a server to collect the messages from all publishers, save the data and distribute the data messages to the right subscribers.
- Subscriber is a component which subscribes to a certain kind of messages coming from publishers. A subscriber in the smart home use case could be a monitor or panel which shows the different temperatures and/or humidity of the home and outside.
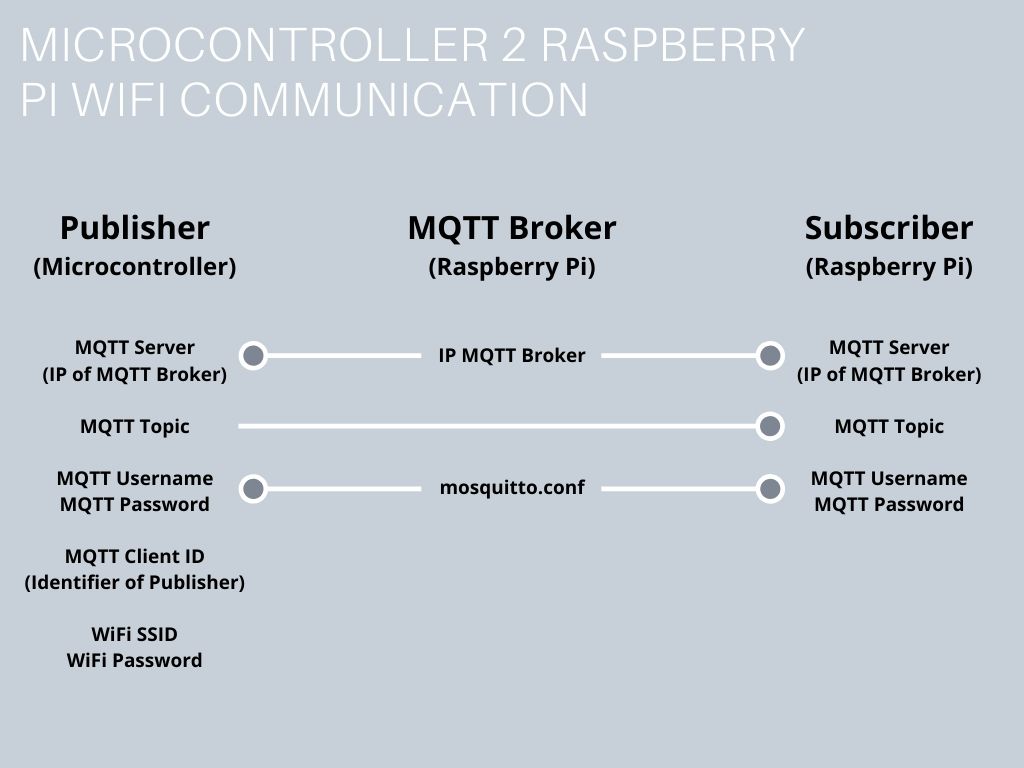
If we want to send data via MQTT we have to define some variables and setting which are linked between the publisher, the broker and the subscriber. The following picture gives a perfect overview about how defines the setting and to which parties are the settings distributed.
For our example we use an ESP32 or ESP8266 as publisher. The MQTT Broker will be a Raspberry Pi and we choose Mosquitto as MQTT software for the broker. The subscriber is the same Raspberry Pi as the broker. That the broker and subscriber is on the same device makes no problem and is common practice.
The first setting is the IP of the MQTT broker. Of course the IP of the MQTT broker is the same IP address that the Raspberry Pi has in your network. This IP is a variable in the publisher and subscriber script because they have to connect to the broker.
The second setting is the MQTT topic which is defined by the publisher. Which data you put in a topic it totally up to you. For me if I had several indoor weather stations in different room in the house I would give each room a topic. But in the end every topic has to be unique. Therefor topics are build like a folder structure. For examples you can have the following topics:
- home/bathroom/temperature
- home/bathroom/humidity
- home/livingroom/temperature
- …
The advantage is that one subscriber can have the subscription to the bathroom with all data following down the folder structure and a second subscriber can be only interested in the temperature of the bathroom.
The MQTT username and password is defined in the configuration file of the MQTT broker (mosquitto.conf). This configuration has to be exactly the same in the publisher and subscriber script to get access to the MQTT broker.
Only the publisher gets a MQTT client ID. With this client is the publisher is identified. This prevents the broker for disallowed data from unknown publishers and you know which publisher is sending what data. You can think for the client ID like a name.
The last setting is also only for the publisher. It is the SSID and password for your home network. Without this information the microcontroller can not send data via the local network.
After we defined all settings and which device has to define what setting or variable we can dive into your example. In this example we want to send the temperature and humidity from a DHT11 sensor or a DHT22 sensor module to the Raspberry Pi. The sensor is connected to the ESP8266 or ESP32 microcontroller. The Raspberry Pi as subscriber should print the last sent temperature and humidity to the terminal.
Because we will need all these variables and settings in the following part of this tutorial the table below shows the specific variables and settings. You can copy them or define your one. This is up to you.
The following table gives you an overview of all components and parts that I used for this tutorial. I get commissions for purchases made through links in this table.
Publisher Setup Part 1 (ESP8266 / ESP32)
The first step is to set up the publisher so that we can be sure that the temperature and humidity is read correctly and published to the network via MQTT.
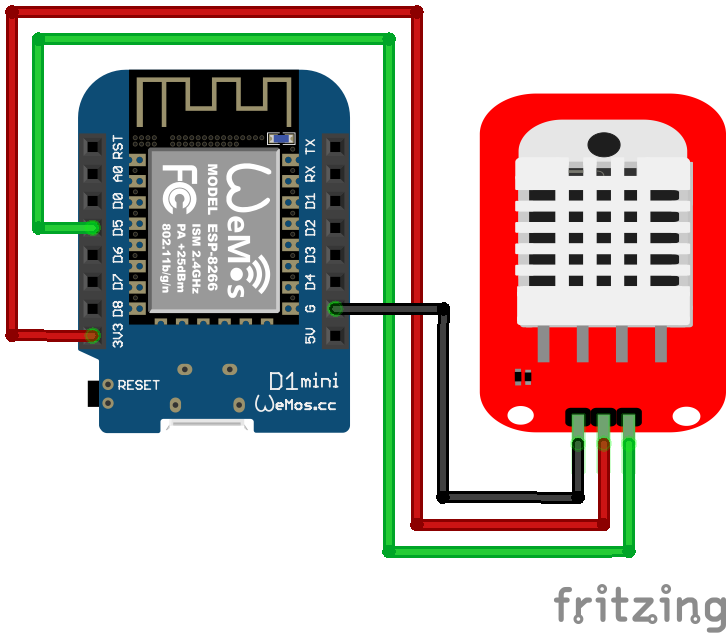
In the following picture you see the wiring between the ESP8266 or the ESP32 microcontroller and the DHT22 sensor module.

DHT22 Module ESP32 NodeMCU

DHT22 Module ESP8266 NodeMCU
DHT22 Module ESP8266 WeMos D1 Mini
The program sketch is easy. First we have to import the DHT library and define the pin the DHT temperature and humidity sensor is connected to the microcontroller. For the ESP8266 I use the digital I/O pin D5 and for the ESP32 pin 4, which you can see from the fritzing pictures. Depending on your microcontroller, you have to comment one of the two lines.
After the definition of the used pin, we choose the DHT type. In my case I use the DHT22 sensor. If you use a DHT11 sensor, you have to change the corresponding line of code. The wiring is the same between the DHT11 and DHT22 sensor module.
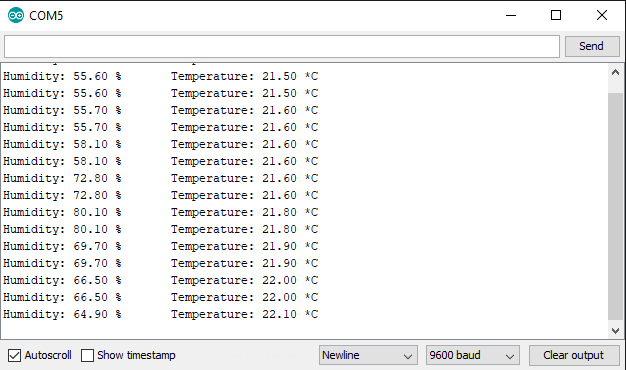
In the setup function we set the baud rate to 9600 and initialize the sensor. The temperature and humidity are saved in one variable and the sensor values are printed to the serial monitor if they are valid. At the end of the script we pause for 10 seconds.
#include "DHT.h"

//#define DHTPIN D5  // for ESP8266
#define DHTPIN 4  // for ESP32

#define DHTTYPE DHT22  // DHT11 or DHT22

DHT dht(DHTPIN, DHTTYPE);

void setup() {
  Serial.begin(9600);
  dht.begin();
}

void loop() {
  float humidity = dht.readHumidity();
  float temperature = dht.readTemperature();

  // check if returns are valid and print the sensor data
  if (isnan(temperature) || isnan(humidity)) {
    Serial.println("Failed to read from DHT");
  } else {
    Serial.print("Humidity: ");
    Serial.print(humidity);
    Serial.print(" %\t");
    Serial.print("Temperature: ");
    Serial.print(temperature);
    Serial.println(" *C");
  }

  delay(10000);
}
If you did everything right you should see the sensor values in the serial monitor.
This was part one of the publisher setup. Now we have to setup the MQTT broker and come back to the publisher to send the temperature and humidity with MQTT to the broker.
MQTT Broker Setup (Raspberry Pi)
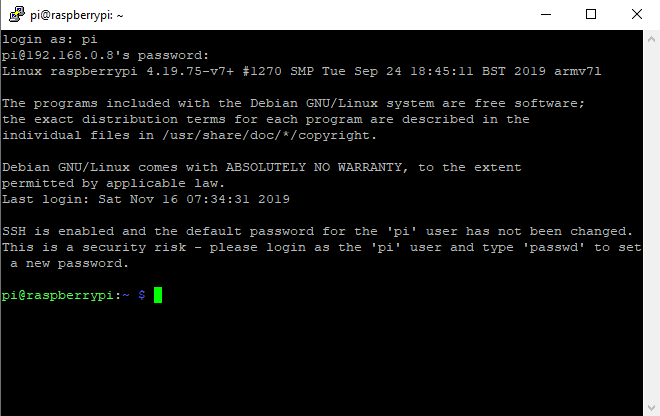
First you have to setup the Raspberry Pi. If you do not know how to setup your Raspberry Pi, here you find the tutorial.
The first thing is that we have to connect to the Raspberry Pi via SSH to install the necessary packages and libraries. You should see the terminal in front of you.
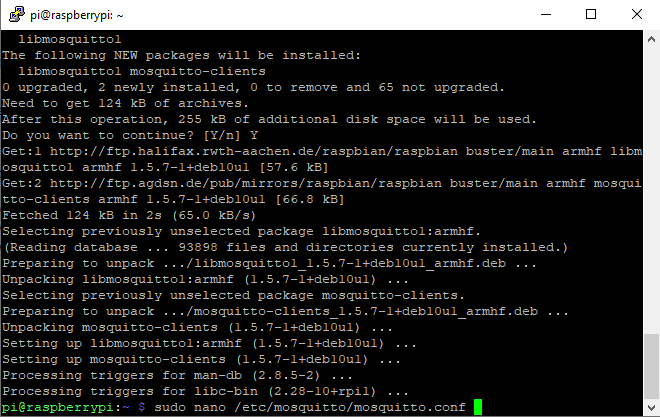
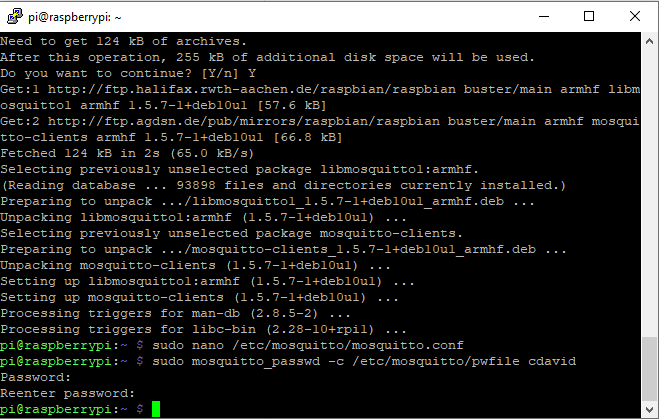
The first thing is to install the MQTT broker Mosquitto on the Raspberry Pi with the command line clients for debugging in case of error. Use the commands in the following table for the installation.
Install the MQTT broker/server | sudo apt-get install mosquitto |
Install command line clients in case for debugging | sudo apt-get install mosquitto-clients -y |
In case the packages can not be found run sudo apt-get update to update what packages are in general available for your Raspberry Pi.
After the installation of the MQTT broker Mosquitto we have to change some configurations. There are two different configurations to control Mosquitto:
- /etc/mosquitto/mosquitto.conf: Default configuration
- /etc/mosquitto/conf.d: Extension to the default configuration.
In our example we only want to use the default configuration. Therefor open the configuration file with the text editor nano and the following command:
Open the Mosquitto MQTT broker configuration | sudo nano /etc/mosquitto/mosquitto.conf |
You see the default configuration after the installation of Mosquitto.
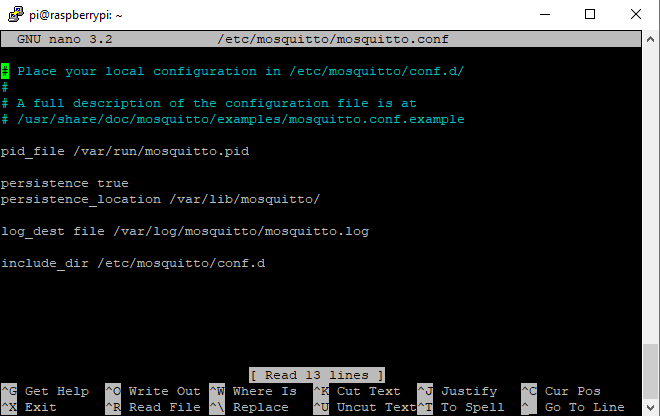
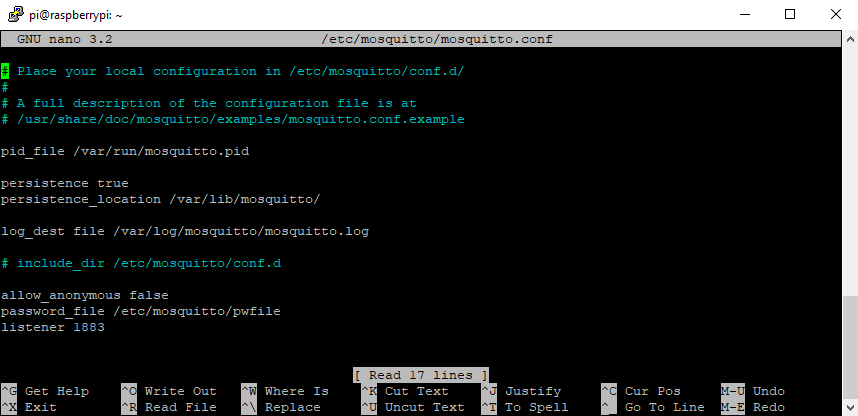
There are 4 things we want to change apart of the default configuration:
- The broker should only include the default settings. That is done be comment the line where the conf.d file is included.
- We do not want anonymous users to connected to the MQTT broker: allow_anonymous = false
- We want to save the passwords in a separate file: password_file /etc/mosquitto/pwfile
- The MQTT broker should be accessible on port 1883
After all changes your Mosquitto configuration file should look like the following.
Click Ctrl + X, then Y to confirm to save and hit the enter button to save to the existing file.
Now we have to set the username and the password that publishers and subscribers get access to the MQTT broker. Use the following command to create a new user and password for this user.
Create new user with username and password | sudo mosquitto_passwd -c /etc/mosquitto/pwfile username sudo mosquitto_passwd -c /etc/mosquitto/pwfile cdavid |
In my case I use the following username and password:
- Username: cdavid
- Password: cdavid
Of course this password is bad regarding the security. Feel free to create a stronger password. This username and password is also used in the publisher and subscriber script.
If you want to delete an existing user, you can use the following command.
Remove existing user | sudo mosquitto_passwd -d /etc/mosquitto/pwfile username |
At this point we created the MQTT broker as well as every setting we use in this tutorial. Now we want to check is Mosquitto is already running. You can test the current status of the MQTT broker with:
See current status of MQTT broker | sudo systemctl status mosquitto |
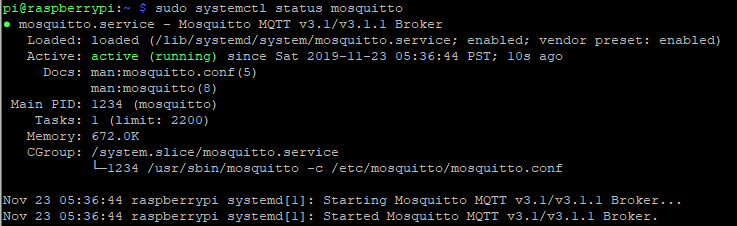
My broker is running. The following commands start, stop and restart and start the MQTT broker at boot of the Raspberry Pi. Use the following commands to control the broker:
Start MQTT broker | sudo systemctl start mosquitto |
Stop MQTT broker | sudo systemctl stop mosquitto |
Restart MQTT broker | sudo systemctl restart mosquitto |
Start MQTT broker at boot | sudo systemctl enable mosquitto |
Now after the MQTT broker is ready to receive the data via MQTT we have to make sure that the publisher is sending the data via MQTT to the broker.
Publisher Setup Part 2 (ESP8266 / ESP32)
The publisher part 1 finished that the temperature and humidity are stored in a variable and printed to the serial. In this part 2 we establish the WiFi connection to the home network and send the data as payload via the MQTT protocol to the broker.
Now we go part by part over the Arduino script for the ESP8266 or ESP32.
#include "DHT.h"
#include "PubSubClient.h" // Connect and publish to the MQTT broker

// Code for the ESP32
#include "WiFi.h" // Enables the ESP32 to connect to the local network (via WiFi)
#define DHTPIN 4  // Pin connected to the DHT sensor

// Code for the ESP8266
//#include "ESP8266WiFi.h"  // Enables the ESP8266 to connect to the local network (via WiFi)
//#define DHTPIN D5         // Pin connected to the DHT sensor

#define DHTTYPE DHT22  // DHT11 or DHT22
DHT dht(DHTPIN, DHTTYPE);

// WiFi
const char* ssid = "KabelBox-0174";                 // Your personal network SSID
const char* wifi_password = "9434763855628**"; // Your personal network password

// MQTT
const char* mqtt_server = "192.168.0.8";  // IP of the MQTT broker
const char* humidity_topic = "home/livingroom/humidity";
const char* temperature_topic = "home/livingroom/temperature";
const char* mqtt_username = "cdavid"; // MQTT username
const char* mqtt_password = "cdavid"; // MQTT password
const char* clientID = "client_livingroom"; // MQTT client ID

// Initialise the WiFi and MQTT Client objects
WiFiClient wifiClient;
// 1883 is the listener port for the Broker
PubSubClient client(mqtt_server, 1883, wifiClient);


// Custom function to connet to the MQTT broker via WiFi
void connect_MQTT(){
  Serial.print("Connecting to ");
  Serial.println(ssid);

  // Connect to the WiFi
  WiFi.begin(ssid, wifi_password);

  // Wait until the connection has been confirmed before continuing
  while (WiFi.status() != WL_CONNECTED) {
    delay(500);
    Serial.print(".");
  }

  // Debugging - Output the IP Address of the ESP8266
  Serial.println("WiFi connected");
  Serial.print("IP address: ");
  Serial.println(WiFi.localIP());

  // Connect to MQTT Broker
  // client.connect returns a boolean value to let us know if the connection was successful.
  // If the connection is failing, make sure you are using the correct MQTT Username and Password (Setup Earlier in the Instructable)
  if (client.connect(clientID, mqtt_username, mqtt_password)) {
    Serial.println("Connected to MQTT Broker!");
  }
  else {
    Serial.println("Connection to MQTT Broker failed...");
  }
}


void setup() {
  Serial.begin(9600);
  dht.begin();
}

void loop() {
  connect_MQTT();
  Serial.setTimeout(2000);

  float h = dht.readHumidity();
  float t = dht.readTemperature();

  Serial.print("Humidity: ");
  Serial.print(h);
  Serial.println(" %");
  Serial.print("Temperature: ");
  Serial.print(t);
  Serial.println(" *C");

  // MQTT can only transmit strings
  String hs="Hum: "+String((float)h)+" % ";
  String ts="Temp: "+String((float)t)+" C ";

  // PUBLISH to the MQTT Broker (topic = Temperature, defined at the beginning)
  if (client.publish(temperature_topic, String(t).c_str())) {
    Serial.println("Temperature sent!");
  }
  // Again, client.publish will return a boolean value depending on whether it succeded or not.
  // If the message failed to send, we will try again, as the connection may have broken.
  else {
    Serial.println("Temperature failed to send. Reconnecting to MQTT Broker and trying again");
    client.connect(clientID, mqtt_username, mqtt_password);
    delay(10); // This delay ensures that client.publish doesn't clash with the client.connect call
    client.publish(temperature_topic, String(t).c_str());
  }

  // PUBLISH to the MQTT Broker (topic = Humidity, defined at the beginning)
  if (client.publish(humidity_topic, String(h).c_str())) {
    Serial.println("Humidity sent!");
  }
  // Again, client.publish will return a boolean value depending on whether it succeded or not.
  // If the message failed to send, we will try again, as the connection may have broken.
  else {
    Serial.println("Humidity failed to send. Reconnecting to MQTT Broker and trying again");
    client.connect(clientID, mqtt_username, mqtt_password);
    delay(10); // This delay ensures that client.publish doesn't clash with the client.connect call
    client.publish(humidity_topic, String(h).c_str());
  }
  client.disconnect();  // disconnect from the MQTT broker
  delay(1000*60);       // print new values every 1 Minute
}
At the beginning of the script we have to include two more libraries. The PubSubClient enables the ESP8266 or ESP32 microcontroller to be a MQTT publisher. To connect the microcontroller to the local WiFi we have to add another library that is different for the ESP8266 and ESP32. For the ESP32 we use the WiFi library and for the ESP8266 the ESP8266WiFi library.
If you do not know how to install Arduino libraries, here you find a step by step tutorial. The rest of the code is the same compared to the setup in the first chapter.
In the next part we define a lot of variables. Of course you have to fill in your personal data here. The following table gives you an overview of the variables. If you have to modify the variable to your local setting, the row is colored in orange.
If you followed the settings and variables I used you can copy them. If for example you want to use another username, make sure you also change the username in the Mosquitto configuration file.
After all variables are defined we initialize the WiFi as well as the MQTT client objects. Make sure you use the identical listener port (1883) compared to the Mosquitto configuration file.
The next part is a custom function, called connect_MQTT(), to connect to the MQTT broker via the wireless connection. First the SSID and password is printed. Then the script waits until the wireless connection is established and prints the IP of the microcontroller. After the WiFi is setup we connect to the MQTT broker with the client ID, the MQTT username and MQTT password. We print in the serial if the connection is successful or failed.
The setup function is the same as in the first chapter.
The loop function starts with executing the MQTT connection function we discussed before. You could also setup the WiFi connection in the setup function and do not reconnected every iteration in the loop function. Because I only want to send the temperature and humidity every hour in a real live example, I disconnect the WiFi connection after the MQTT data is send and reconnect after one hour.
After the MQTT connection is established, we read the temperature and the humidity from the DHT sensor and print the values to the serial output. New is that the temperature and humidity are also stored as strings because MQTT can only transfer strings and no other data types.
The last step is to send the temperature and humidity as strings to the MQTT broker via the established connection. Therefore we use the function client.publish of the PubSubClient library. If the message is not sent successful we try to establish the connection to the broker again and try to send the payload a second time. This is done with the temperature and the humidity.
After the temperature and the humidity is sent to the MQTT broker, we disconnect the publisher from the broker and add a delay at the end of the script of 1 minute.
Let us quickly summarize the steps in part 2 of the publisher setup:
- We establish a WiFi and MQTT connection.
- The temperature and humidity are stored as strings.
- The strings are send via MQTT to the broker.
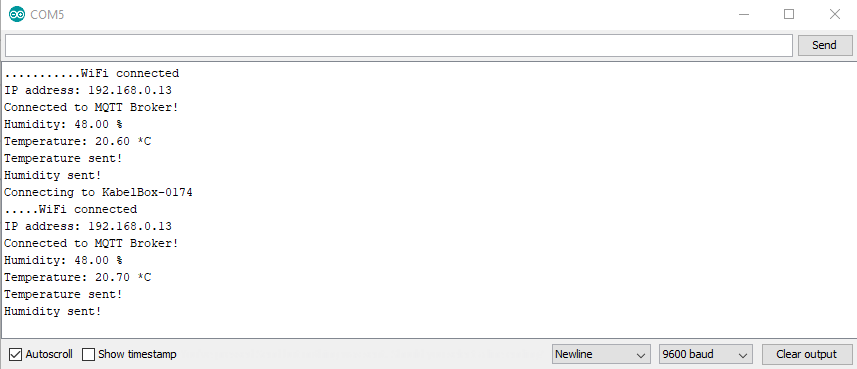
If everything runs correctly you should see the following output in your serial monitor.
Check if MQTT data is received by Mosquitto
Before we continue, we want to make sure that the MQTT messages from the ESP8266 or ESP32 is received by the Mosquitto MQTT broker. Therefore we start the Mosquitto console on the Raspberry Pi to see the connecting publishers. Enter the following command in the console of the Raspberry Pi to start the Mosquitto console:
| Start Mosquitto console | sudo mosquitto |
You should see that the publisher connects to the broker with the defined publisher ID and also that there is a clean disconnect. (The client ID differs in my case, because is updated the article with a new publisher)

Subscriber Setup (Raspberry Pi)
At this point the setup of the publisher and the broker are finished. The last step is to setup the subscriber. In our case the subscriber is the same Raspberry Pi. There is no need, that a subscriber is another device like the broker. We want to use the script language Python to program a script that is listen to the MQTT topics of the publisher. Therefore we have to install a python library for MQTT. Use the following command in the Raspberry Pi terminal:
Install Python MQTT language bindings | sudo pip install paho-mqtt |

So we want to create a python script. To create the file we use the text editor nano again:
Create a python file for subscribing to MQTT data | sudo nano get_MQTT_data.py |
Like in part 2 of the publisher setup we go step by step through the following python script.
import paho.mqtt.client as mqtt

MQTT_ADDRESS = '192.168.0.8'
MQTT_USER = 'cdavid'
MQTT_PASSWORD = 'cdavid'
MQTT_TOPIC = 'home/+/+'


def on_connect(client, userdata, flags, rc):
    """ The callback for when the client receives a CONNACK response from the server."""
    print('Connected with result code ' + str(rc))
    client.subscribe(MQTT_TOPIC)


def on_message(client, userdata, msg):
    """The callback for when a PUBLISH message is received from the server."""
    print(msg.topic + ' ' + str(msg.payload))


def main():
    mqtt_client = mqtt.Client()
    mqtt_client.username_pw_set(MQTT_USER, MQTT_PASSWORD)
    mqtt_client.on_connect = on_connect
    mqtt_client.on_message = on_message

    mqtt_client.connect(MQTT_ADDRESS, 1883)
    mqtt_client.loop_forever()


if __name__ == '__main__':
    print('MQTT to InfluxDB bridge')
    main()
The first thing in the script is to import the MQTT library we installed before. After the library is imported we define all necessary variables. Make sure that the MQTT broker IP (IP of your Raspberry Pi) is correctly as well as the MQTT username and password if you changed them during this tutorial. The MQTT topic is defined with wildcards to create the script as general as possible for reusability.
The on_connect function handle what happens when the MQTT client connects to the broker. If our clients connects to the broker we want to subscribe to the temperature and humidity topics and print the message that the connection was established. The variable rc holds and error code if the connection is not successful so the debugging is easier:
- 0: Connection successful
- 1: Connection refused – incorrect protocol version
- 2: Connection refused – invalid client identifier
- 3: Connection refused – server unavailable
- 4: Connection refused – bad username or password
- 5: Connection refused – not authorized
- 6-255: Currently unused.
The on_message function is called every time the topic is published to. In this case the topic and the message are printed to the terminal. We expect that on this point we will get the current temperature and humidity printed to the terminal.
The main function holds the main part of the python script where all defined function are executed. First we create a client object and set the username and password for the MQTT client. Then we tell the client which function is called when we want to connect to the MQTT broker and receive messages.
Once everything has been set up, we can connect to the broker with the broker IP and the broker port. Once we have told the client to connect, the client object runs in the loop function forever.
Click Ctrl + X, then Y to confirm to save and hit the enter button to save to the existing file.
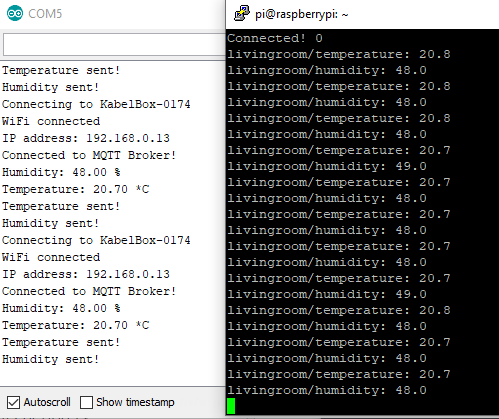
Now we test if everything is running correctly. Therefore run the python code with the following statement in the Raspberry Pi console and watch the terminal if you receive data.
Run the MQTT subscriber | python get_MQTT_data.py |
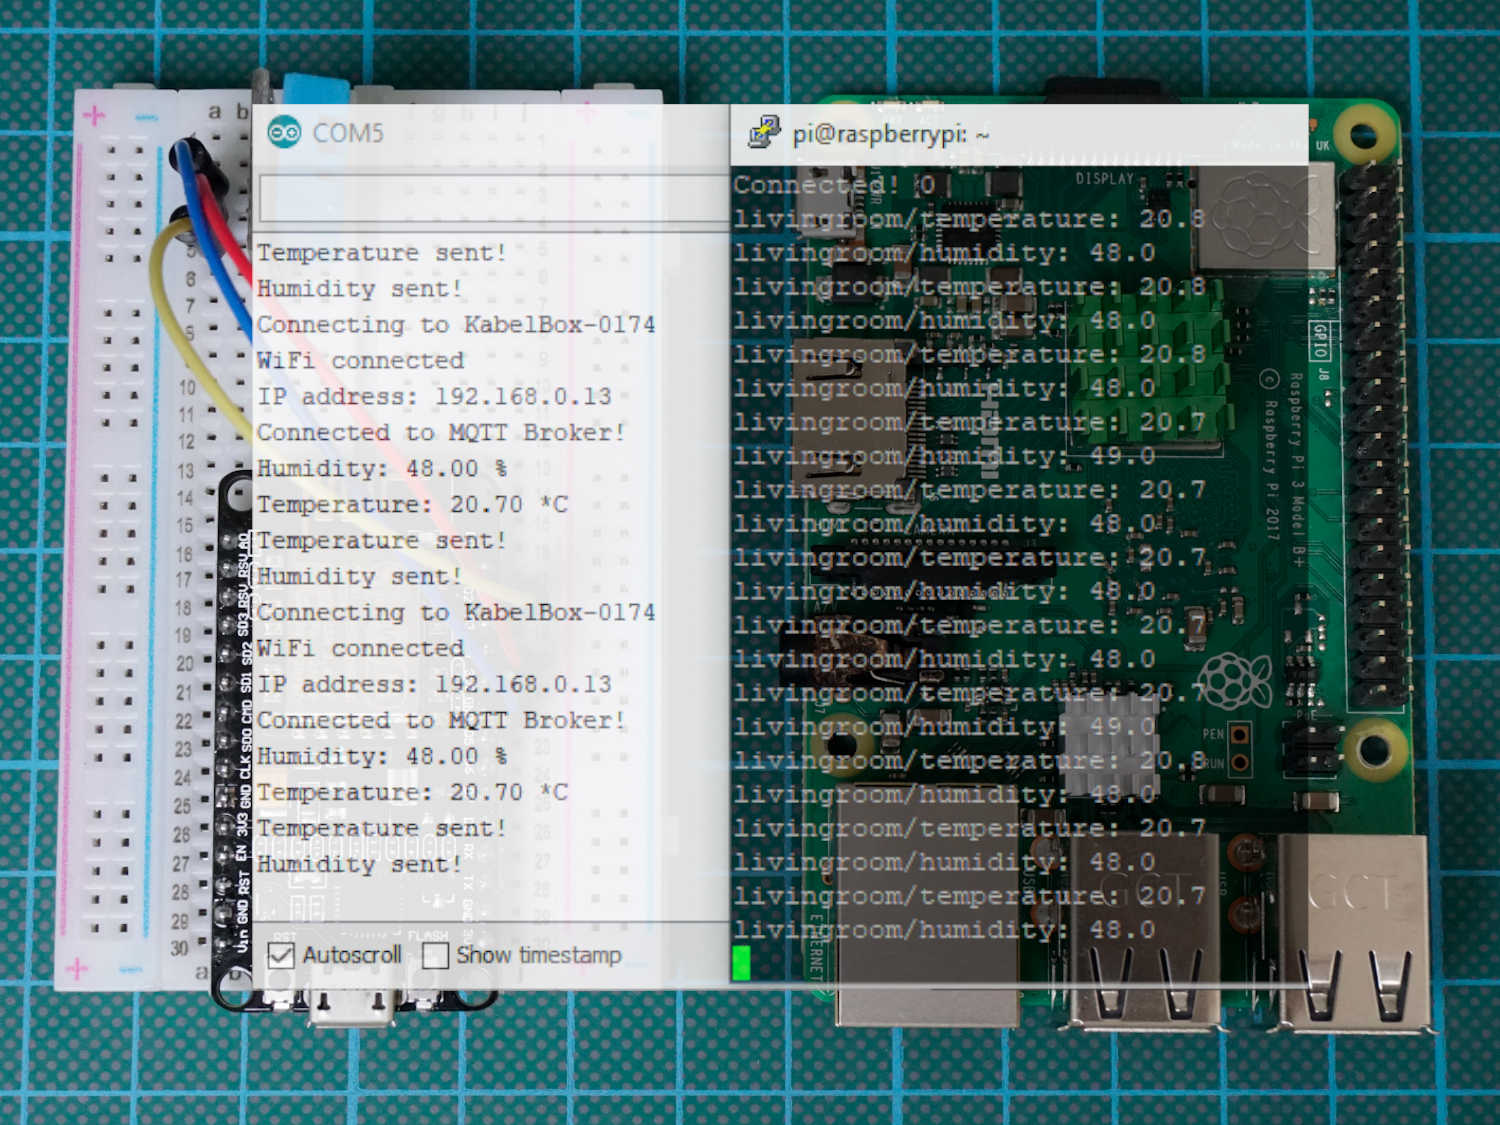
You should see the temperature and humidity in the terminal like the following picture.
It can take up to 1 minute before the ESP microcontroller is sending new data. And of course make sure that the ESP8266 or ESP32 is running.
Conclusion
During this tutorial we build a full MQTT pipeline to send sensor data from a ESP8266 or ESP32 to a MQTT broker on a Raspberry Pi. Moreover we created a subscriber who reads the temperature and humidity data published to the broker. It is also possible to change the payload to the status of a light if it is on or off. Also the status of a switch can be send via MQTT. In my apartment I have in total 3 indoor weather stations and 1 outdoor weather station measuring the temperature, humidity and light. All 4 devices send the data to 1 MQTT broker and I can easily add more sensors and devices to the system.
If you struggle at some point in this tutorial or if you have questions regarding the project or MQTT in general, fell free to use the comment section below to ask questions. I will answer them as quickly as possible.
Are you are interested in a whole section of articles related to MQTT, Home Assistant, InfluxDB and Grafana? The following picture shows the structure of in total 5 articles in this series.
The easiest way to an explanation of MQTT. Great Work…
Hi Bhargav,
thank you for the feedback. I hope your learned a lot about MQTT. For me one of the best DIY IoT protocols.
Great Job David! I will finally succeed to gather all data from my esp8266(s) spread in the house/outside into a common view!
I need help! The ESP code is ok! It is sending date to MQQT! Fine!!! But the raspberry, when a write “sudo mosquitto” it return me this:
pi@raspberrypi:~ $ sudo mosquitto
1592691877: mosquitto version 1.4.10 (build date Wed, 13 Feb 2019 00:45:38 +0000) starting
1592691877: Using default config.
1592691877: Opening ipv4 listen socket on port 1883.
1592691877: Error: Address already in use
I already configured the IP static with “https://diyi0t.com/raspberry-pi-headless-setup-tutorial/” but my Ip I put 30 and you put 8!
Help!! -> email.giovane@gmail.com
Giovane
Hi Giovane,
maybe this answer on stackoverflow helps you: https://stackoverflow.com/questions/30207649/address-already-in-use-error-in-mosquitto
Also version 1.4.10 is an old version of mosquitto. You can try to solve the problem my updating mosquitto to the newest version.
Superb tutorial David!
I used it as base for doing some home-automation with ESP32-WROOM-32.
All lights in my home are switched with 433Mhz buttons + relays, all switches are set up as “flip flop” comtrol.
As lomg as I use these switches manually, I see the result and if needed, I just repeat the action.
But I can also further turn the lights on and off with PC’s and smartphones via my Raspberry linked 433 Mhz sender and receiver.
Because of the flip-flop setup there is no information available about the status.
To conclude the status of the outdoor lights these are connected to optocouplers and the optocouplers are connected to ESP32’s.
Further a light sensor is connected to conclude night/day.
I had to do the following essential amendments in the arduino sketch:
#include “WiFi.h”
void setup() { //skipped the other sensor
Serial.begin(115200);
pinMode(sensorPin, INPUT);
pinMode(optocPin, INPUT);
pinMode(ledPin, OUTPUT);
}
void loop()
…….
else {
Serial.println(“Optoc failed to send. Reconnecting to MQTT Broker and trying again”);
connect_MQTT();
//client.connect(clientID, mqtt_username, mqtt_password);
It could be helpful to add a hint about firewall issues.
It took me some time to find out that port 1883 was not open.
after
sudo ufw allow 1883
the script started working. Before that the script stopped after telling me the WiFi.localIP
cheers and
thank you
Mike
MQTT error
pi@raspberrypi:~ $ sudo systemctl status mosquitto
● mosquitto.service – Mosquitto MQTT Broker daemon
Loaded: loaded (/etc/systemd/system/mosquitto.service; enabled; vendor preset: enabled)
Active: failed (Result: exit-code) since Mon 2020-08-03 02:40:31 IST; 16min ago
Main PID: 501 (code=exited, status=203/EXEC)
Aug 03 02:40:31 raspberrypi systemd[1]: mosquitto.service: Service RestartSec=100ms expired, scheduling restart.
Aug 03 02:40:31 raspberrypi systemd[1]: mosquitto.service: Scheduled restart job, restart counter is at 5.
Aug 03 02:40:31 raspberrypi systemd[1]: Stopped Mosquitto MQTT Broker daemon.
Aug 03 02:40:31 raspberrypi systemd[1]: mosquitto.service: Start request repeated too quickly.
Aug 03 02:40:31 raspberrypi systemd[1]: mosquitto.service: Failed with result ‘exit-code’.
Aug 03 02:40:31 raspberrypi systemd[1]: Failed to start Mosquitto MQTT Broker daemon.
Great work and its the easiest way to understand MQTT
This was a REALLY good article. I learned a lot from these two parts. Thank you!!
One suggestion or even just a request. Could you review how to setup a mqtt publisher in python for a Rasp Pi? I’m pretty sure I’ve figured it out but would like to see how you do it. Thanks again!
Can you put the esp32 code equivalence? It seems to not work like 8266 example here :/
Hi NK,
take me some time but now the ESP32 code is fully available.
From the code – you’re reconnecting to the WIFI network every cycle – although this might be a safe way to do this, is there no better way to only reconnect when something might be broken?
Hi Jef,
you could also establish the MQTT connection only in the setup function and also reconnect is there is an error in the transfer of the sensor data. But in a real world example I would only send the data once a hour. Therefore I can disconnect the sensor for this time as my personal preference.
There is a great tool to monitor the broker while doing experiments with the IoT devices:
MQTT Explorer. See mqtt-explorer.com
Kind regards,
Urs.