ESP8266 NodeMCU Tutorial
In this tutorial you learn the highlights of the ESP8266 NodeMCU regarding its datasheet and you learn the differences of the pinout between the NodeMCU V2 and V3 Lolin.
There are three possibilities to power the ESP8266 NodeMCU and you can reduce the power consumption up to 91% with the deep sleep mode.
Table of Contents
ESP8266 NodeMCU Datasheet
The NodeMCU is based on the ESP8266 microcontroller, designed and produced by Espressif Systems in Shanghai. The ESP8266 has a build-in bootloader, that makes it quite easy to flash the board with program code that you create.
The technical highlights and noticeable points of the ESP8266 NodeMCU are:
- Easy to use for I0T projects with micro-USB connection and build in WiFi (IEEE 802.11 b/g/n)
- Fast processing power with up to 160 MHz compared to 16 MHz for the ATmega328p (Arduino)
- The version 2 fits on a standard breadboard so that you can access any pin but because version 3 is wider, it also fits on a breadboard, but you cannot access the pins.
The following table shows the full technical specifications for the ESP8266 NodeMCU V2 and the ESP8266 NodeMCU V3 Lolin.
| Board | ESP8266 NodeMCU V2 | ESP8266 NodeMCU V3 |
|---|---|---|
| Microcontroller | ESP8266 | ESP8266 |
| Processor | Tensilica Xtensa Diamond 32-bit | Tensilica Xtensa Diamond 32-bit |
| Operating Voltage | 3.3V | 3.3V |
| Minimum Operating Voltage | 2.58V | 2.58V |
| Maximum Operating Voltage | 3.6V | 3.6V |
| Arduino IDE Board | NodeMCU 1.0 (ESP-12E Module) | NodeMCU 1.0 (ESP-12E Module) |
| Power Supply via VIN,VCC | 5V...12V | 5V...12V |
| Digital I/O Pins (with PWM) | 11 (11) | 11 (11) |
| Analog Input Pins | 1 | 1 |
| Resolution ADC | 10 bit (0...1023) | 10 bit (0...1023) |
| Analog Output Pins | 0 | 0 |
| SPI/I2C/I2S/UART | 2/1/2/2 | 2/1/2/2 |
| Max DC Current per I/O Pin | 12 mA | 12 mA |
| Flash Memory | 4 MB | 4 MB |
| SRAM | 64 KB | 64 KB |
| EEPROM | 512 bytes | 512 bytes |
| Clock Speed | 80/160 MHz | 80/160 MHz |
| Length x Width | 48mm x 26mm | 58mm x 31mm |
| Fits on standard breadboard | yes | no |
| WIFI | IEEE 802.11 b/g/n | IEEE 802.11 b/g/n |
| Bluetooth | no | no |
| Touch sensor | no | no |
| CAN | no | no |
| Ethernet MAC Interface | no | no |
| Temperature Sensor | no | no |
| Hall effect sensor | no | no |
| Power jack | no | no |
| USB connection | yes | yes |
| Battery Connection | no | no |
| Programmable | Arduino IDE, LuaNode SDK, Micropython | Arduino IDE, LuaNode SDK, Micropython |
| 3.3V Voltage Regulator | AMS1117 | AMS1117 |
| Output Voltage | 3.3V | 3.3V |
| Maximum Input Voltage | 15V | 15V |
| Minimum Input Voltage | 4.8V | 4.8V |
| Maximum Output Current | 1A | 1A |
| Maximum Voltage Dropout | 1.1V @ 800mA | 1.1V @ 800mA |
| Typical Quiescent Current | 5mA | 5mA |
| Power Consumption @ 5V | ||
| Reference WiFi Scan Mean [mA] | 109 | 126 |
| Reference Empty Script [mA] | 82 | 81 |
| Light Sleep [mA] | 10 | 9 |
| Deep Sleep [mA] | 9 | 9 |
Do you want to compare the datasheet of different microcontroller boards like Arduino Uno, Arduino Nano, WeMos D1 Mini against the ESP8266 NodeMCU? I wrote a complete article for the big microcontroller board comparison.
If you do not already have an ESP8266 NodeMCU, you can buy one from the following links. I get commissions for purchases made through links in this table.
| Component | Amazon Link | AliExpress Link |
|---|---|---|
| ESP8266 NodeMCU V2 | Amazon | AliExpress |
| ESP8266 NodeMCU V3 | Amazon | AliExpress |
ESP8266 NodeMCU Pinout
Because there are different versions of the ESP8266 NodeMCU on the market, we must differentiate the pinout. The following sections shows the pinout of the V2 and V3 Lolin. There exists also a V1 of the ESP8266 NodeMCU, but you have trouble to find the first version and I also do not recommend buying the first version.
ESP8266 NodeMCU V2 Pinout
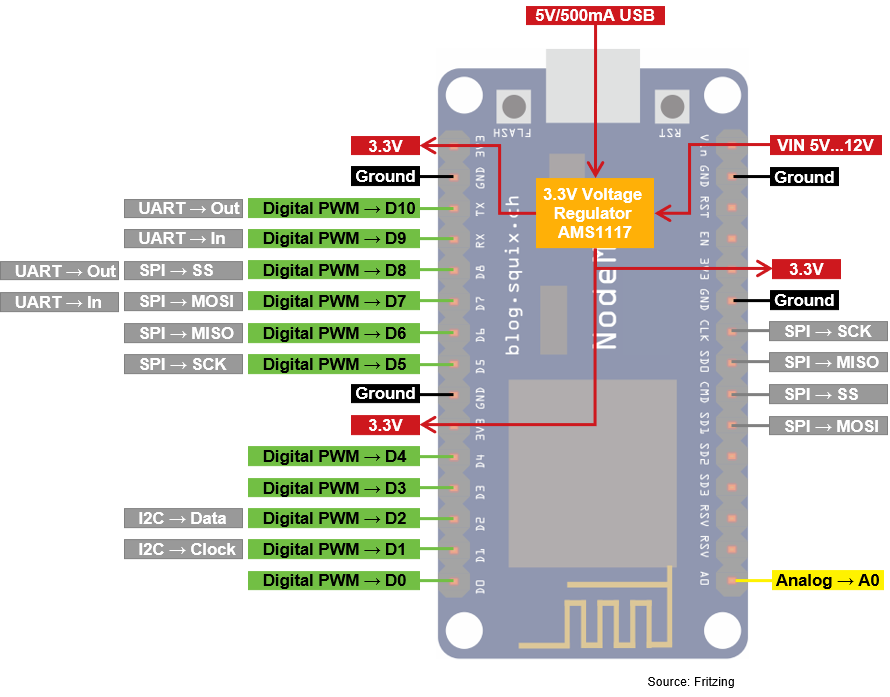
The ESP8266 NodeMCU V2 has in total three 3.3V output pins. The VIN pin has either the function as a power supply for the ESP8266 with voltages between 5V and 12V or can be used as 4.7V output when the ESP8266 NodeMCU V2 is powered via USB. Therefore you can also supply electronic components that need a supply voltage of 5V, because these components should also work with a supply voltage of 4.7V.
The ESP8266 NodeMCU V2 has in total 11 digital input / output pins. All these 11 pins can create PWM signals and have a maximum output current of 12mA.
If you want to close the electrical circuit, there are in total 4 ground pins available, which are all connected to each other on the PCB.
Unfortunately, the ESP8266 has only 1 analog input A0 that is connected internally with a 10-bit analog-to-digital converter (ADC) to convert the analog voltage into 1024 digital values between 0 and 1023.
The ESP8266 NodeMCU V2 has all communication standards on board:
ESP8266 NodeMCU V3 Pinout
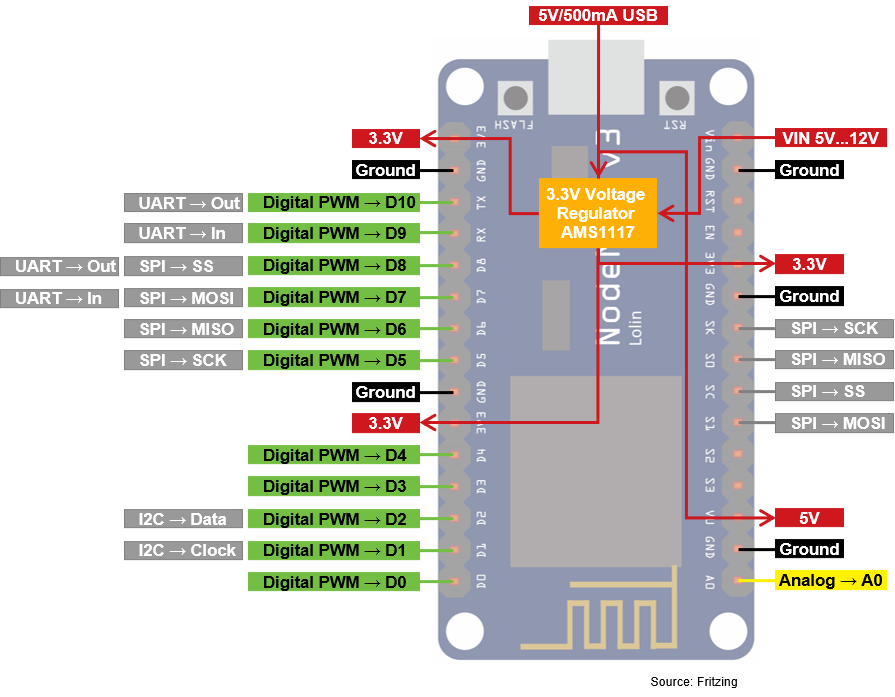
The ESP8266 NodeMCU V3, produced by Lolin, is not a further development of the version 2 of the NodeMCU board. The pinout has only a slightly difference that has a great influence on your wiring:
- The VIN pin has the same functionality as the version 2 of the NodeMCU to supply the NodeMCU with a voltage between 5V and 12V. But if you power the ESP8266 NodeMCU V3 via USB; you get only a 1.6V output voltage from the VIN pin and not 4.7V like the NodeMCU V2. Therefore you have to use the VU pin that is new in the version 3. This VU pin has an output voltage of 5V when the microcontroller board is powered via USB.
- Besides the new VU pin the ESP8266 NodeMCU has also a fifth ground pin.
All other pins and communication pins are the same between version 2 and 3.
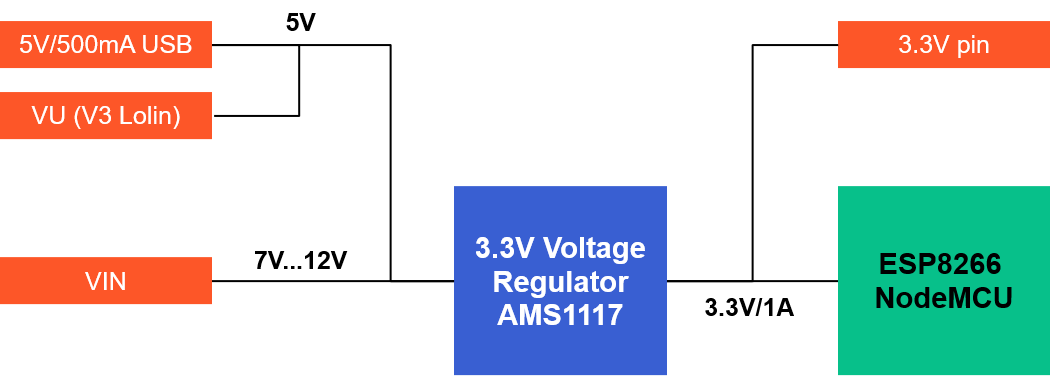
ESP8266 NodeMCU Power Supply
The ESP8266 NodeMCU power supply depends on the different voltage levels of the microcontroller. Therefore we have to know which electronic components are relevant for the voltage levels. The following picture provides an overview of the voltage levels and the maximum currents of the NodeMCU.
The main component of the NodeMCU is the microprocessor ESP8266. The following table shows the minimum, operation and maximum voltage of the ESP8266.
| Microcontroller | Minimum Voltage | Typical Voltage | Maximum Voltage |
|---|---|---|---|
| ESP8266 NodeMCU | 2.58V | 3.3V | 3.6V |
Because the operation voltage is 3.3V, there this a build-in voltage regulator that provide a stable 3.3V for the ESP8266 and the corresponding pins.
ESP8266 NodeMCU Voltage Regulator
The following table shows the most important technical details of the 3.3V voltage regulator regarding the power supply.
| Voltage Regulator | Output Voltage | Minimum Input Voltage | Maximum Input Voltage | Maximum Output Current |
|---|---|---|---|---|
| AMS1117 | 3.3V | 4.8V | 15V | 1A |
The AMS1117 3.3V voltage regulator is connected to the VIN pin and the USB port. Technically the maximum input voltage is 15V but because at 15V the voltage regulator is producing a lot of heat and would break after a short time, it is recommended to supply an input voltage between 4.8V (USB input voltage is 5V) and 12V. The AMS1117 provides a stable output voltage of 3.3V and a maximum current of 1A for the ESP8266.
How to Power the ESP8266 NodeMCU?
You have two possibilities to power the ESP8266 NodeMCU in a save way and one additionally possibility that I do not recommend.
- Micro USB: The most popular and the easiest way to power the microcontroller is via USB cable. The standard USB connection delivers 5V and allows you to draw 500mA in total.
- VIN Pin: If you use an external power supply like a battery or laboratory power supply, you can use the VIN pin. The voltage must be between 5V and 12V. Therefore you are able to power the NodeMCU with an external 9 Volt battery.
- 3V Pin: Because the 3.3 pin is directly connected to the ESP8266 after the voltage regulator, you can also power the ESP8266 via a stable 3.3V voltage on the 3.3V pin. But be aware that if the voltage gets higher than 3.6V you can damage the ESP8266.
Microcontroller Datasheet eBook
The 35 pages Microcontroller Datasheet Playbook contains the most useful information of 14 Arduino, ESP8266 and ESP32 microcontroller boards.
ESP8266 NodeMCU Power Consumption
The power consumption of the ESP8266 NodeMCU is obviously dependent on the connected electrical devices and the task that is performed. But when we are interested in the power consumption, most of the times we want to know how to reduce the electrical power consumption.
The following two pictures show the power consumption of the ESP8266 NodeMCU V2 and the ESP8266 NodeMCU V3 in different setups.
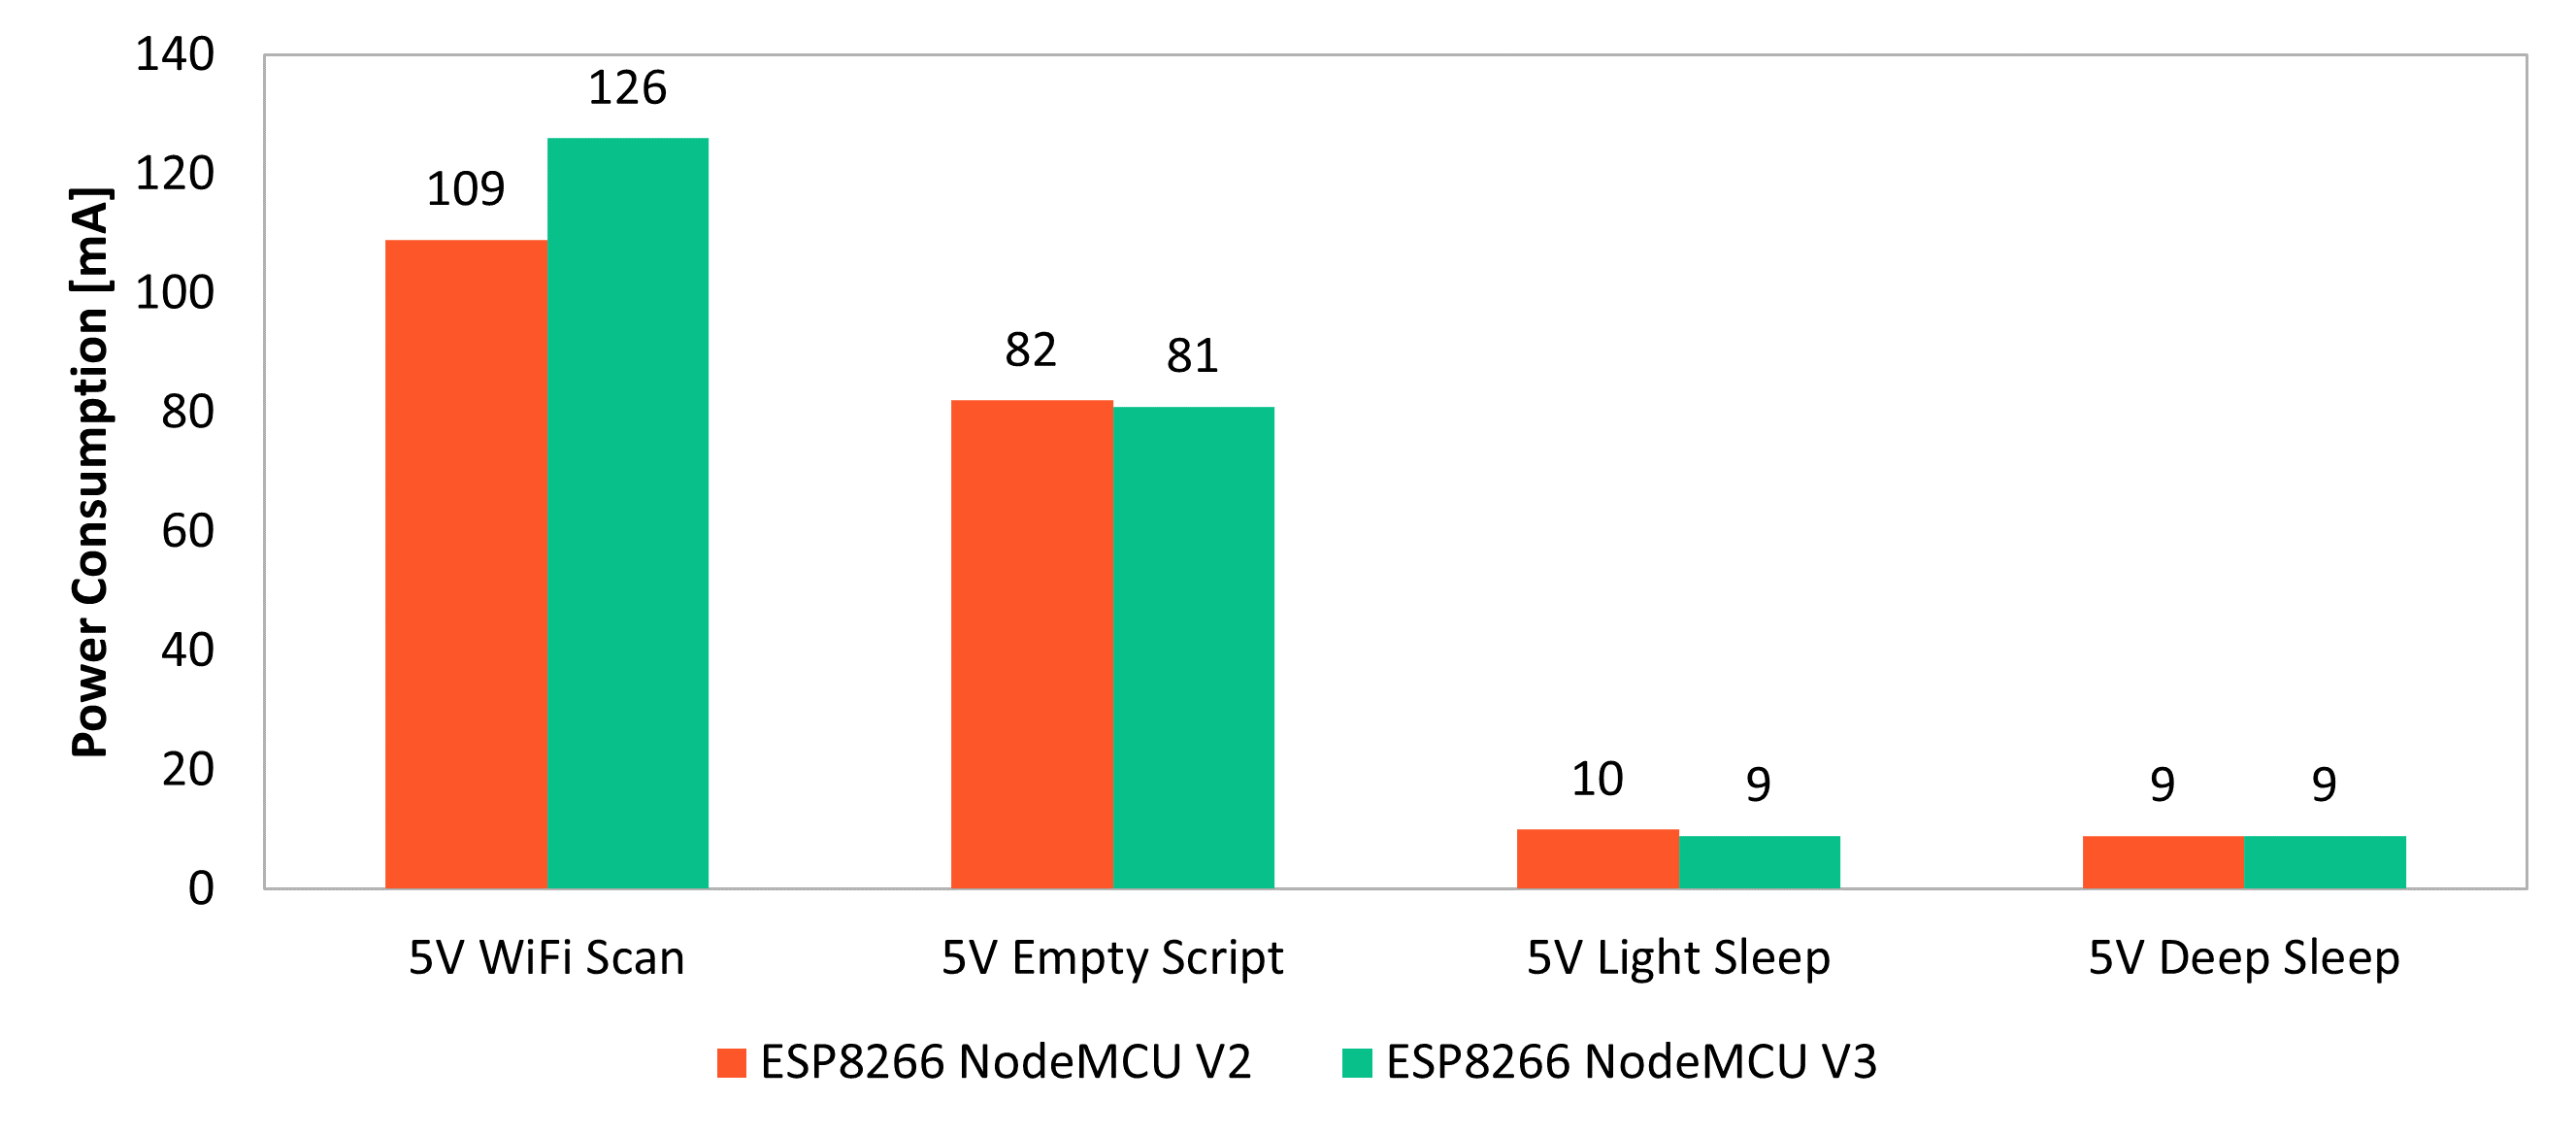
If you use the WiFi of the ESP8266 NodeMCU, the power consumption is the highest with 109mA for the version2 and 126mA for version 3 at the power supply of 5V. You can reduce the power consumption to 82mA and 81mA if you let the ESP8266 run in IDLE.
The ESP8266 has several power saving modes that you can use to further reduce the power consumption. In the light sleep power mode, the current consumption is only 10mA and 9mA because the WiFi module and the system clock are disabled and in the deep sleep mode, you can reduce the current drain to 9mA so that also the CPU is disabled.
If you want to know what changes you have to make in your program script to enter the different power modes of the ESP8266, then I recommend reading my article: How to reduce the ESP8266 power consumption?
You find a full comparison about the power consumption in different power modes of several Arduino, ESP8266 and ESP32 microcontroller boards in my Microcontroller Datasheet eBook.
How to flash your Code on the ESP8266 NodeMCU?
You can create your program script with the Arduino IDE and use the Arduino IDE to flash your code to the ESP8266 NodeMCU. There is only a small change in the Arduino IDE that is described in the following steps:
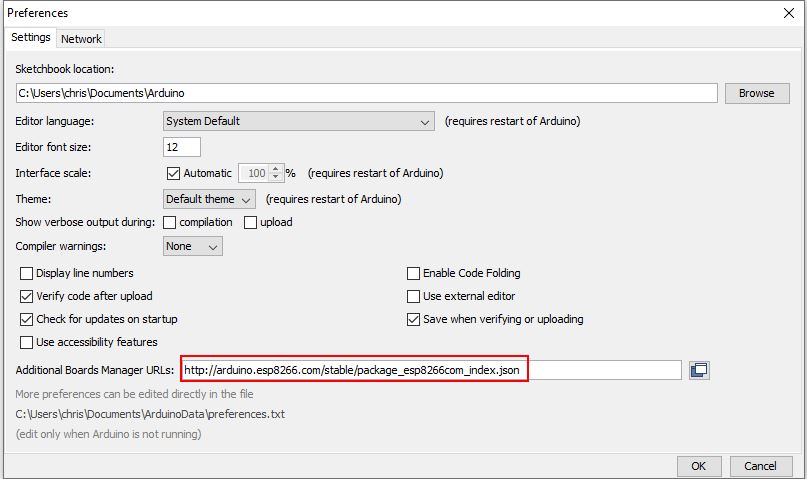
- In the Arduino IDE menu click on File → Preferences
- Insert the following URL in the field “Additional Boards Manager URLs:”: http://arduino.esp8266.com/stable/package_esp8266com_index.json
The following picture shows the result in the preferences menu.
The second step is to install the necessary packages for the ESP8266 module:
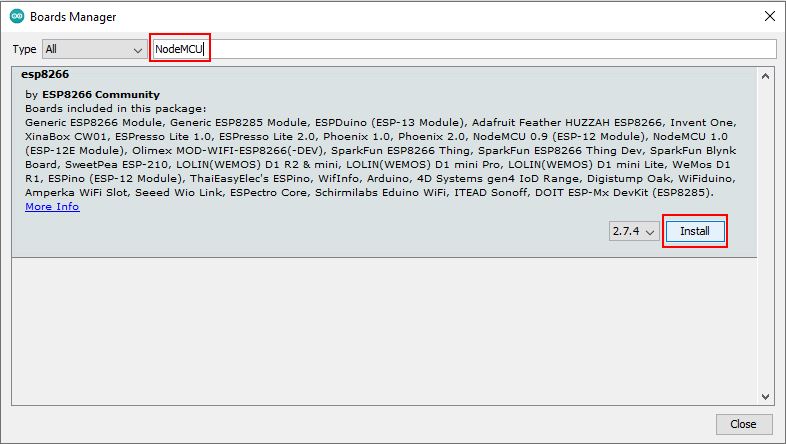
- Click in the Arduino IDE on Tools → Board → Board Manager.
- Now search for NodeMCU and you will find the esp8266 by ESP8266 Community. Install the latest version of the board.
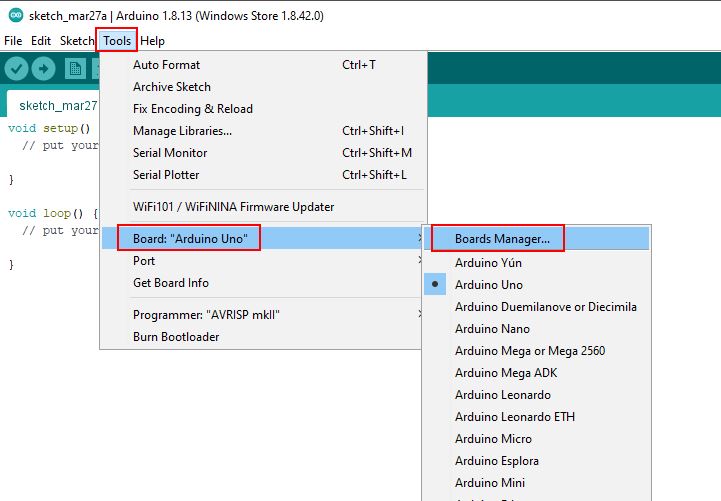
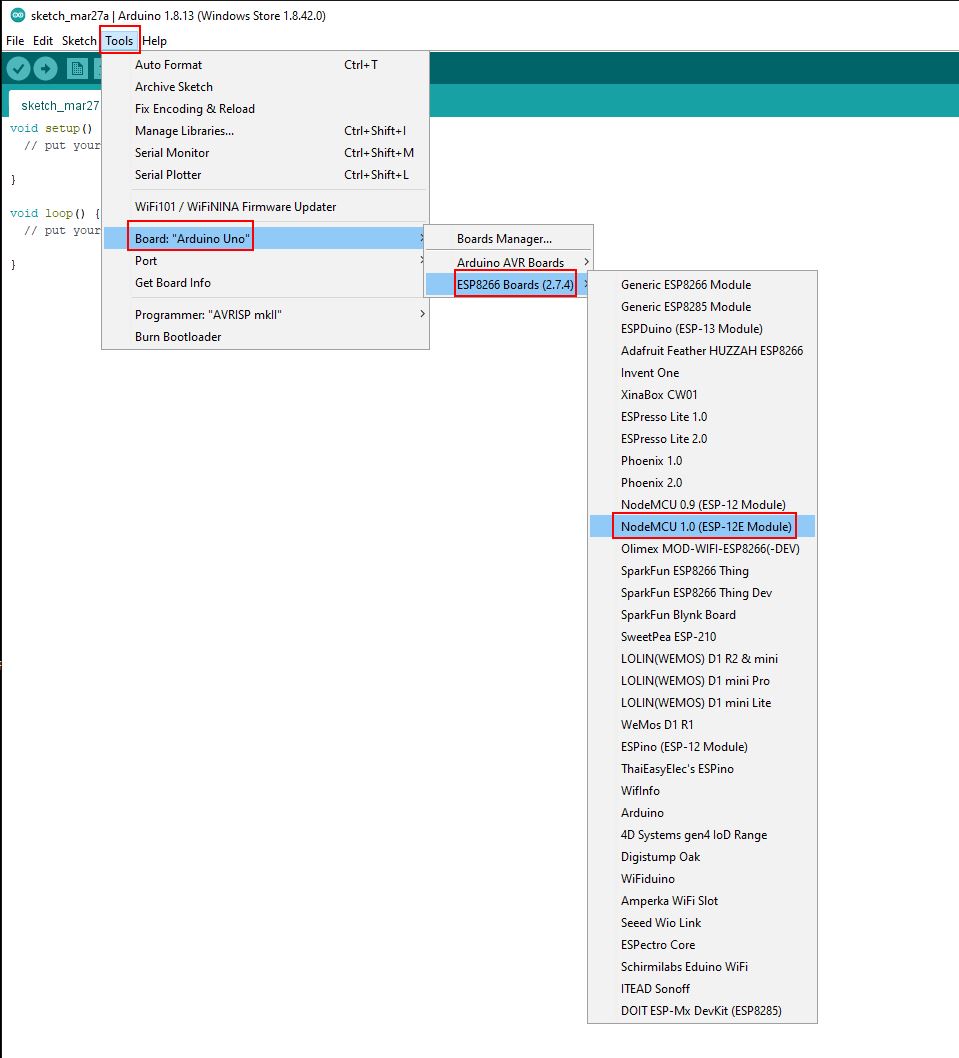
After the installation you can select the ESP8266 NodeMCU that has the name “NodeMCU 1.0 (ESP-12E Module)” under Tools → Board.
ESP8266 NodeMCU Advantages and Disadvantages
Advantages
- In my opinion, the biggest advantage of the ESP8266 NodeMCU is that you get a WiFi capable microcontroller for little money.
- The NodeMCU V2 fits perfectly on a breadboard so that you can test your projects with other electrical devices super easy.
Disadvantages
- If you have a project that needs a lot of analog inputs, you need an analog multiplexer, because the ESP8266 has only one analog input pin.
- For a battery powered project, the power consumption of the ESP8266 NodeMCU is too high. There are other microcontroller boards that have a power consumption of 0.17mA. instead of 9mA. If you want to know which microcontroller have a lower power consumption than the ESP8266 NodeMCU, download my Microcontroller Datasheet eBook.

You are forgetting the Lua environment, that have many advantages for the hobbyist, specially with the Esplorer IDE. Actually, I use successfully the NodeMCU firmware with all ESP8266 boards, from ESP01 to the Wemos D1.
I2S is mentioned only at one point in the text (in the comparison between ESP8266 NodeMCU V2 and V3). The pinout diagram does not show any specific I2S-pins.
May I assume, that each pin can be programmed to be an I2S pin?