ESP8266 WeMos D1 Mini Tutorial
In this tutorial you learn the highlights of the ESP8266 WeMos D1 Mini regarding its datasheet, the pinout and three different possibilities for the power supply.
Moreover, you learn how to use the power modes of the ESP8266 to reduce the power consumption up to 99% in the deep sleep mode.
The ESP8266 WeMos D1 Mini is one of my favorite I0T microcontroller when I need a microcontroller for a battery powered project, because the ESP8266 has an integrated WiFi module and an exceptionally low power consumption. Therefore, I want to share my knowledge and experience with the ESP8266 WeMos D1 Mini in this tutorial.
Table of Contents
ESP8266 WeMos D1 Mini Datasheet
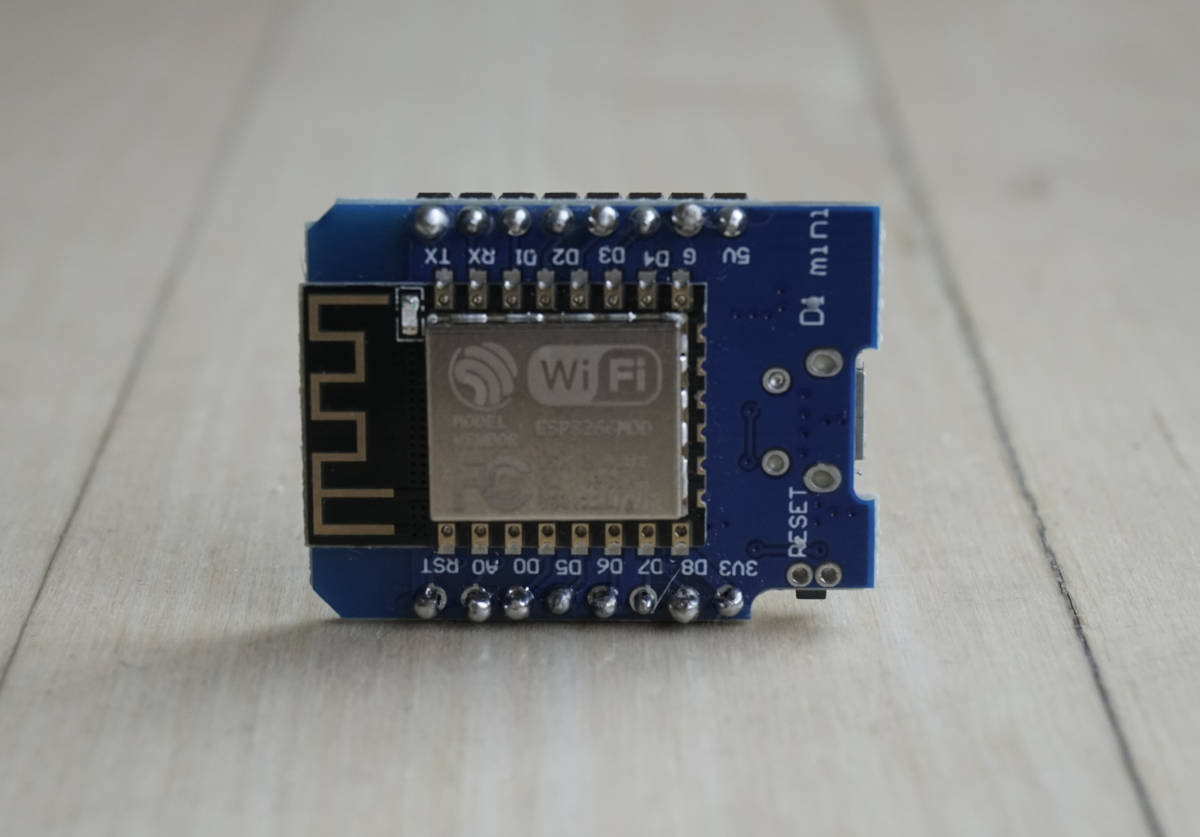
The WeMos D1 Mini is based on the ESP8266 microcontroller, designed and produced by Espressif Systems in Shanghai. The ESP8266 has a build-in bootloader, that makes it quite easy to flash the board with program code that you create.
The technical highlights and noticeable points of the ESP8266 WeMos D1 Mini datasheet are:
- Easy to use for I0T projects with micro-USB connection and build in WiFi (IEEE 802.11 b/g/n)
- Low energy consumption in the deep sleep power mode (0.17mA) and therefore very well suited for battery powered projects.
- Fast processing power with up to 160 MHz compared to 16 MHz for the ATmega328p (Arduino)
The following table shows the full technical specifications for the ESP8266 WeMos D1 Mini.
| Board | ESP8266 WeMos D1 Mini |
|---|---|
| Microcontroller | ESP8266 |
| Processor | Tensilica Xtensa Diamond 32-bit |
| Operating Voltage | 3.3V |
| Minimum Operating Voltage | 2.58V |
| Maximum Operating Voltage | 3.6V |
| Arduino IDE Board | LOLIN(WEMOS) D1 R2 & mini |
| Power Supply via VIN,VCC | 4V...6V |
| VIN,VCC output USB power supply | 4.67V |
| Digital I/O Pins (with PWM) | 11 (11) |
| Analog Input Pins | 1 |
| Resolution ADC | 10 bit (0...1023) |
| Analog Output Pins | 0 |
| SPI/I2C/I2S/UART | 1/1/1/1 |
| Max DC Current per I/O Pin | 12 mA |
| Flash Memory | 4 MB |
| SRAM | 64 KB |
| EEPROM | 512 bytes |
| Clock Speed | 80/160 MHz |
| Length x Width | 34mm x 26mm |
| Fits on standard breadboard | yes |
| WIFI | IEEE 802.11 b/g/n |
| Bluetooth | no |
| Touch sensor | no |
| CAN | no |
| Ethernet MAC Interface | no |
| Temperature Sensor | no |
| Hall effect sensor | no |
| Power jack | no |
| USB connection | yes |
| Battery Connection | no |
| Programmable | Arduino IDE, LuaNode SDK, Micropython |
| 3.3V Voltage Regulator | ME6211 |
| Output Voltage | 3.3V |
| Maximum Input Voltage | 6V |
| Minimum Input Voltage | 4.3V |
| Maximum Output Current | 500mA |
| Maximum Voltage Dropout | 680mV @ 500mA |
| Typical Quiescent Current | 0.1µA |
| Power Consumption @ 5V | |
| Reference WiFi Scan Mean [mA] | 68 |
| Reference Empty Script [mA] | 72 |
| Light Sleep [mA] | 0.68 |
| Deep Sleep [mA] | 0.17 |
ESP8266 WeMos D1 Mini Pinout
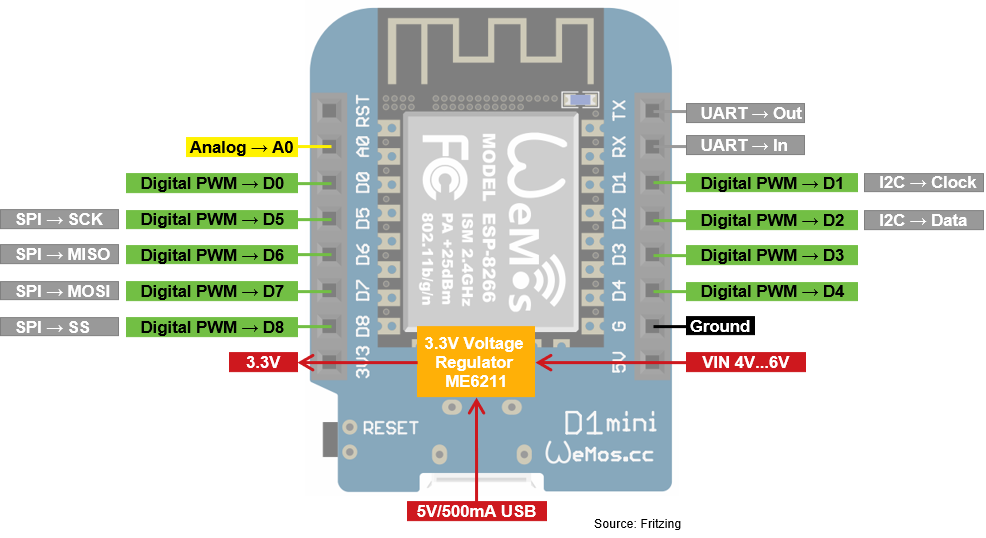
The ESP8266 WeMos D1 Mini has only one 3.3V output pin and also only one ground pin to power an external circuit. Today it is easy to create custom PCBs that are not expensive. If your project is ready for action you could put the WeMos D1 Mini on this custom PCB and more than one 3.3V pin and one ground for the PCB is not necessary. During the creation of the project, you can connect the 3.3V and ground pin with the rails of the breadboard to supply different electronic components.
The 5V pin has either the function as a power supply for the ESP8266 with voltages between 4V and 6 or can be used as 4.67V output when the ESP8266 WeMos D1 Mini is powered via USB. Therefore, you might also supply electronic components that need a supply voltage of 5V, because these components should also work with a supply voltage of 4.67V.
The ESP8266 WeMos D1 Mini has in total 9 digital input / output pins. All these 9 pins can create PWM signals and have a maximum output current of 12mA. You could also use the two UART pins that are not labeled as digital pins to get even 12 digital pins.
Unfortunately, the ESP8266 has only 1 analog input A0 that is connected internally with a 10-bit analog-to-digital converter (ADC) to convert the analog voltage into 1024 digital values between 0 and 1023.
The WeMos D1 Mini has all communication standards on board:
| Component | Amazon Link | AliExpress Link |
|---|---|---|
| ESP8266 WeMos D1 Mini | Amazon | AliExpress |
ESP8266 WeMos D1 Mini Power Supply
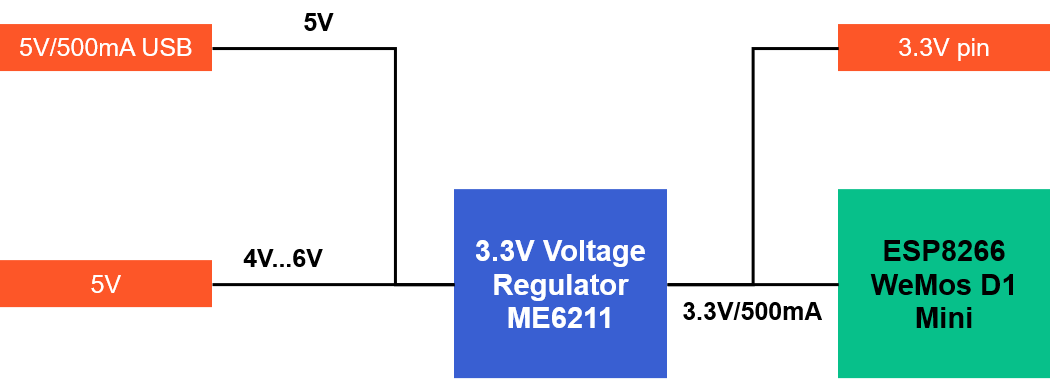
The ESP8266 WeMos D1 Mini power supply depends on the different voltage levels of the microcontroller. Therefore we have to know which electronic components are relevant for the voltage levels. The following picture provides an overview of the voltage levels and the maximum currents of the WeMos D1 Mini.
The main component of the WeMos D1 Mini is the microprocessor ESP8266. The following table shows the minimum, operation and maximum voltage of the ESP8266.
| Microcontroller | Minimum Voltage | Typical Voltage | Maximum Voltage |
|---|---|---|---|
| ESP8266 NodeMCU | 2.58V | 3.3V | 3.6V |
Because the operation voltage is 3.3V, there this a build-in voltage regulator that provides a stable 3.3V for the WeMos D1 Mini and the corresponding pins.
ESP8266 WeMos D1 Mini Voltage Regulator
The following table shows the most important technical details of the 3.3V voltage regulator regarding the power supply.
| Voltage Regulator | Output Voltage | Minimum Input Voltage | Maximum Input Voltage | Maximum Output Current |
|---|---|---|---|---|
| ME6211 | 3.3V | 4.3V | 6V | 500mA |
The ME6211 3.3V voltage regulator is connected to the 5V pin and the USB port. The maximum input voltage of the ME6211 is 6V (USB input voltage is 5V) and you should provide at least a voltage of 4.3V for a stable output voltage of 3.3V. The maximum output current of the voltage regulator is 500mA that is also the maximum current for a USB power supply.
How to Power the ESP8266 WeMos D1 Mini
You have two possibilities to power the ESP8266 WeMos D1 Mini in a save way and one additionally possibility that I do not recommend.
- Micro USB: The most popular and the easiest way to power the microcontroller is via USB cable. The standard USB connection delivers 5V and allows you to draw 500mA in total.
- 5V Pin: If you use an external power supply like a battery or laboratory power supply, you can use the VIN pin. The voltage must be between 4.3V and 6V. Therefore you are able to power the WeMos D1 Mini with a LiPo battery with JST connector in combination with the battery shield for the WeMos D1 Mini. I recommend reading my article about what is the best battery of the ESP8266 microcontroller to get more information.
- 3V Pin (not recommended): Because the 3.3 pin is directly connected to the ESP8266 after the voltage regulator, you can also power the WeMos D1 Mini via a stable 3.3V voltage on the 3.3V pin. But be aware that if the voltage gets higher than 3.6V you can damage the ESP8266.
Microcontroller Datasheet eBook
The 35 pages Microcontroller Datasheet Playbook contains the most useful information of 14 Arduino, ESP8266 and ESP32 microcontroller boards.
ESP8266 WeMos D1 Mini Power Consumption
The power consumption of the ESP8266 WeMos D1 Mini is obviously dependent on the connected electrical devices and the task that is performed. But when we are interested in the power consumption, most of the times we want to know how to reduce the electrical power consumption.
The following two pictures show the power consumption of the ESP8266 WeMos D1 Mini in different setups.

During a WiFi scan with a 5V power supply the current consumption of the ESP8266 WeMos D1 Mini is 68mA. Unfortunately, I measured a higher power consumption of 72mA with an empty Arduino script and a 5V power supply. Currently I have no explanation why the power consumption of the WeMos D1 Mini with an empty script is higher as during a WiFi scan. If you have any suggestions, let me know in the comment section under this tutorial.
The ESP8266 has several power saving modes that you can use to further reduce the power consumption. In the light sleep power mode, the current consumption is only 0.68mA because the WiFi module and the system clock are disabled and in the deep sleep mode, you can reduce the current drain to 0.17mA so that also the CPU is disabled.
In comparison to the ESP8266 NodeMCU, we see that the WeMos D1 Mini has a much lower current consumption during the light and deep sleep power modes. A major influence has the ME6211 3.3V voltage regulator of the WeMos D1 Mini. You get a much lower power consumption, but you are limited to lower maximum input voltages of 6V instead of 12V for the NodeMCU.
If you want to know what changes you have to make in your program script to enter the different power modes of the ESP8266, then I recommend reading my article: How to reduce the ESP8266 power consumption?
You find a full comparison about the power consumption in different power modes of several Arduino, ESP8266 and ESP32 microcontroller boards in my Microcontroller Datasheet eBook.
How to flash your Code on the ESP8266 WeMos D1 Mini
You can create your program script with the Arduino IDE and use the Arduino IDE to flash your code to the ESP8266 WeMos D1 Mini. There is only a small change in the Arduino IDE that is described in the following steps:
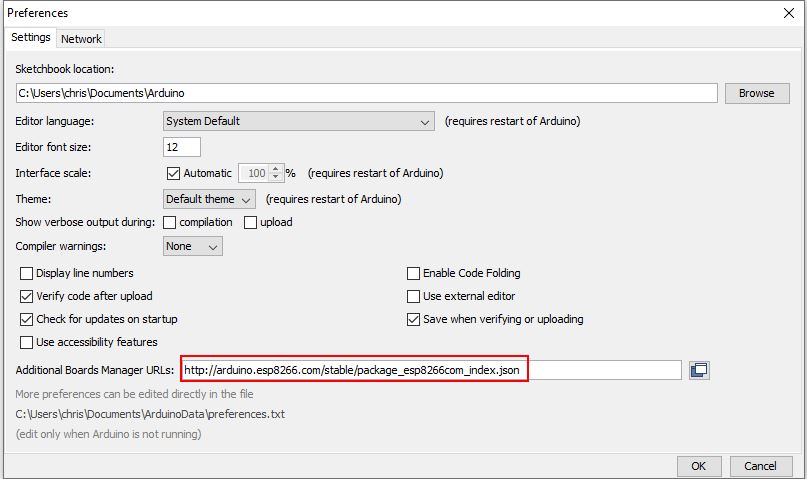
- In the Arduino IDE menu click on File → Preferences
- Insert the following URL in the field “Additional Boards Manager URLs:”: http://arduino.esp8266.com/stable/package_esp8266com_index.json
The following picture shows the result in the preferences menu.
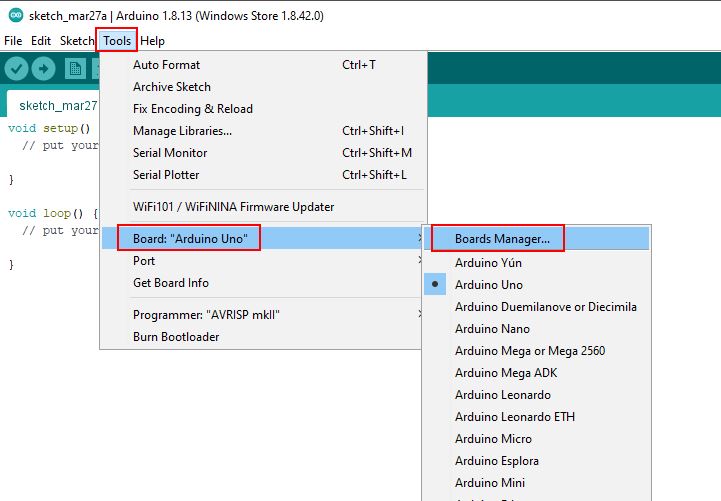
The second step is to install the necessary packages for the ESP8266 module:
- Click in the Arduino IDE on Tools → Board → Board Manager.
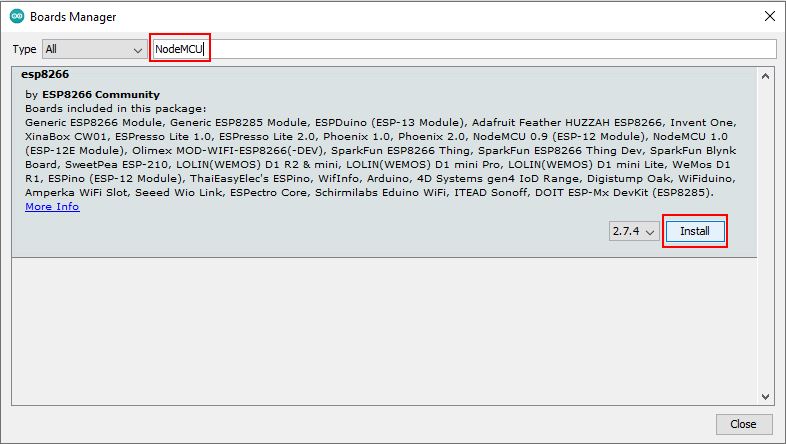
- Now search for NodeMCU or ESP8266 and you will find the esp8266 by ESP8266 Community. Install the latest version of the board.
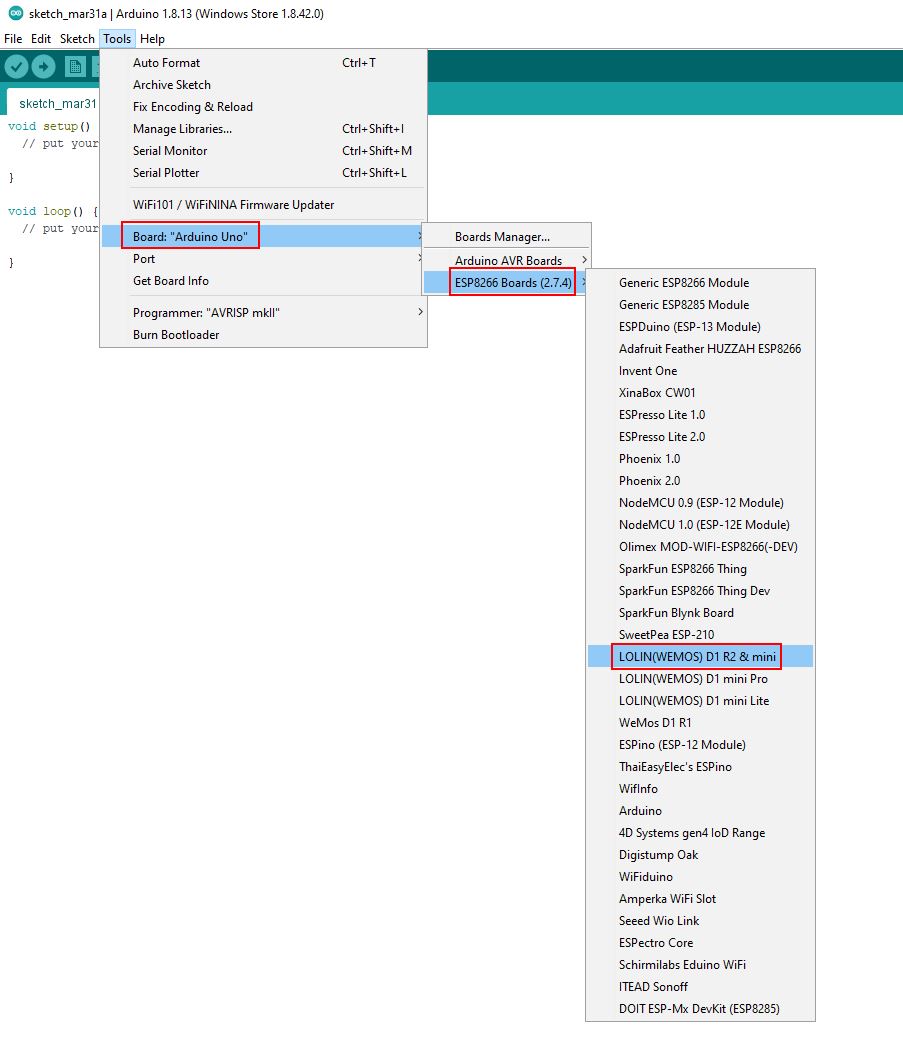
After the installation you can select the ESP8266 WeMos D1 Mini that has the name “LOLIN(WEMOS) D1 R2 & mini” under Tools → Board.
ESP8266 WeMos D1 Mini Advantages and Disadvantages
Advantages
- In my opinion, the biggest advantage of the ESP8266 WeMos D1 Mini is that you get a WiFi capable microcontroller for little money.
- The WeMos D1 Mini has an exceptionally low power consumption in the ESP8266 power saving modes and is therefore a perfect solution of battery powered projects.

Perhaps it would be worth mentioning that the D1 Mini Pro is similar in all aspects but has a connection for an external antenna, and can have until 16Mb memory.
Would be good to mention which pin toggles the onboard blue led of these devices, as ‘blink’ is one of the first programs people are going to run when starting to explore. It’s an easy way in when you have nothing more than an ESP device and a USB lead.
On a d1 mini pro, it’s pin 2.