Sound Sensor Tutorial for Arduino, ESP8266 and ESP32
In this tutorial you learn everything about the KY-038 and KY-037 microphone sound sensor modules. After the technical specifications I explain the schematic and the functionality of the sound sensor modules in detail.
You create the wiring and the program code for Arduino, ESP8266 and ESP32 microcontroller and I present the major results of the sound sensor tutorial.
In the last chapter we compare the KY-038 and KY-037 module regarding their sensitivity.
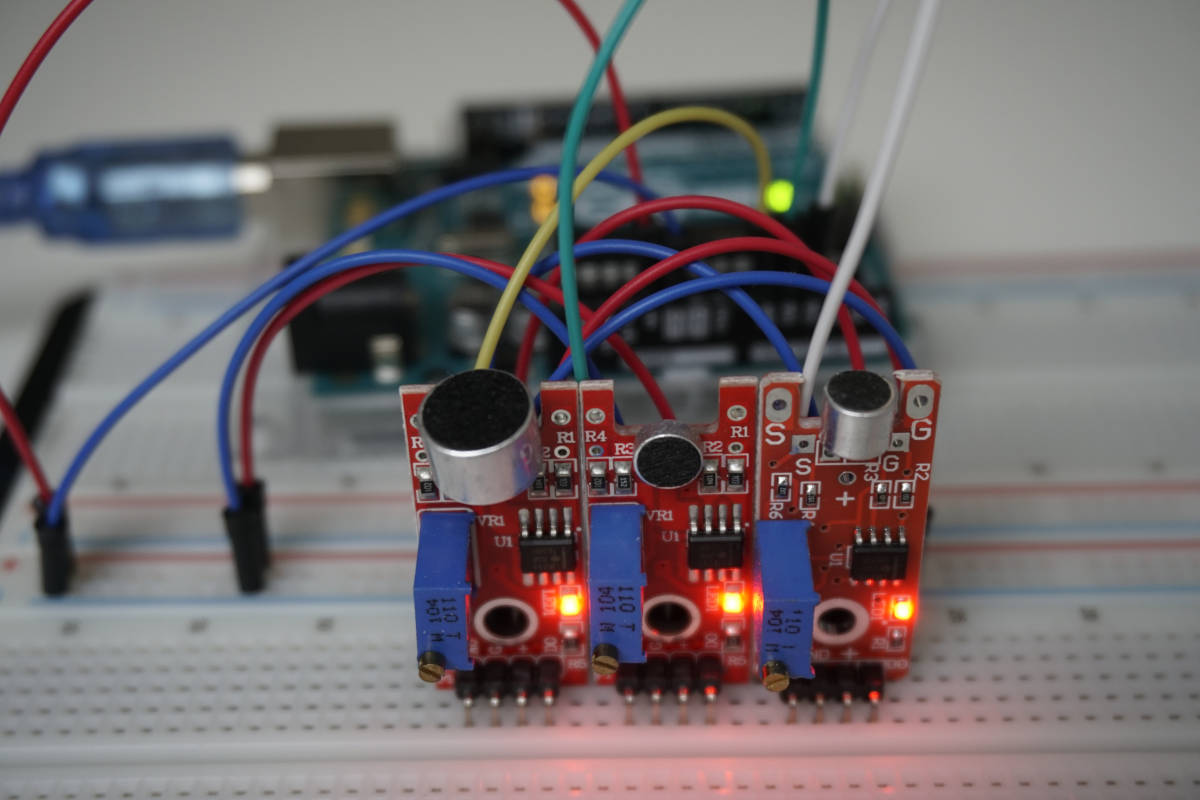
Table of Contents
Technical Datasheet of the KY-038 / KY-037 Sound Sensor
There are two different microphone sound sensors, called KY-038 and KY-037, that have nearly no difference. The only difference is that the KY-037 has a build in microphone with a higher sensitivity that is not further specified. Therefore we can use both sound sensor modules completely the same, because they have the same specifications and the same electrical components.
Before we can connect the KY-038 or KY-037 sound sensor to any microcontroller, we have to know the technical specifications of the sensor. The following table shows the datasheet of the KY-038 and the KY-38 sound sensor.
| KY-038 | KY-037 | |
|---|---|---|
| Operation Voltage | 3.3V…5V | 3.3V…5V |
| Frequency Response | 50 Hz…20 kHz | 50 Hz…20 kHz |
| Impedance | 2.2 kΩ | 2.2 kΩ |
| Sensitivity | 48…66 dB | >48…66 dB |
KY-038 / KY-037 Operation Voltage
The operation voltage is between 3.3V and 5V, what makes the sound sensor compatible to Arduino microcontroller with an operation voltage of 5V and we can also connect the KY-038 and the KY-037 module to ESP8266 and ESP32 microcontroller boards that have an operation voltage of 3.3V. Therefore we use Arduino, ESP8266 and also ESP32 microcontroller boards in this tutorial.
You you want to get expert knowledge of the Arduino, ESP8266 and ESP32 microcontroller boards, I recommend to download the Microcontroller Datasheet eBook.
KY-038 / KY-037 Frequency Response
The frequency response is exceptionally large and between 50Hz and 20kHz and for non-experts hard to imagine. But you can play test tones that are oscillating in a square wave descending 20kHz through 20Hz. To set the frequency response in relation to your human speed, the frequency range for a man speaking is between 100Hz and 120Hz and for women around 300Hz.
KY-038 / KY-037 Impedance
Impedance is the measure of the total opposition of a circuit to current that considers the resistance and the effects of the capacitance and the inductance. We must include the capacitance and inductance, because although we have a DC circuit, when dealing with audio electronics, the amplitude of the signal voltage changes continuously to represent the audio signal. Therefore the audio signal alternates like an AC circuit.
The impedance is measured in ohms and the KY-038 / KY-037 has an impedance of 2.2 kΩ, which categorizes the sound sensor as medium ohm microphone. For our tutorial it is nice to know what the impedance is, but the impedance does not have any influence on our circuits in this tutorial.
KY-038 / KY-037 Sensitivity
The sensitivity of the sound sensor is the smallest absolute amount of change that can be detected. The KY-038 sound sensor has a sensitivity between 48 dB and 66 dB and the KY-037 should have a slightly higher sensitivity.
To get a feeling for the sensitivity, we set the sensitivity of the sound sensors in relation to speaking db levels. A whisper is about 30 dB and a normal conversation is about 60 dB. Therefore the sensors should be able to recognize a normal conversation. In the section of the sensitivity comparison, we measure the difference in sensitivity of the KY-038 and the KY-037 microphone sound sensor modules.
KY-038 / KY-037 Module Pinout and Electronic Components
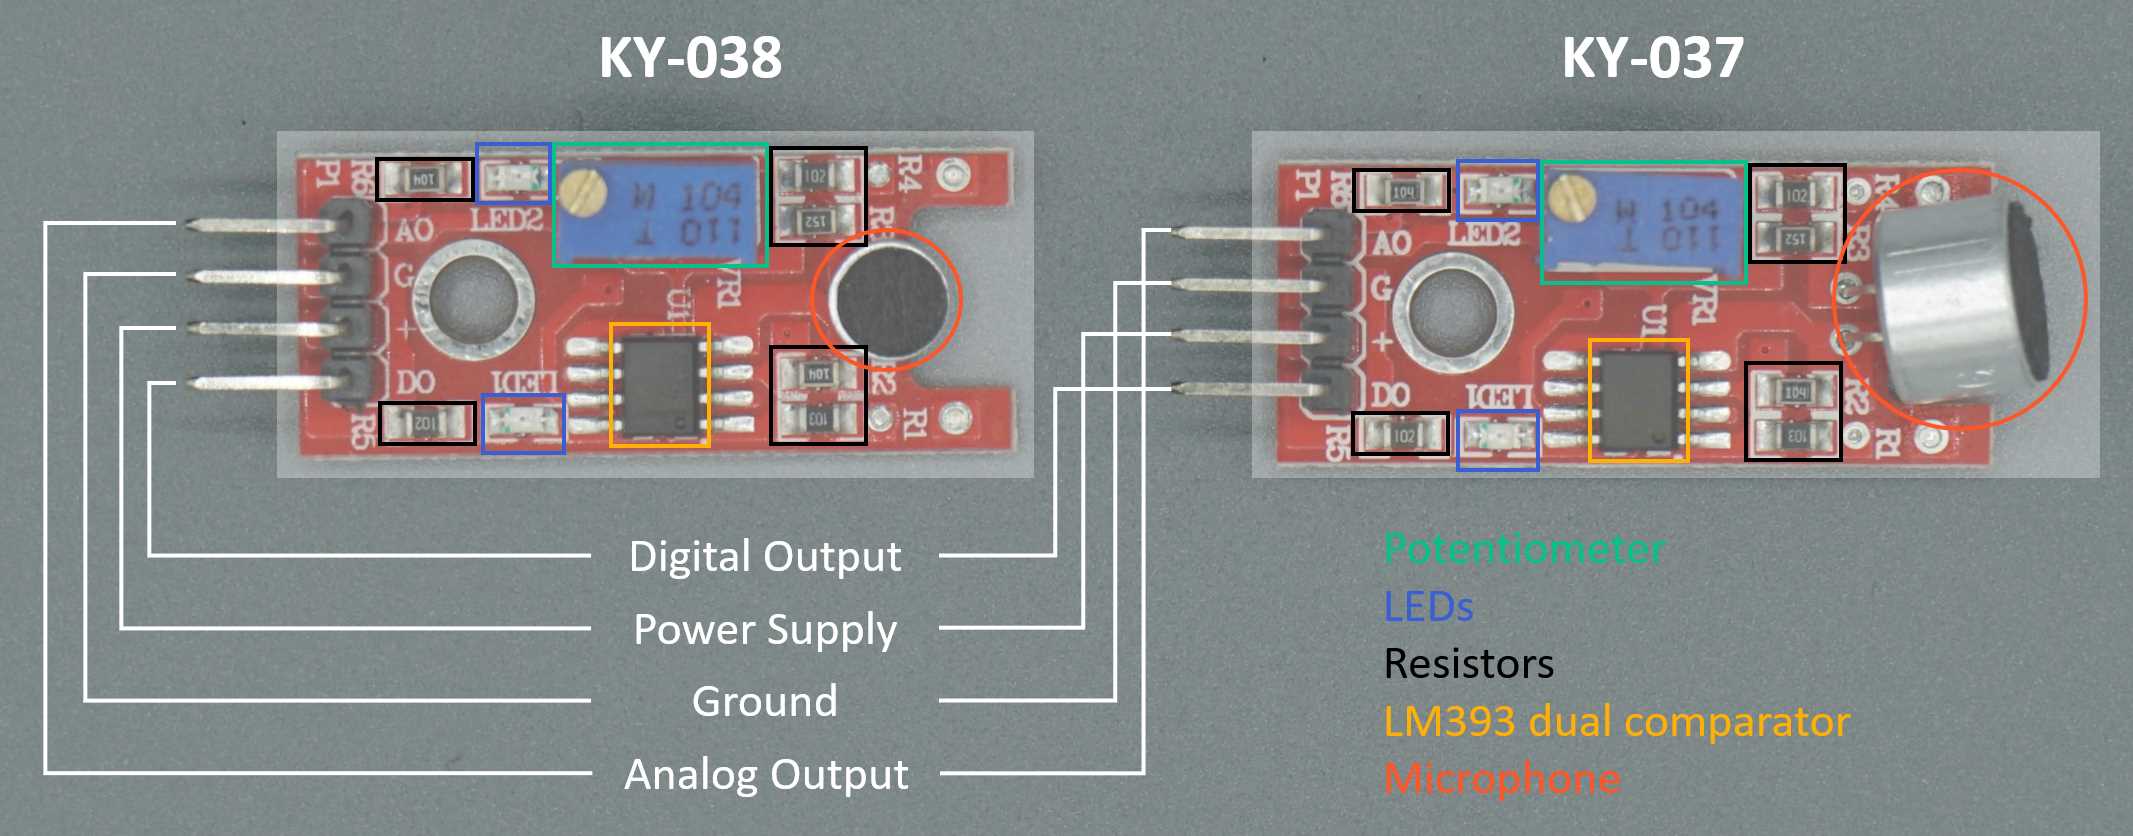
If we talk about the KY-038 or the KY-037 microphone sound sensor, we mean a sensor module with several components that are part of a circuit. The following picture shows the KY-038 and also the KY-037 microphone module with all electronic parts.
You can click on the image to enlarge it.
From the picture, you see that there is no difference in electronic components between the KY-038 and the KY-037. Only the microphone of the KY-038 is a bit larger compared to the KY-037.
The KY-038 and the KY-037 module consists of the following electronic parts:
- 4 output pins that connect the sound sensor to a microcontroller.
- A0: Analog pin to transfer an analog signal.
- G: Ground to connect the sound sensor to ground with the microcontroller.
- +: Pin for the operation voltage between 3.3V to 5V regarding to the technical datasheet.
- D0: Digital output based on a predefined threshold through the potentiometer and the operation voltage of the microcontroller.
- Potentiometer to define a threshold for the digital output pin.
- 2 LEDs to indicate that the module is operating and to indicate the status of the digital pin.
- 6 Resistors to prevent LEDs for too high voltages and to operate as voltage dividers.
- LM393 dual comparator to compare the signal created by the microphone with the predefined value through the potentiometer and to control the status of the LED that indicates the status of the digital output.
- Microphone that generates the sound signal.
Functionality of the Microphone for the KY-038 and KY-037 Modules
The basic functionality of the microphone is the same for the KY-038 and the KY-037. The microphone generates the input for the sound sensor module and consists of a thin diaphragm that is one plate of a capacitor. The second plate of the capacitor is the back plate and in parallel to the diaphragm in very close distance. The following picture shows a basic schematic of the microphone.
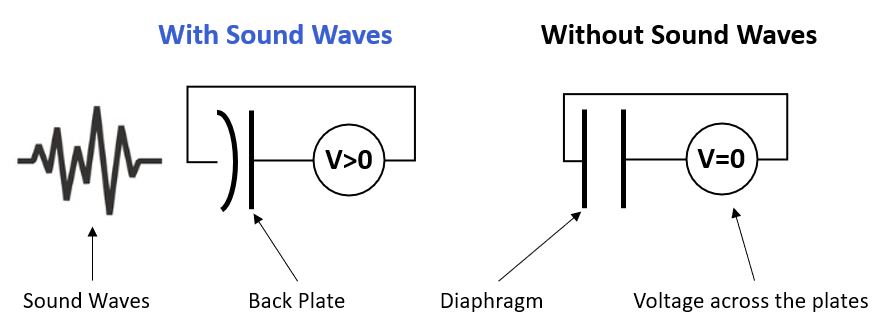
If someone speaks into the microphone, the sound waves created by the voice hit the diaphragm. Due to those hits, the diaphragm vibrates and therefore the distance between the two plates of the capacitor gets shorter or wider (picture on the left side).
Because the capacitance is directly proportional to the distance between the plates, the sound waves of the voice changes the voltage across the plates that has a direct influence of the circuit of the KY-038 and KY-037 sound sensor module.
Microcontroller Datasheet eBook
The 35 pages Microcontroller Datasheet Playbook contains the most useful information of 14 Arduino, ESP8266 and ESP32 microcontroller boards.
Functionality of the LM393 Dual Comparator
The LM393 dual comparator consists of two independent voltage comparators that have a very low offset voltage of maximum 2mV and an operation voltage between 2V and 36V. The objective of the voltage comparator is to compare an input voltage with a reference voltage and set the output voltage based on the higher voltage of the comparison.
The following picture shows the schematic of a voltage-comparator.
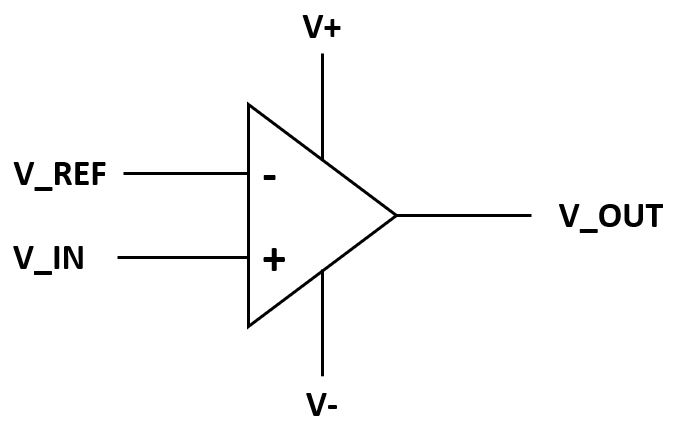
The output voltage depends on the comparison of the reference and input voltage that is described in the following table, and the offset voltage that is subtracted from the power supply and for the LM393 typically 1mV.
| Input Voltage | Output Voltage |
|---|---|
| V_IN < V_REF | V- |
| V_IN = V_REF | 0 |
| V_IN > V_REF | V+ |
Schematic of the KY-038 and KY-037 Sound Sensor Module
To understand the functionality of the sound sensor module, we have to take a closer look into the schematic of the sensor module that shows us how the electronic components are connected. The following picture shows the schematic of the KY-038 as well as the KY-037 sound sensor module. The input and outputs of the LM393 dual comparator are numbered from 1 to 7. I use them as reference points in the following description of the schematic for the KY-038 and KY-037 microphone sound sensor module.
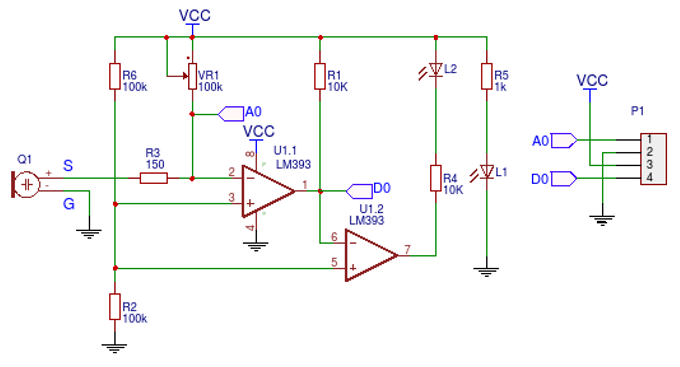
On the right side of the schematic, we see the connection pins that are used to connect the module to a microcontroller like the Arduino, ESP8266 or ESP32. We take a closer look at these connection pins in the wiring section of this tutorial.
On the top of the schematic, we see that if VCC and ground is connected, the circuit over the resistor R5 and LED L1 is closed. Therefore LED L1 indicated that the sound sensor module is operating.
Now take a closer look on the left side. Resistor R6 and R2 build a voltage divider and because the resistance of both resistors is the same, we have 1/2 VCC voltage as input voltage of the first comparator U1.1 of the LM393 (3).
The reference voltage of the first comparator U1.1 (2) is the voltage created by the voltage divider that consists of resistor R3 in series to the changing resistance of the microphone Q1 and the potentiometer VR1.
The analog output of the microphone sound sensor module is the reference voltage of the first comparator and not amplified.
The output of the first comparator U1.1 (1) is either VCC or 0 and directly connected to the digital output pin of the KY-038 and KY-037 sound sensor module. Also the output is the reference voltage of the second comparator U1.2 (6). The input voltage of the second comparator is the same as for the first comparator 1/2 VCC (5).
The output of the second comparator U1.2 (7) is either VCC or 0 and connected to the circuit part with resistor R4 and LED L2.
In the next part of the tutorial, we dive into different scenarios and see the functionality of the sound sensor module.
Functionality of the KY-038 and KY-037 Sound Sensor Module
For the functionality of the sound sensor, we assume that we have a supply voltage VCC that is in the range of the operation voltage 3.3V and 5V and that the ground pin is connected to the microcontroller. Therefore LED1 is on and indicates that the sound sensor is working.
If there is an active noise, the voltage drop across the microphone is changing (higher and lower) because the distance between the diaphragm and back plate gets shorter and wider. That results in a changing reference voltage on the comparator U1.1 (2). This changing reference voltage, that oscillates between the stable reference voltage, can be measured with the analog output pin.
To describe the functionality, we look at two different scenarios:
- The voltage drop across the microphone is lower than the reference (wider distance of plates inside the microphone)
- The voltage drop across the microphone is higher than the reference (closer distance of plates inside the microphone)
Voltage drop across the Microphone is Lower
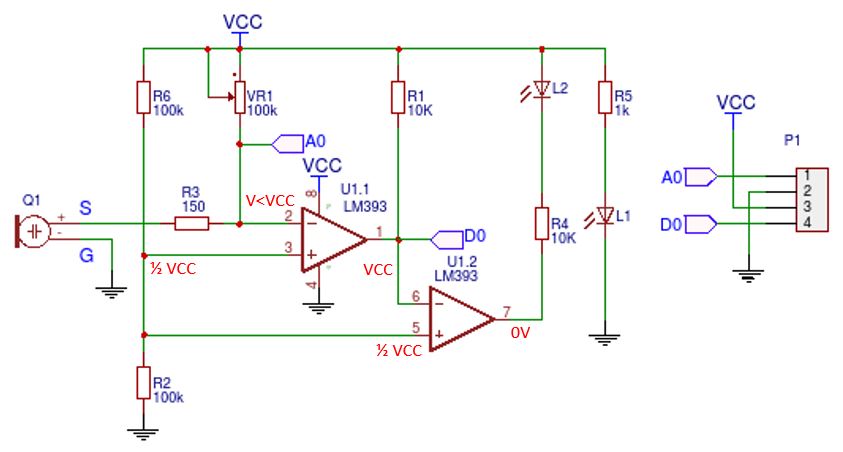
When the distance between the diaphragm and the back plate gets wider, depending on the resistance of the potentiometer, the reference voltage of the first comparator (2) is lower than the input voltage 1/2 VCC of U1.1 (3). In this case, the output of the first comparator (1) is VCC and the digital output D0 of the KY-038 / KY-037 module is HIGH.
The reference voltage of the second comparator (6) is VCC and therefore higher than the input voltage 1/2 VCC (5). This results in an output of 0V on U1.2 LM393. Due to the potential difference (VCC to 0V) between the LED L2 and R4, LED L2 turns on.
Voltage drop across the Microphone is Higher
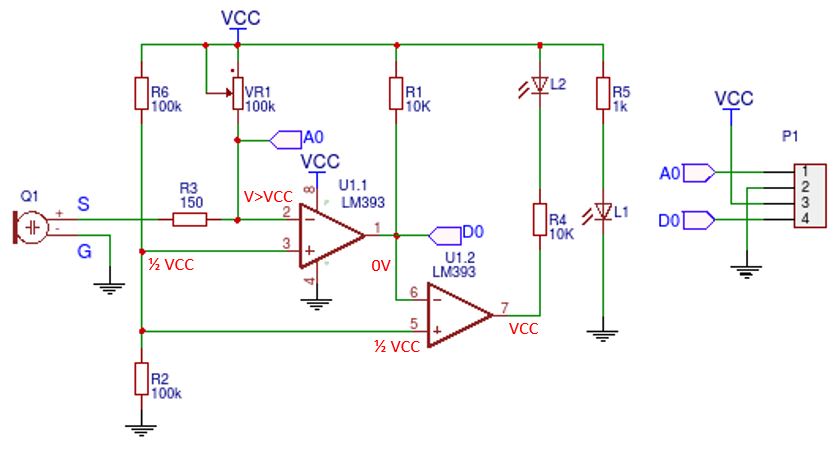
On the other hand, if the distance between the diaphragm and the back plate is closer, the reference voltage is higher than 1/2 VCC, the input voltage on comparator U1.1 (3). Therefore, the output of the first comparator is 0V (1) that can be measured via a digital output that is LOW.
Therefore the reference voltage of the second comparator U1.2 (6) is 0V which is lower than the input voltage (5) of 1/2 VCC. In this case, the output of U1.2 (7) is VCC and the potential difference of the circuit over L2 and R4 is 0V. Because there is no potential difference, the LED L2 is off.
Adjust the Potentiometer for the KY-038 / KY-037 Module
The resistance of the potentiometer is the main influencing variable for the output of the first comparator and therefore for the digital output of the sound sensor module. Because the status of the digital output is directly visible through LED L2, we will concentrate on LED2 to adjust the potentiometer.
In my opinion, the easiest way to set the resistance of the potentiometer is the following:
- Do not make any extra sound
- Turn the potentiometer until LED L2 turns on.
- Turn the potentiometer slowly in the opposite direction so that LED L2 turns off. In this case, the digital output D0 is LOW
- Now test the settings and tap beside the KY-038 or KY-037 microphone sound sensor module.
- LED L2 should turn on by an active sound.
The following video shows the 5 steps above in detail.

By loading the video, you agree to YouTube's privacy policy.
Learn more
The following table gives you an overview of all components and parts that I used for this tutorial. I get commissions for purchases made through links in this table.
| Component | Amazon Link | AliExpress Link |
|---|---|---|
| Arduino Nano | Amazon | AliExpress |
| Arduino Pro Mini | Amazon | AliExpress |
| Arduino Uno | Amazon | AliExpress |
| Arduino Mega | Amazon | AliExpress |
| ESP32 ESP-WROOM-32 | Amazon | AliExpress |
| ESP8266 NodeMCU | Amazon | AliExpress |
| ESP8266 WeMos D1 Mini | Amazon | AliExpress |
| KY-037 and KY-038 Sound Sensor Module in Sensor Kit | Amazon | AliExpress |
KY-038 / KY-037 Microphone Sound Sensor on Arduino Boards
In the following section we connect different Arduino microcontroller boards to the KY-038 or KY-037 microphone sound sensor. The Arduino microcontroller have an operation voltage of 5V that matches to the voltage range of the sound sensor.
The example that we want to create tuns on an external LED when there is a sound recognized by the sensor and the digital value of the sound sensor changes from 1 to 0.
Wiring between KY-038 / KY-037 Module and Arduino Boards
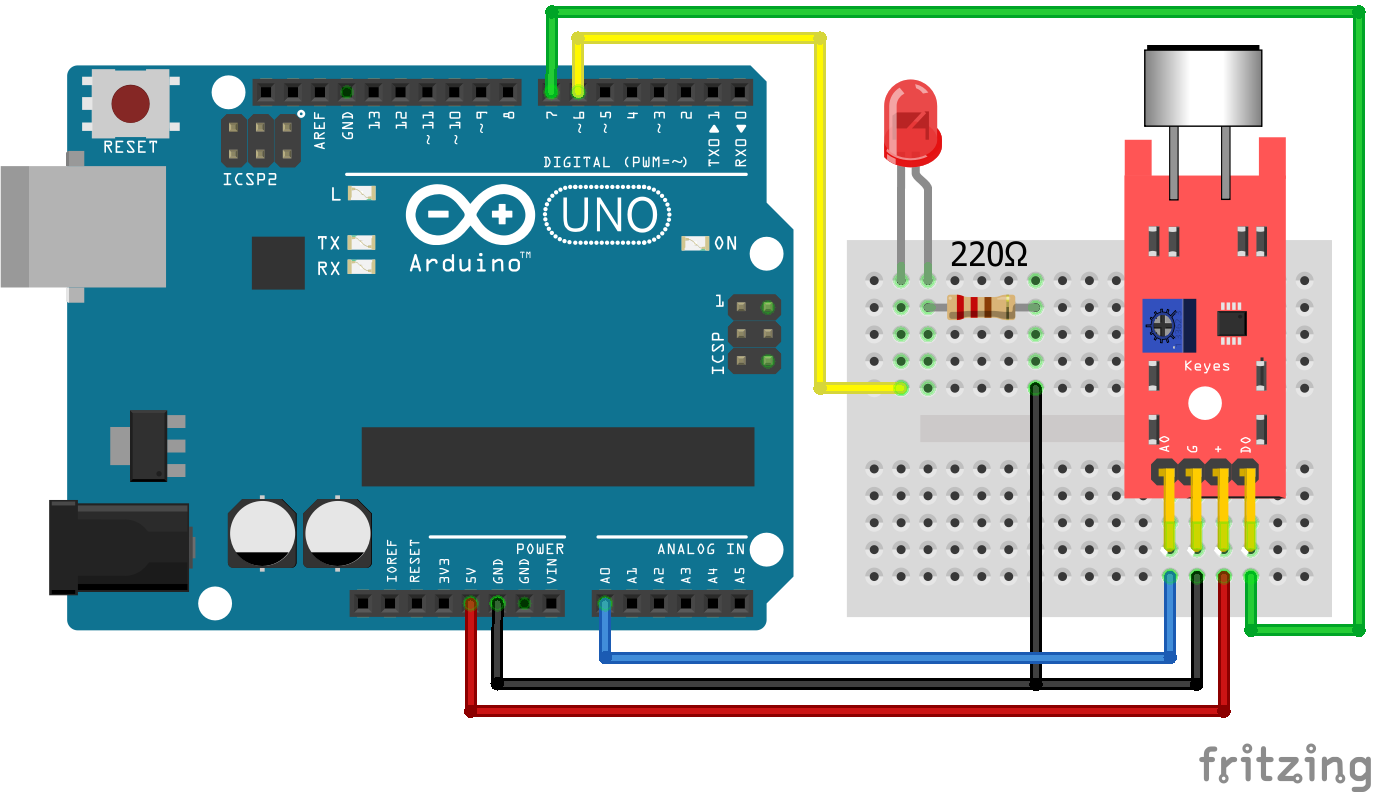
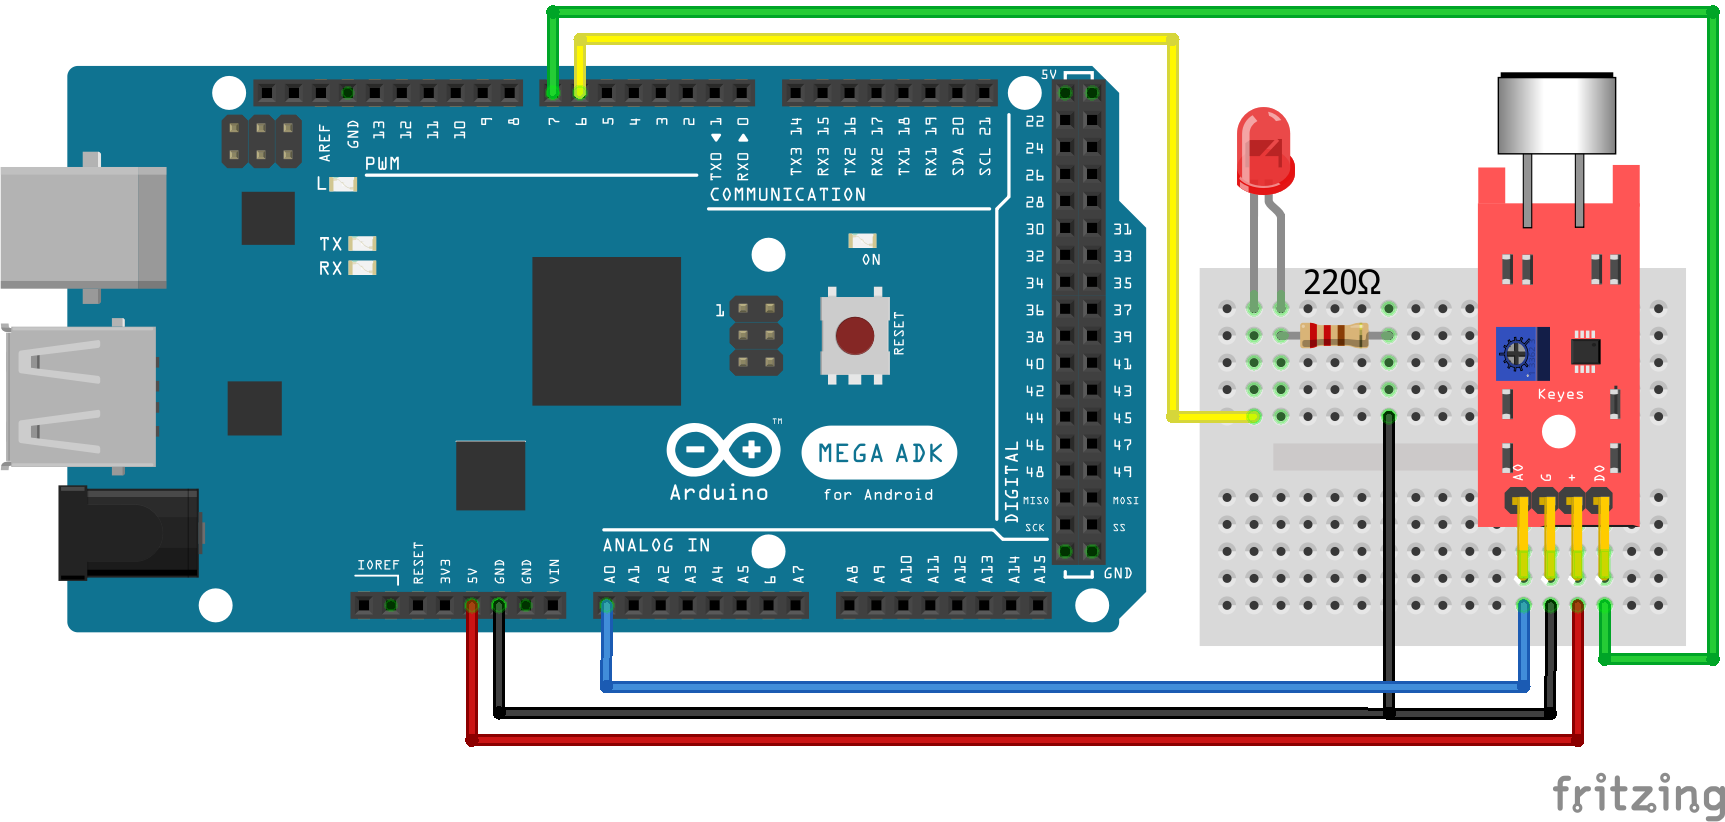
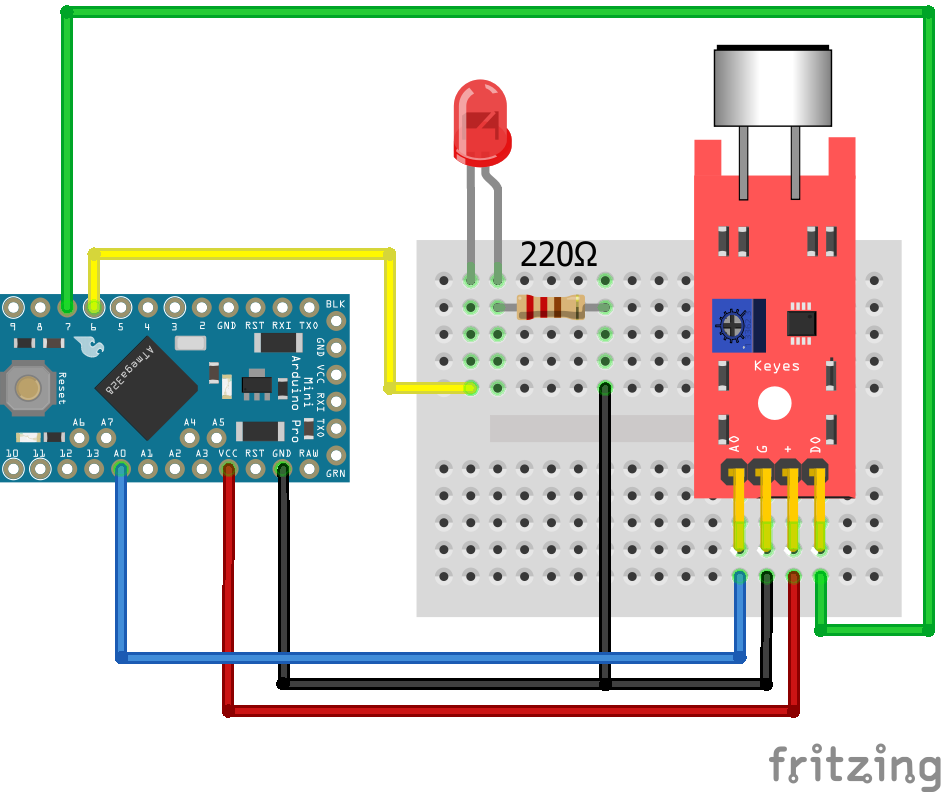
The wiring of the sound sensor is straight forward and shown in the following table. The external LED is connected to a digital pin of the Arduino microcontroller and to prevent the LED against too high voltages, we use a resistor in series of 220Ω. The sound sensor module is connected with all 4 pins to the microcontroller. Therefore we can read the digital and analog value of the sound sensor in this example.
| Arduino | KY-038 / KY-037 Module | External LED |
|---|---|---|
| 5V | + | |
| A0 | A0 | |
| D7 | D0 | |
| D6 | Anode | |
| GND | G | Cathode |
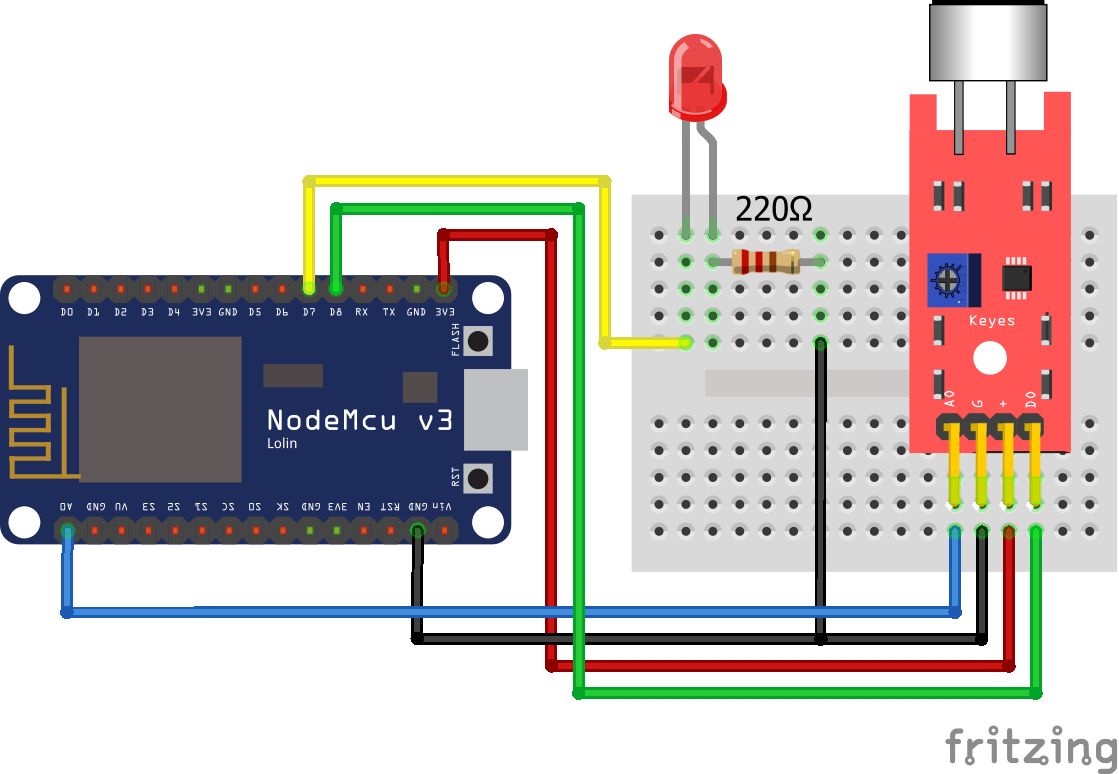
The following pictures show the fritzing sketches for the Arduino Nano, Arduino Pro Mini in the 5V version, Arduino Uno and the Arduino Mega. You can switch between all these Arduino boards by clicking on each tab.
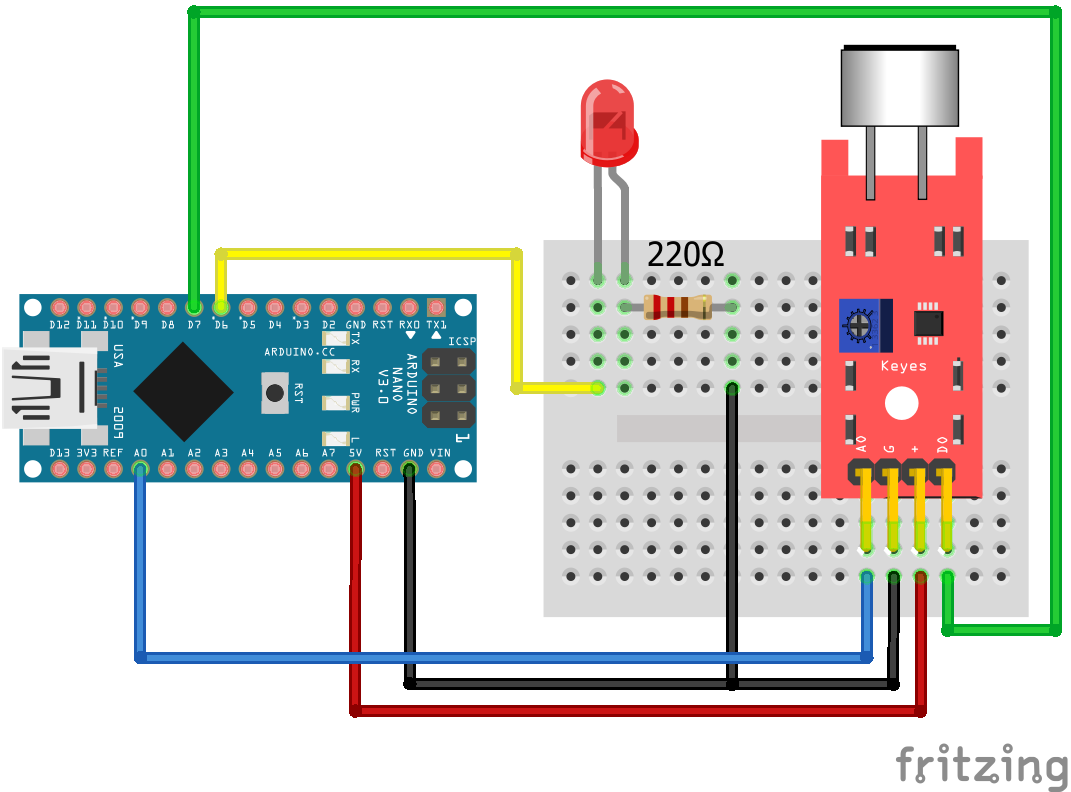
For more information about the Arduino Nano, visit the Arduino Nano Tutorial.
For more information about the Arduino Uno, visit the Arduino Uno Tutorial.
For more information about the Arduino Mega, visit the Arduino Mega Tutorial.
Program Code for KY-038 / KY-037 Module on Arduino Boards
After we connect the Arduino with the KY-038 or KY-037 sound sensor and also the LED and the resistor, we can start programming the script that reads the analog and digital value of the sound sensor and if the digital sensor value is HIGH, we turn on the external LED.
The following sections shows the complete program script for Arduino boards.
int led = 6;
int sound_digital = 7;
int sound_analog = A0;

void setup(){
  Serial.begin(9600);
  pinMode(led, OUTPUT);
  pinMode(sound_digital, INPUT);
}

void loop(){
  int val_digital = digitalRead(sound_digital);
  int val_analog = analogRead(sound_analog);

  Serial.print(val_analog);
  Serial.print("\t");
  Serial.println(val_digital);

  if (val_digital == HIGH)
  {
    digitalWrite (led, HIGH);
    delay(3000);
    }
  else
  {
    digitalWrite (led, LOW);
    }
}
At the beginning of the script, we define the pins that connect external components to the microcontroller. The digital output of the microphone sound sensor is connected to digital I/O pin 7 and the analog output to A0 of the Arduino. The anode is connected to digital I/O pin 6.
In the setup function, we set the baud rate to 9600 that must be the same value as in the serial monitor of the Arduino IDE. We have also to define the digital pins either as output or as input. In our sound sensor example, the LED pin is an output, because we want to control the LED. The digital output of the sound sensor is an input on the Arduino board, because we want to read the digital sensor values.
The loop function start with reading the digital and analog sensor values with the build in read functions. We store each sensor value in a separate variable as integer.
To see the analog and digital sensor values in your Arduino IDE, we print both variables to the serial and if your Arduino board is connected to your PC via USB, you can see the sensor values in the serial monitor of your Arduino IDE. To make the readability easier, we separate both values via a tabulator.
In the last part of the program script we create an if else statement where we turn on the LED with the function digitalWrite(led, HIGH) if the digital value of the KY-038 / KY-037 module switches from LOW to HIGH. With the delay function, we make sure that the LED is turned on for at least 3 seconds. If the digital sensor value is LOW, we turn off the LED.
You find the detailed results reading the analog and digital sensor values of the KY-038 / KY-037 module is in the results chapter of this tutorial.
KY-038 / KY-037 Microphone Sound Sensor on ESP8266 Boards
In this section we use different ESP8266 microcontroller with the KY-038 or KY-037 microphone sound sensor. The ESP8266 microcontroller has an operation voltage of 3.3V this is the minimal operation voltage of the sound sensor module.
We use a basic example that tuns on an external LED when there is a sound recognized by the KY-038 or KY-037 microphone sound sensor. We will see that in this case the digital value of the sound sensor changes from 1 to 0.
Wiring between KY-038 / KY-037 Module and ESP8266 Boards
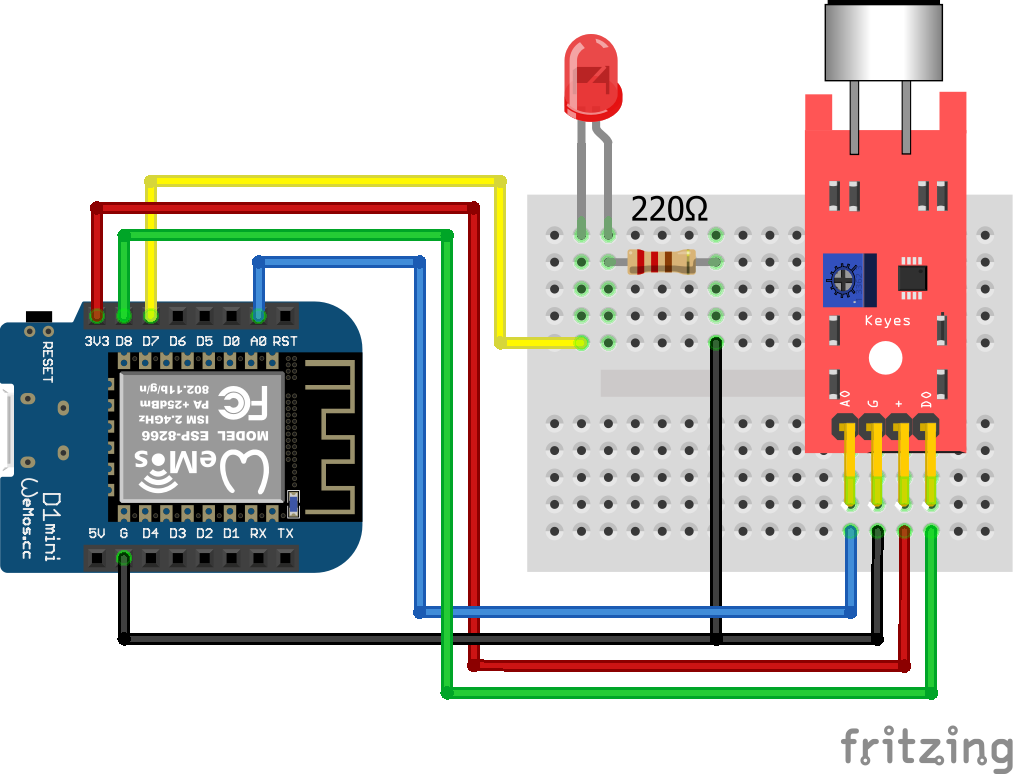
The wiring between the ESP8266, the sound sensor and the LED is shown in the following table. The KY-038 / KY-037 module with its digital and analog output is connected to the analog pin A0 and the digital pin D8 of the ESP8266 board. The external LED is connected to digital pin D7 of the ESP8266 microcontroller and to prevent the LED against too high voltages, we use a resistor in series of 220Ω.
| ESP8266 | KY-038 / KY-037 Module | External LED |
|---|---|---|
| 3V3 | + | |
| A0 | A0 | |
| D8 | D0 | |
| D7 | Anode | |
| GND | G | Cathode |
The following pictures show the fritzing sketches for the ESP8266 NodeMCU and the ESP8266 Wemos D1 Mini. You can switch between the two ESP8266 boards by clicking on each tab. If you are missing your favorite ESP8266 board, leave a comment under this article and I will add your microcontroller to this article.
Program Code for KY-038 / KY-037 Module on ESP8266 Boards
After the wiring, we set up the Arduino program code, that you find in the following box. Because the code is nearly the same like for Arduino boards, you find the detailed explanation of the code in the Arduino program code section. You only have to change the pins that connect the ESP8266 board, the sound sensor module and the LED and resistor, that is defined in the first three lines.
int led = D7;
int sound_digital = D8;
int sound_analog = A0;

void setup(){
  Serial.begin(9600);
  pinMode(led, OUTPUT);
  pinMode(sound_digital, INPUT);
}

void loop(){
  int val_digital = digitalRead(sound_digital);
  int val_analog = analogRead(sound_analog);

  Serial.print(val_analog);
  Serial.print("\t");
  Serial.println(val_digital);

  if (val_digital == HIGH)
  {
    digitalWrite (led, HIGH);
    delay(3000);
    }
  else
  {
    digitalWrite (led, LOW);
    }
}
KY-038 / KY-037 Microphone Sound Sensor on ESP32 Boards
The ESP32 has an operation voltage of 3.3V, like the ESP8266, and therefore also suited to connect to the KY-038 and KY-037 sound sensor module. In this section we first go over the wiring between the ESP32 microcontroller and all components that we need to read the analog and digital value of the sound sensor. Depending on the status of the digital sensor value, we turn an external LED on or off.
Wiring between KY-038 / KY-037 Module and ESP32 Boards
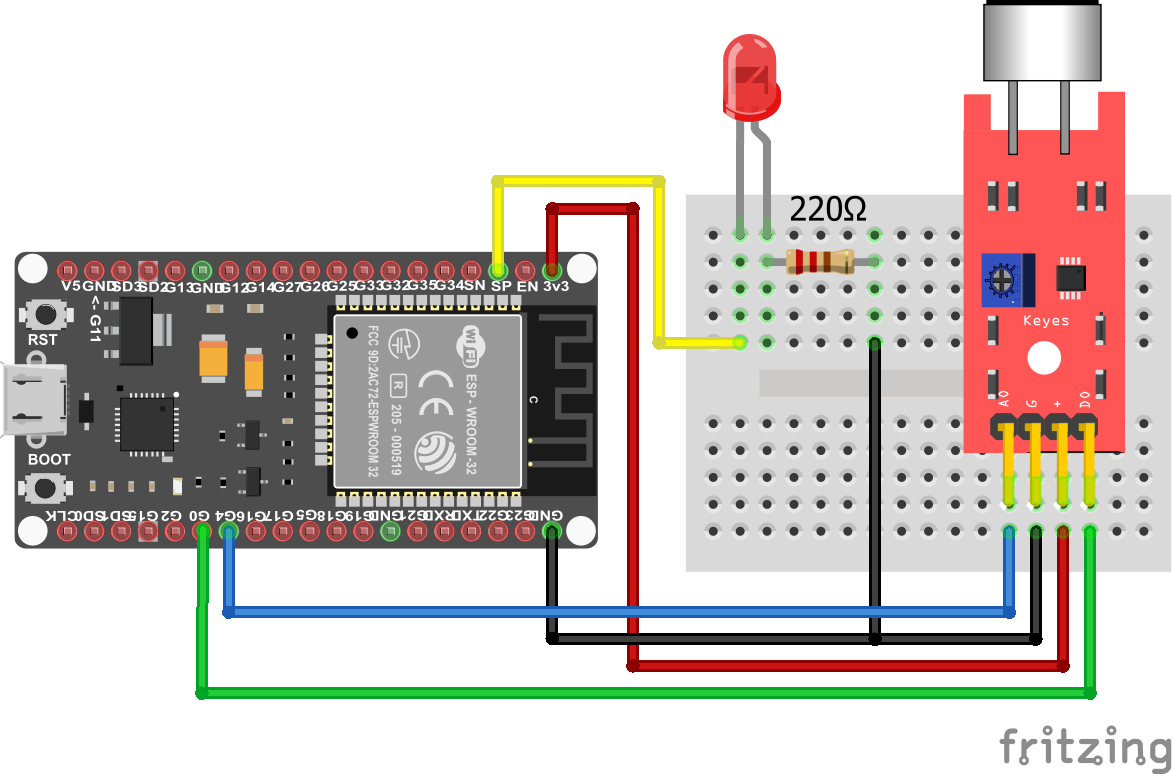
The wiring between the ESP32 microcontroller, the KY-038 / KY-037 sound sensor module, the LED and the 220Ω resistor to prevent the LED for too high voltages is shown in the following table and also in the fritzing picture.
| ESP32 | KY-038 / KY-037 Module | External LED |
|---|---|---|
| 3V3 | + | |
| 4 | A0 | |
| 0 | D0 | |
| 36 | Anode | |
| GND | G | Cathode |
As ESP32 microcontroller I concentrated on the ESP32 ESP-WROOM-32 board. If you are missing your favorite ESP32 board, leave a comment under this article and I will add your microcontroller to this article.
Program Code for KY-038 / KY-037 Module on ESP32 Boards
The program code is not dependent on the microcontroller you use. Only the first three lines that define the connection pins on the microcontroller are different.
Because I already explained the program code in the Arduino program code section, you only have to change the pins that connect the ESP32 board, the sound sensor module and the LED and resistor.
int led = 36;
int sound_digital = 0;
int sound_analog = 4;

void setup(){
  Serial.begin(9600);
  pinMode(led, OUTPUT);
  pinMode(sound_digital, INPUT);
}

void loop(){
  int val_digital = digitalRead(sound_digital);
  int val_analog = analogRead(sound_analog);

  Serial.print(val_analog);
  Serial.print("\t");
  Serial.println(val_digital);

  if (val_digital == HIGH)
  {
    digitalWrite (led, HIGH);
    delay(3000);
    }
  else
  {
    digitalWrite (led, LOW);
    }
}
Results reading the Sensor values of the Sound Sensor
This section of the sound sensor tutorial for Arduino, ESP8266 and ESP32 show the results of the whole tutorial that are independent of the microcontroller that you use. In total there are three different results that we take a closer look at:
- Serial Monitor of the Analog and Digital Sensor Values
- Visualize the Analog Sensor Value in the Serial Plotter
- Visualize the Analog and Digital Values in an Oscilloscope
Serial Monitor of the Analog and Digital Sensor Values
The following picture shows the serial monitor of your Arduino IDE with the analog and digital sensor values that are separated with a tabulator. You should get results in a comparable way, with the program code that we created in the previous chapters for Arduino, EPS8266 and ESP32 microcontroller.

The main take way from the picture is, that the digital value is 0 when the analog value is lower than average. This matches exactly the explanation from the functionality of the KY-038 and KY-037 sound sensor module chapter. In the next sub-chapter, you see the oscillation of the analog sensor value from the serial plotter.
Visualize the Analog Sensor Value in the Serial Plotter
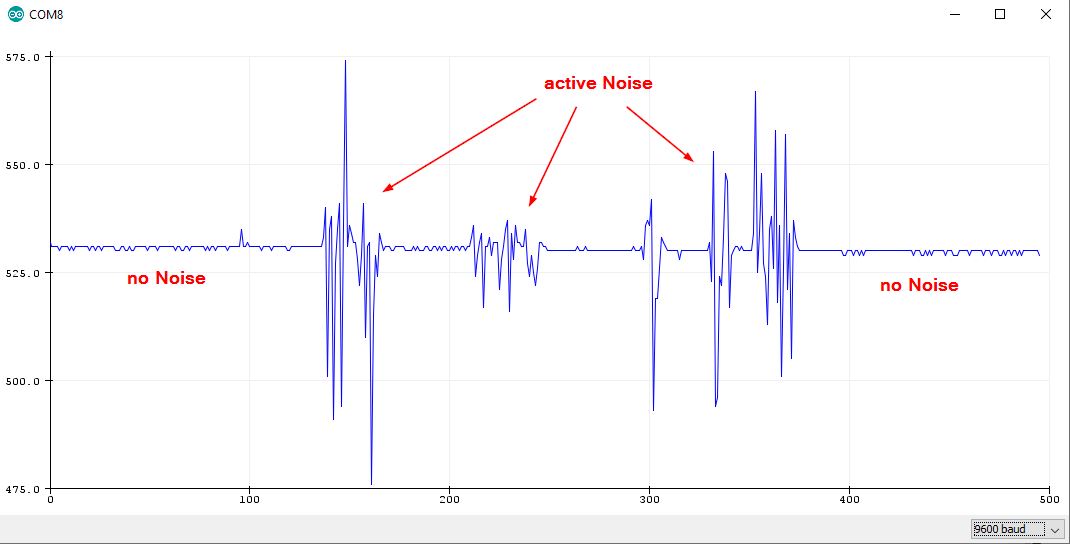
To get a better understanding of the behavior of the analog sensor values, I changed the program script a little bit to visualize the analog values as a time series in the serial plotter instead of the serial monitor. The following picture shows the result.
The picture shows that the analog value is stable around 530 when there is no external noise. If the microphone of the KY-038 or KY-037 module is affected by sound, the distance of the two plates that forms a capacitor inside the microphone changes and therefore the voltage drops across the microphone.
From the schematic we learned that this changing voltage directly affects the analog output of the sound sensor. Therefore, if there is an active noise the analog sensor value oscillates around the stable value.
Visualize the Analog and Digital Values in an Oscilloscope
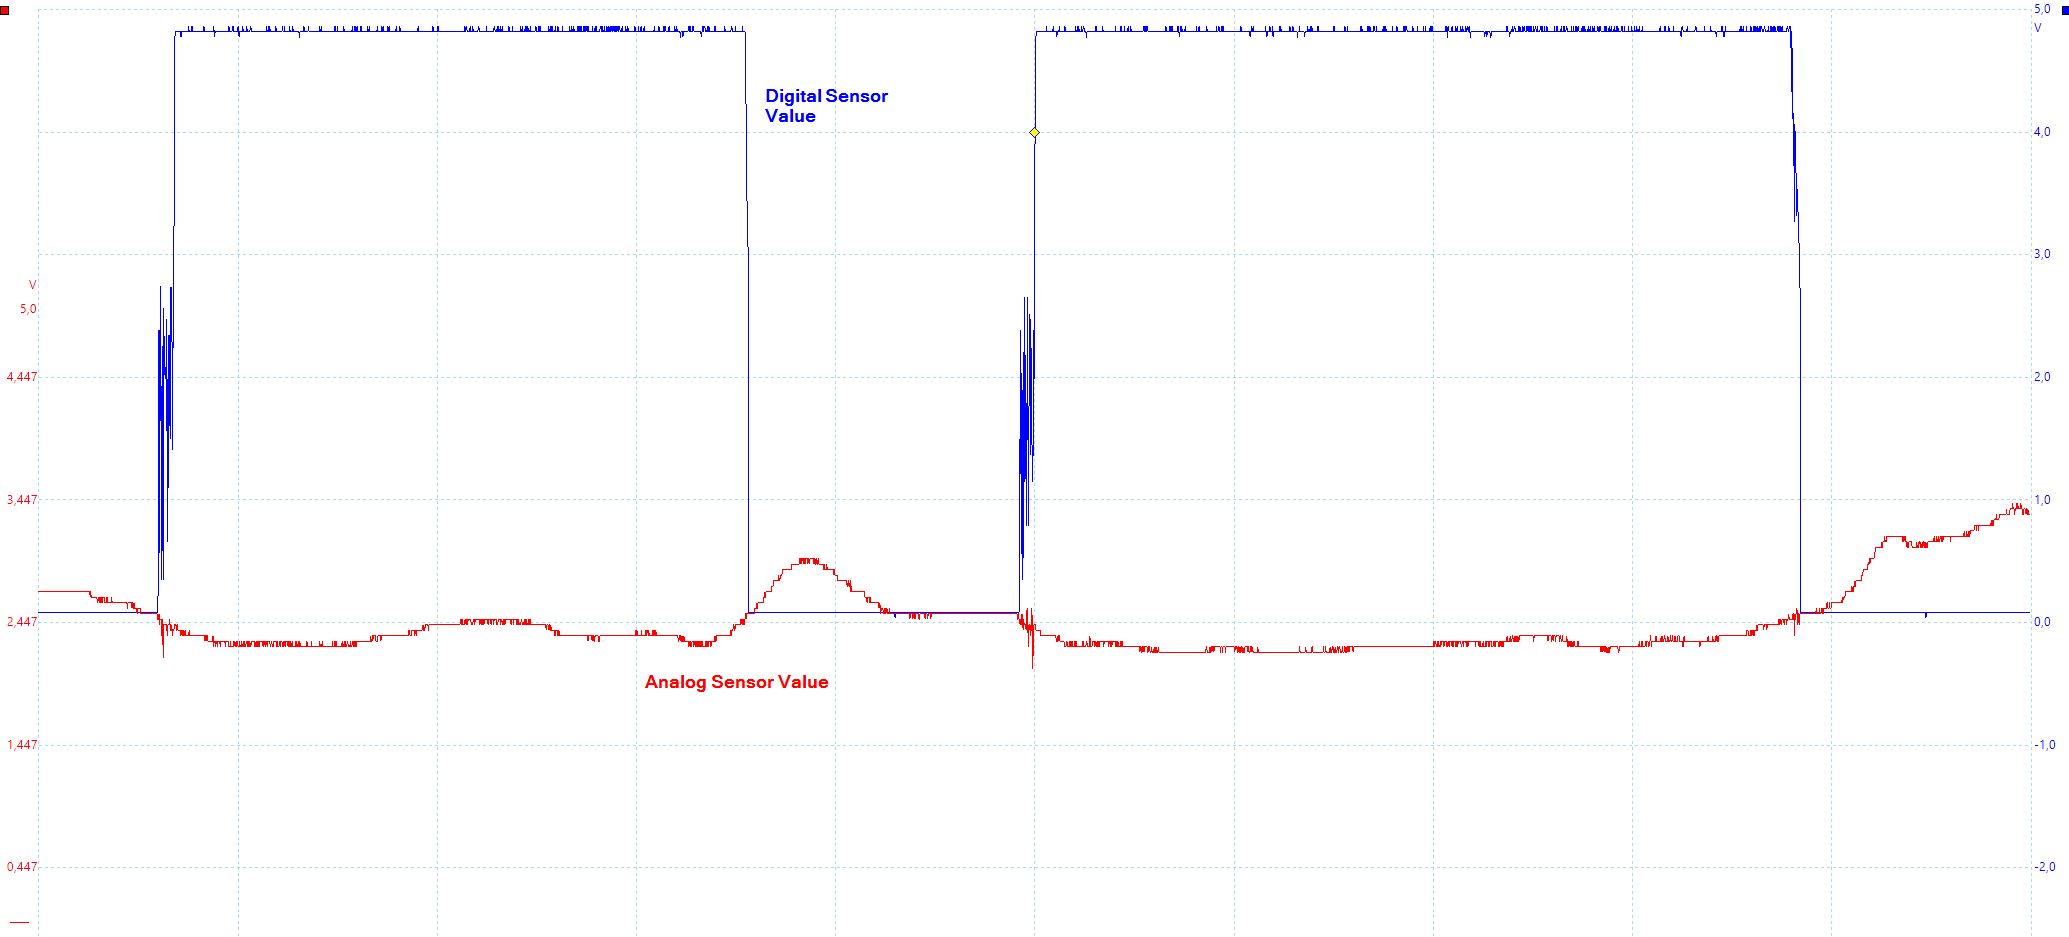
The last result I want to show is the change from the digital value based on the analog sensor value in more detail. Therefore, I measured the analog and digital outputs of the sound sensor module with my oscilloscope. The following picture shows the measurement. You can click on the image to enlarge it and get a more detailed view.
You see the digital sensor value in blue and the analog sensor value in red. Because I changed the y-axis of the analog sensor value in height, we see that if the analog value is lower than 2.447, the digital value switches from LOW to HIGH. And if the analog value increases and reaches exceeds the threshold, the digital sensor value switches back to LOW.
Therefore, the onboard LED of the KY-038 or KY-037 sound sensor module turns on in the negative “wave” of the analog value, when the digital value is HIGH.
Sensitivity Comparison between KY-038 and KY-037 Modules
In this last section of the sound sensor tutorial for Arduino, ESP8266 and ESP32, I want to know if there is a real difference in the sensitivity between the KY-038 and KY-037 module. Therefore I create an experiment to measure the analog signal of all modules, make a clap sound and compare the change in the analog signal of each sound sensor module.
The following picture shows a picture of the experiment. You notice that I use three sound sensor modules, because I found a KY-038 module with a bigger microphone that is positioned like the KY-037 module.

From the left to the right you see the following sound sensors:
- KY-037 (blue color in the example)
- KY-038 (red color in the example)
- KY-038 with a bigger microphone (green color in the example)
Wiring for the Sound Sensor Sensitivity Comparison
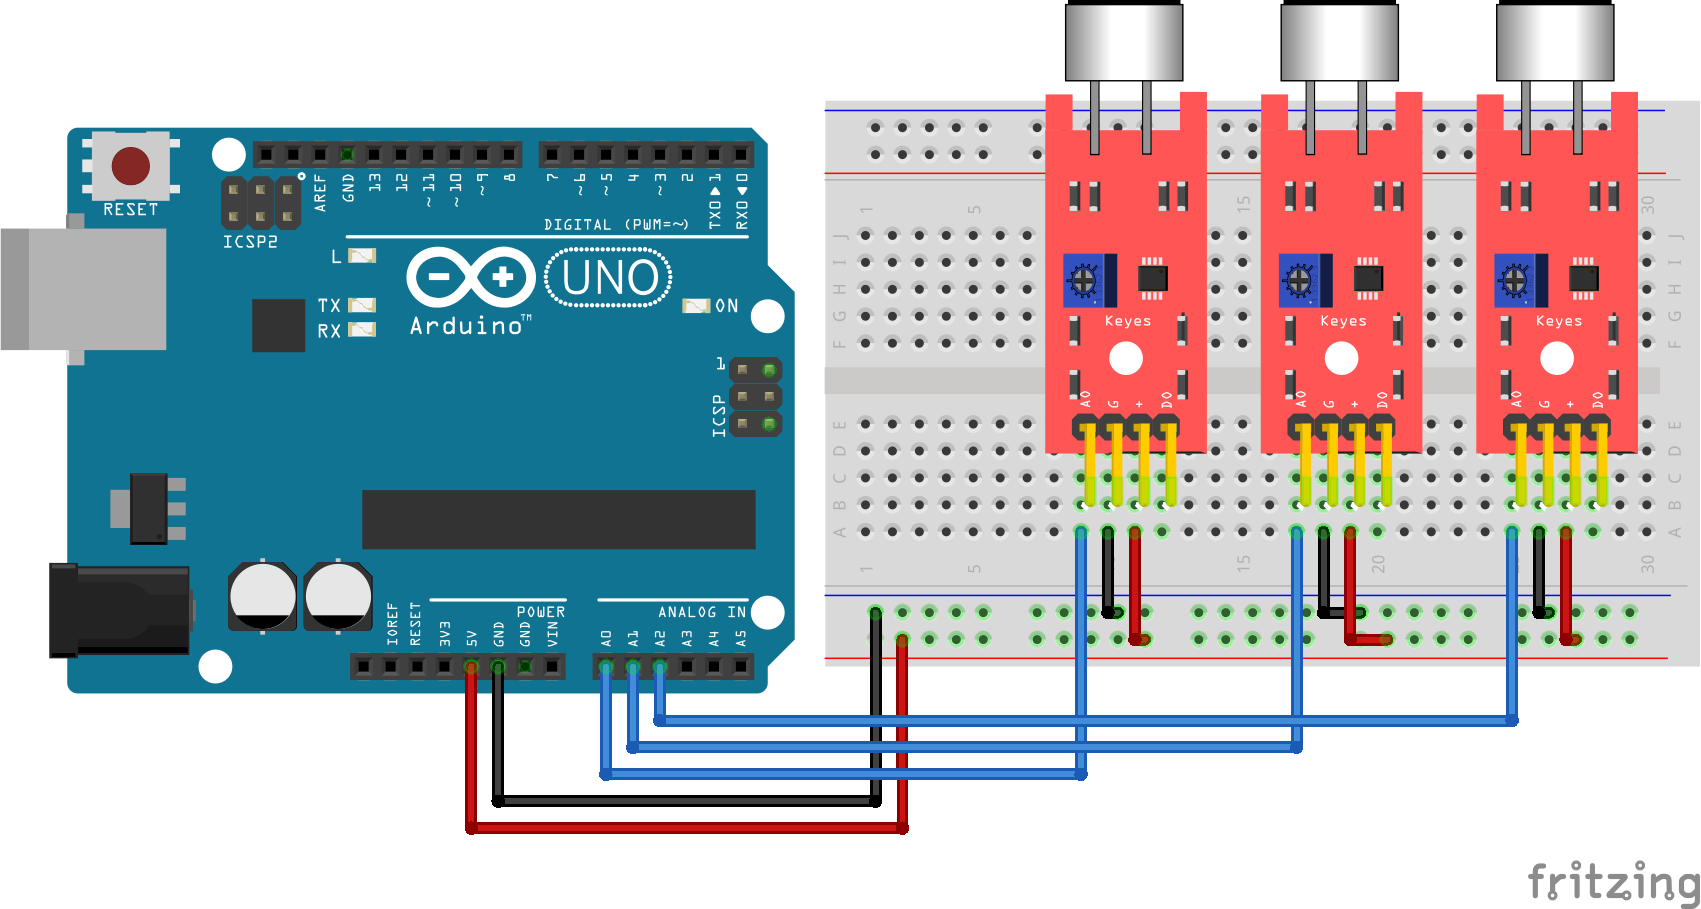
Because we only compare the analog sensor values in this experiment, we do not need to wire the digital output of the sensor module to the Arduino microcontroller and also do not need any LED. The following picture shows the wiring between the three microphone sound sensor modules and the Arduino microcontroller.
Program Code for the Sensitivity Comparison
After the wiring, we create the program code to measure the analog sensor value of all three KY-037 and KY-038 sound sensor modules. The program code is shown in the following box.
int sound_analog_0 = A0;  // blue
int sound_analog_1 = A1;  // red
int sound_analog_2 = A2;  // green

void setup(){
  Serial.begin(9600);
}

void loop(){
  int val_analog_0 = analogRead(sound_analog_0);
  int val_analog_1 = analogRead(sound_analog_1);
  int val_analog_2 = analogRead(sound_analog_2);

  Serial.print(val_analog_0);
  Serial.print("\t");
  Serial.print(val_analog_1);
  Serial.print("\t");
  Serial.println(val_analog_2);
}
At the beginning of the program script we define the connection pins for the analog sensor values:
- A0 is connected to the KY-037 module and gets the blue color for the visualization
- A1 is connected to the KY-038 module and gets the red color for the visualization
- A2 is connected to the KY-038 module with a bigger microphone and gets the green color for the visualization
In the setup function we define the baud rate to be 9600 that must match the baud rate of the serial plotter of the Arduino IDE.
In the loop function, we read the analog value of all three sound sensor modules and print each sensor value divided by a tabulator for each measurement.
KY-038 and KY-037 Sensitivity Comparison Results
To compare the sensitivity of each module, we plot the analog sensor value to the serial plotter of the Arduino IDE. The following picture shows a snapshot the analog sensor values that we want to compare.
Click on the image to enlarge it.
From the picture you see that each sensor value changes by my claps. The sensitivity of the sound sensor is the smallest absolute amount of change that can be detected. In this experiment I am interested in the absolute change of the analog signal value during a clap. If the change is high, the sound sensor recognizes the sound very good. If there is nearly no change in the analog sensor value, changes are high that the digital sensor values does not change and the clap was not properly recognized.
In the picture, I analyzed in total 8 claps that I made and for each clap I wrote the color of the sound sensor module where the analog sensor values changes significantly.
The results are the following:
- The KY-037 module (blue color) recognizes 3 out of 8 claps and has therefore the lowest sensitivity in this experiment.
- The KY-038 module (red color) recognizes 4 out of 8 claps and has therefore a moderate sensitivity for this experiment.
- The KY-038 module with a bigger microphone has the highest sensitivity with 5 recognized claps out of 8 for this experiment.
From the datasheets the KY-037 should have a higher sensitivity compared to the KY-038 sound sensor module. The experiment that I did was not very complex but showed that the KY-038 has a higher sensitivity. My personal experience, working with the KY-038 and KY-037 microphone sound sensor modules is that you do not have to care about the difference in sensitivity. If you have one or the other does not matter when you want to build an application.
If you have any questions, regarding the KY-037 or KY-038 sound sensor modules, use the comment section below to ask you questions and I will answer then as soon as possible.



Thank you for a really informative tutorial. I found it very useful.
Hi Anthony,
I hope you find a cool project to use your knowledge about the sound sensor. If you find a project, maybe you can inform others about it in this comment section 🙂
I am testing both sensors with a microbit but, event playing with the resistance, in the 038, the left never goes off.
I’ve also tried to use them in a Raspberry Pi 2 and cannot correctly read the digital output. Is there necessary to add a pull-up or pull-down in order to work with a rpi?
Thanks!
I mean LED2 instead of “left” in first sentence, sorry.
I have the same issue, any resolution?
I mean LED2 instead of “left” in first sentence, sorry.
Wrong test, because when analog1 is reading maybe the clap is detected, but not when is time for read analog2 and analog3, it depends on what part of code de clap is happening and reading. Maybe no clap detected.
Hi Daniel,
yes that is right. Do you have a better solution only with one microcontroller?
Can you please tell me where i can find the aound sensor library for fritzing? I cant find it anywhere.
I found a very nice documented project if your want to measure sound levels quite accurately. https://blog.yavilevich.com/2016/08/arduino-sound-level-meter-and-spectrum-analyzer/