Arduino Desktop IDE Guide
In this article you learn step by step how you install the Arduino Desktop IDE on your computer.
Moreover I show you how to set up the Arduino IDE with different libraries and different boards that you do not have to worry about the setup for your next project.
Table of Contents
The Arduino IDE is a program for creating your Arduino projects. The main features of the Arduino IDE are the following:
- Create your sketch / script
- Download and include external libraries for your devices like sensors
- Flash your microcontroller board and handle errors
- Analyze the running script via the serial plotter and serial monitor
The Arduino IDE is free to use and can be downloaded from the official Arduino website. But not only official Arduino boards can use the Arduino IDE. All boards which are compatible to Arduino can use the IDE in the same way.
Installing the Arduino Desktop IDE on your PC
Follow the steps below to install the Arduino Desktop IDE
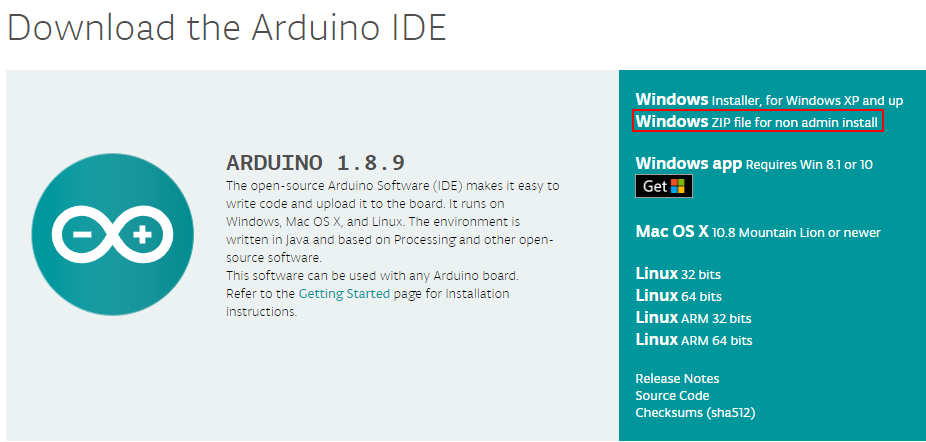
- Go to the official website
- Download the ZIP file (in my case the operating system is Windows)
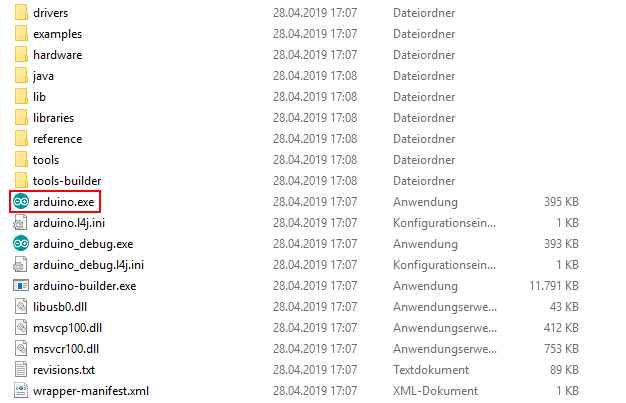
- Unzip the ZIP file into a local directory of your choice
- Navigate into the directory and open the arduino.exe to start the Arduino IDE
Great you have successfully installed the Arduino IDE. Maybe installed is a bit misunderstanding because there is no installation process required.
Next we will look at the IDE itself.
Overview of the Arduino IDE

- Arduino IDE version: shows your current version of the Arduino Desktop IDE. Try to hold the version up to date.
- Menu bar: The menu bar is the main place controlling the IDE. We will view the menu bar in detail further down.
- Operation buttons:
- Verify: Check is written code has right syntax
- Upload: Uploads the script to the microcontroller. Code verification is done before uploading the script.
- New: Opens a new script.
- Open: Open a window to select a script from working directory and open the selected script.
- Save: Saves the actual script in the selected folder in working directory.
- Open serial monitor: Opens the serial monitor to see the output from a script. Use “Serial.print(“This is the serial output”);” to print one line as output.
- Script bar: In the script bar you find all your current selected scripts. Therefore it is easy to switch between different scripts and you do not have to open a extra Arduino IDE for every script.
- Arduino script editor: In the script editor you will program your script. The programming language is a mix between C and C++. The editor highlights code in different colors which make the code faster to read. There have to be two functions in every script:
- void setup(): The setup function will run only one time the board is connected with a power supply. Usually you will define GPIOS as output / input, define settings for external displays or settings for the WiFi connection.
- void loop(): The loop function run as an open ended loop for the microcontroller. If the end of the loop function is reached, the script will continue with the first line of the loop function.
- Output console: In the output console you find errors if the syntax check failed or you see the progress uploading a script to the microcontroller board.
- Selected board and settings: In the bottom right side you see the selected board from the settings and the selected COM port, where the board is connected to the PC to upload a script.
File

- New: Opens a new script.
- Open: Open a window to select a script from working directory and open the selected script.
- Open Recent: Open a recent script directly without opening an extra window.
- Sketchbook: Own written programs to extend the functionality of the Arduino IDE.
- Examples: Open an example script. There are many examples and I recommend to test some of these examples to get a quick overview of different use cases and possible solutions.
- Close: Closes the current script.
- Save: Save the current script
- Save As…: Save the current script but opens a window to save the script under a new name.
- Page Setup: Opens settings for the print layout.
- Print: Print the current script.
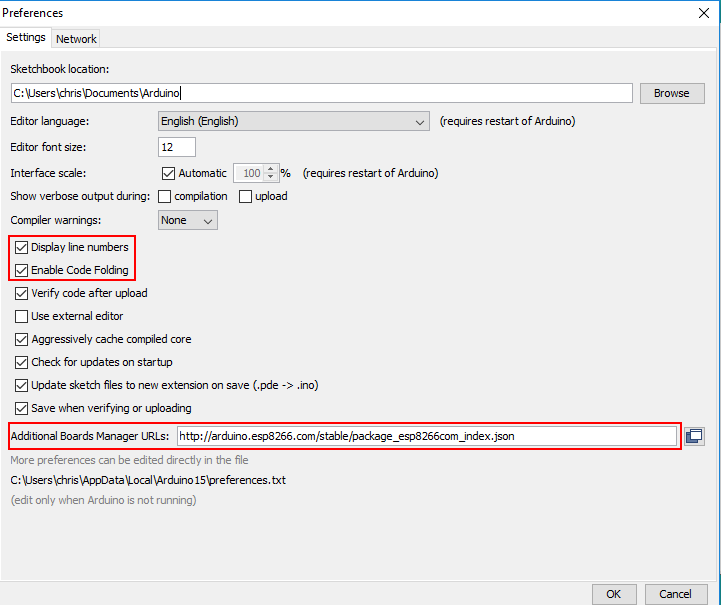
- Preferences: Opens a window with preferences. Here you can change the working directory or include other non-original Arduino boards like the NodeMCU boards based on ESP8266. I would suggest to select the “Display line numbers” for easier project documentation and “Enable Code Folding” to fold function and maintain code overview.
- Quit: Quit the Arduino Dekstop IDE
Edit
All commands refer to the Arduino IDE script editor

- Undo: Reverse the last editing action.
- Redo: To reverse your last Undo.
- Cut: Cut a selected part of the script editor.
- Copy: Copy a selected part of the script editor.
- Copy from Forum: Copy the selected part and set [code] attributes at the before and after the selected code.
- Copy as HTML: Copy the selected part as HTML code.
- Paste: Past a recopied text to the script.
- Select All: Select all content from script.
- Go to line…: Jumps in selected line.
- Comment/Uncomment: Set or remove // at the beginning of every selected line to comment or uncomment the whole line. Commented code will be ignored by the compiler.
- Increase Indent: Increase the indent for syntax correctness and better code overview.
- Decrease Indent: Decrease the indent for syntax correctness and better code overview.
- Increase Font Size: Increase Font Size
- Decrease Font Size: Decrease Font Size
- Find…: Opens a window to search for keywords.
- Find Next: Find the next possible keyword.
- Find Previous: Find the previous possible keyword.
Sketch
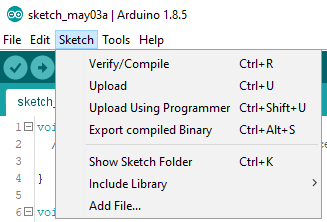
- Verify/Compile: Check is written code has right syntax and if there are any compiler errors.
- Upload: Uploads the script to the microcontroller. Code verification is done before uploading the script.
- Upload Using Programmer: Burn sketches to the Arduino board without using the bootloader. This allows you to use the full program space (flash) of the chip on the Arduino board. But you need an external programmer. (Only for advanced users!)
- Export compiled Binary: Create a .bin file from the script.
- Show Sketch Folder: Open the sketch folder where the compiled binary file is located.
- Include Library: Include different libraries to extent the Arduino functionality. For most and for all standard or most used component you will find the corresponding library in the manual of the component.
- Add File: You can add your own library within a folder that contain a C or C++ file with your code and a header file with your function and variable declarations.
Tools
Under the tools tab there are some information which depend on your selected board. In the example I choose the NodeMCU 1.0 board, which has slightly more options than a standard Arduino board.
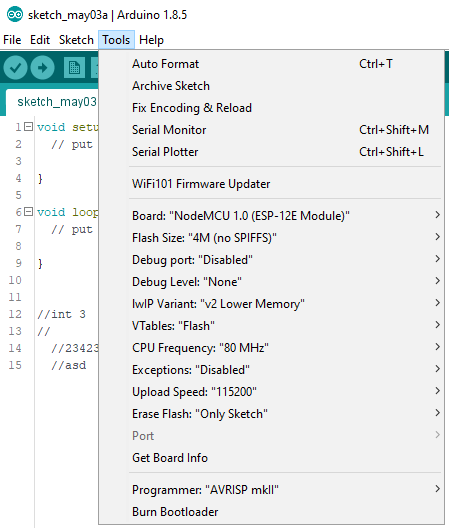
- Auto Format: Format the code properly with perfect indent and line breaks.
- Archive Sketch: Archives a copy of the current sketch in .zip format. The archive is placed in the same directory as the sketch.
- Fix Encoding & Reload: Fixes possible discrepancies between the editor char map encoding and other operating systems char maps.
- Serial Monitor: Opens the serial monitor to see the output from a script. Use “Serial.print(“This is the serial output”);” to print one line as output.
- Serial Plotter: Opens the serial plotter that takes incoming serial numerical data and displays them in a plot over the time as x-axis.
- WiFi101 Firmware Updater: Updating the firmware over WiFi.
- Board: Select the used board from a list.
- Flash Size: Select how much flash size is used for Serial Peripheral Interface Flash File System (SPIFFS).
- Debug port: If you want to debug the microcontroller you can select the referring port.
- Debug Level: If you want to debug the microcontroller you can select the debug level.
- IwIP Variant: Settings for the lightweight IP used as open-source TCP/IP stack.
- Vtable: Setting of virtual table for virtual classes. A little hidden piece of RAM that has pointers to virtual functions.
- CPU Frequency: Setting of the CPU frequency. With 160 MHz the microcontroller runs faster but needs more power. For current-saving projects use the lowest setting.
- Exceptions: Is enabled output exceptions to find out in which line of the application an issue has taken place.
- Upload Speed: Defines the speed, the script is uploaded to the board.
- Erase Flash: Setting if only the flash should be erased where the sketch is saved every time a new sketch is uploaded or if also the WiFi settings or the whole flash should be erased. (Only for advanced users!)
- Port: Select the port number where the board is connected to the PC via USB cable.
- Get Board Info: Display information about the selected board.
- Programmer: For selecting a hardware programmer when programming a board or chip and not using the onboard USB-serial connection. This is only needed when burning the bootloader. (Only for advanced users!)
- Burn Bootloader: The items allow you to burn a bootloader onto the microcontroller on an Arduino board. This is required if you change the microcontroller on the board, because a new Atmega microcontroller comes normally without bootloader. (Only for advanced users!)
Include an ESP8266 boards to the Arduino Desktop IDE
Maybe you want to use an ESP8266 board rather than an Arduino board. Than you have to make a little change to introduce the NodeMCU board to the IDE.
Just klick on File → Preferences. Insert the following URL for the Additional Board Manager URLs
http://arduino.esp8266.com/stable/package_esp8266com_index.json
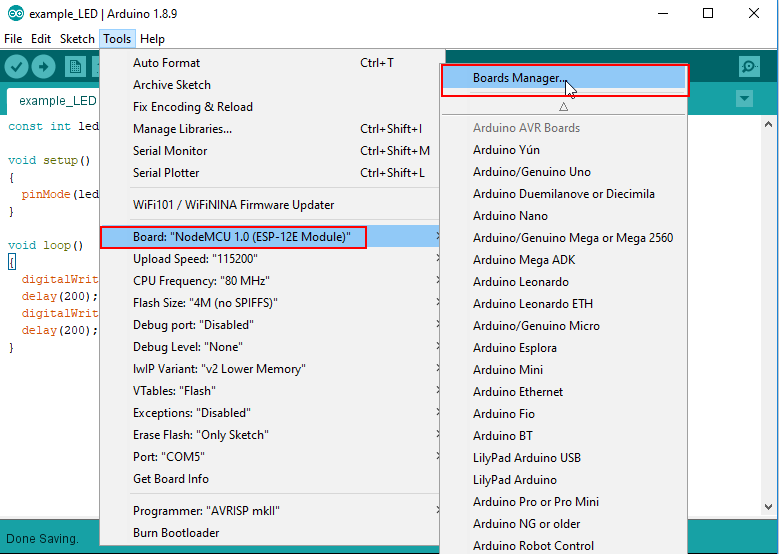
The second step is to install the necessary packages for the ESP8266 module:
Click in the Arduino IDE on Tools and make sure your settings are the following. To select the Node MCU Board the Ardiuno IDE has to download the board information from the Board Manager: Click onTools → Board → Board Manager.
Now search for NodeMCU and you will find the esp8266 by ESP8266 Community. Install the latest version of the board. After the installation you are able to select the right board for the settings.
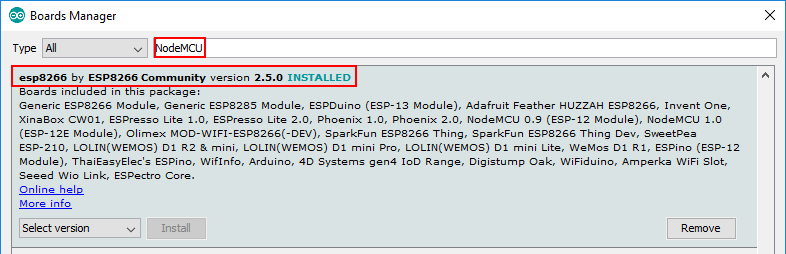
That’s all. You successfully configured a ESP8266 boards to the Arduino Desktop IDE.
Conclusion
This article covered the Arduino Desktop IDE which you will need to use if you want to work with different boards like Arduino or ESP based boards. I hope you enjoyed the article and feel free to ask open questions in the comment section below.
I also wrote a tutorial for the Arduino Web Editor, which you find here.
Leave A Comment