Guide to reduce the Arduino Power Consumption
In this guide I show you 3 hardware and 1 software measure that reduce the energy consumption of the Arduino microcontroller up to 89%.
The following measures are done in this tutorial:
- Use a Smaller Microcontroller (Hardware)
- Reduce Clock Speed (Hardware)
- Reduce Operation Voltage (Hardware)
- Use the Arduino Low Power Mode (Software)

Table of Contents
The following table summarizes the results of all methods to reduce the power consumption and also shows the used microcontrollers in this article.
From the table that summarizes the results of the power consumption measurements, the following key take-away can be derived:
- The lowest current consumption after all possible methods for reduction has the Arduino Pro Mini with 1.58 mA. This is a reduction of 89% for the 5V version and 69% for the 3.3 Version of the Arduino Pro Mini.
- The highest reference current consumption has the Arduino Uno with 98.43 mA. Even the Arduino Mega is a bigger PCB with more electrical components build on the board, the current consumption of the Mega is lower with 73.19 mA because the Arduino Mega runs not on 16 MHz but on 8MHz.
- The lowest reference current consumption has the Arduino Pro in the 3.3V version with 5.13 mA. If you do not want to use any power saving modes and do not need a 5V supply, you should word with the Arduino Pro Mini 3.3V.
- The best method to save energy is the to enable the Low Power Mode and reduce the clock speed so that the microcontroller can operate directly with 3.3V. With this method, the current consumption can be reduced by 83% on average compared to the reference measurement with 9V and no optimization.
- After the enabling of the reduced clock speed and reduced operation voltage of 3.3V, the current consumption of the Arduino Pro Mini in the 5V version is the same as the 3.3V version of the microcontroller.
The following table gives you an overview of all components and parts that I used for this tutorial. I get commissions for purchases made through links in this table.
The following sections I show you how to implement the techniques to reduce the Arduino power consumption.
Use a Smaller Microcontroller
In this article we cover different microcontrollers from large ones like the Arduino Mega up to smaller ones like the Arduino Pro Mini. The first think you have to keep in mind when you plan your project that needs a lower power consumption: every electrical device on the PCB needs power to operate. Therefore the first step to reduce the Arduino power consumption is:
Use the smallest microcontroller that fits to your project to remove unnecessary hardware.
The following bar-chart shows the reference measurement for all Arduino boards, supplied with a 9V voltage. Each bar shows the power consumption for one Arduino board.
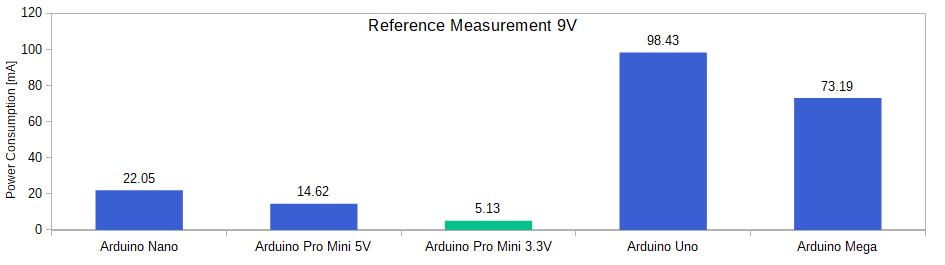
For example if you want to build a weather station that needs only 5 digital inputs and 1 analog input, you choose the Arduino Nano (22.05 mA) or the Arduino Pro Mini (14.62 mA) instead of an Arduino Uno (98.43 mA).
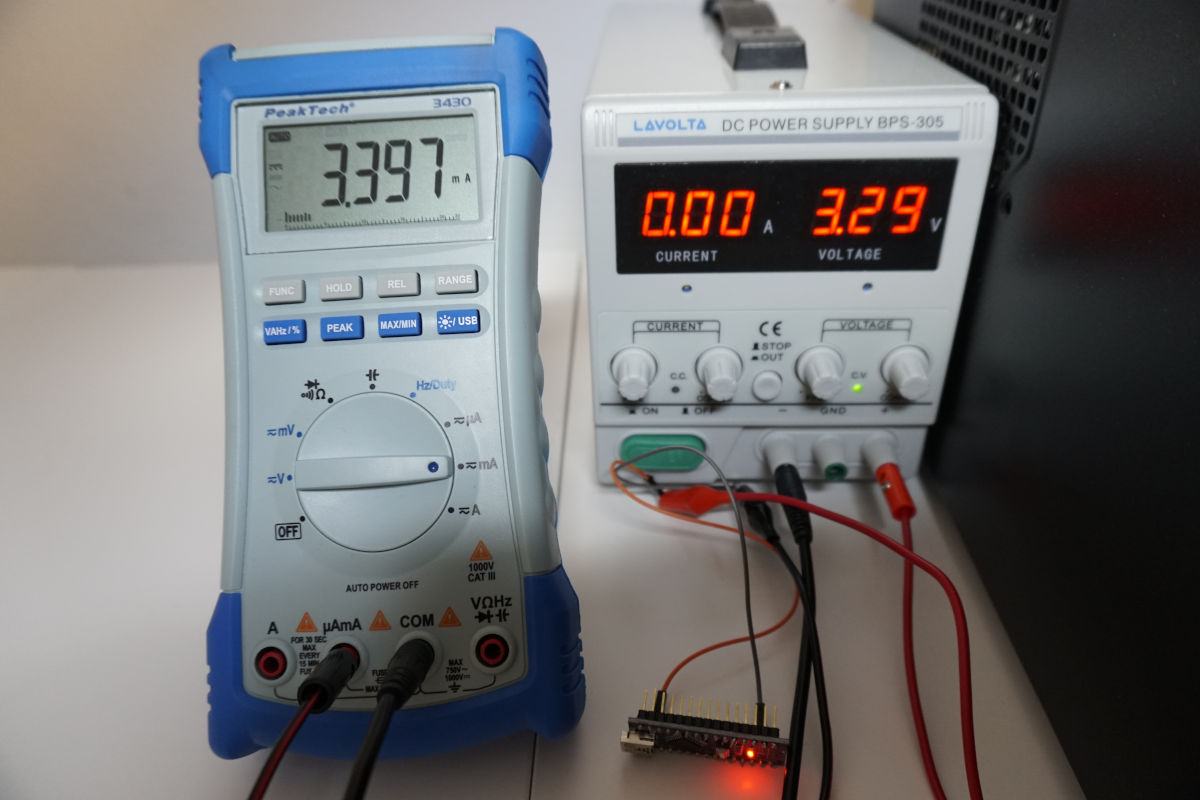
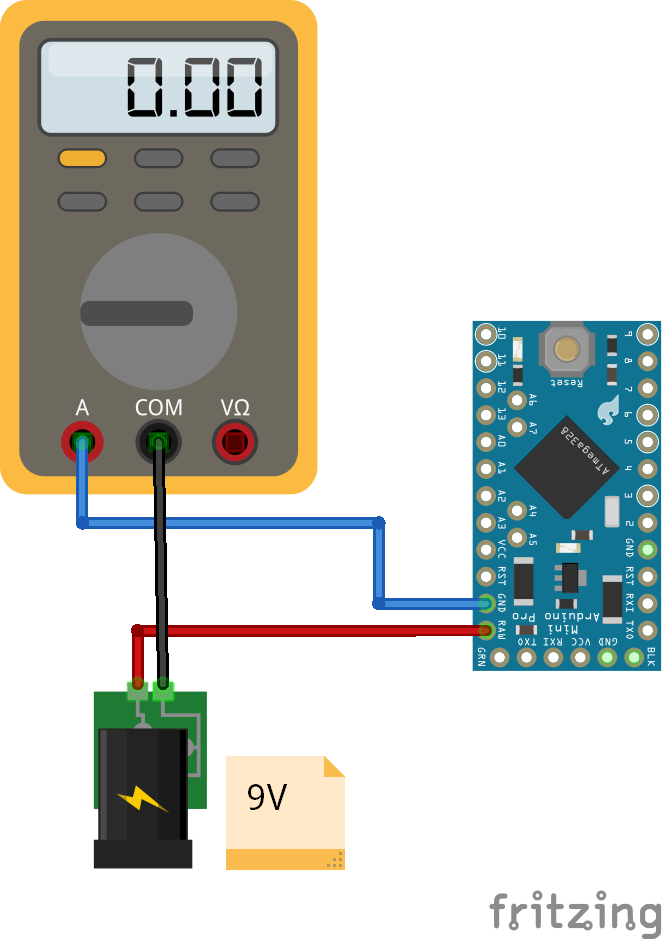
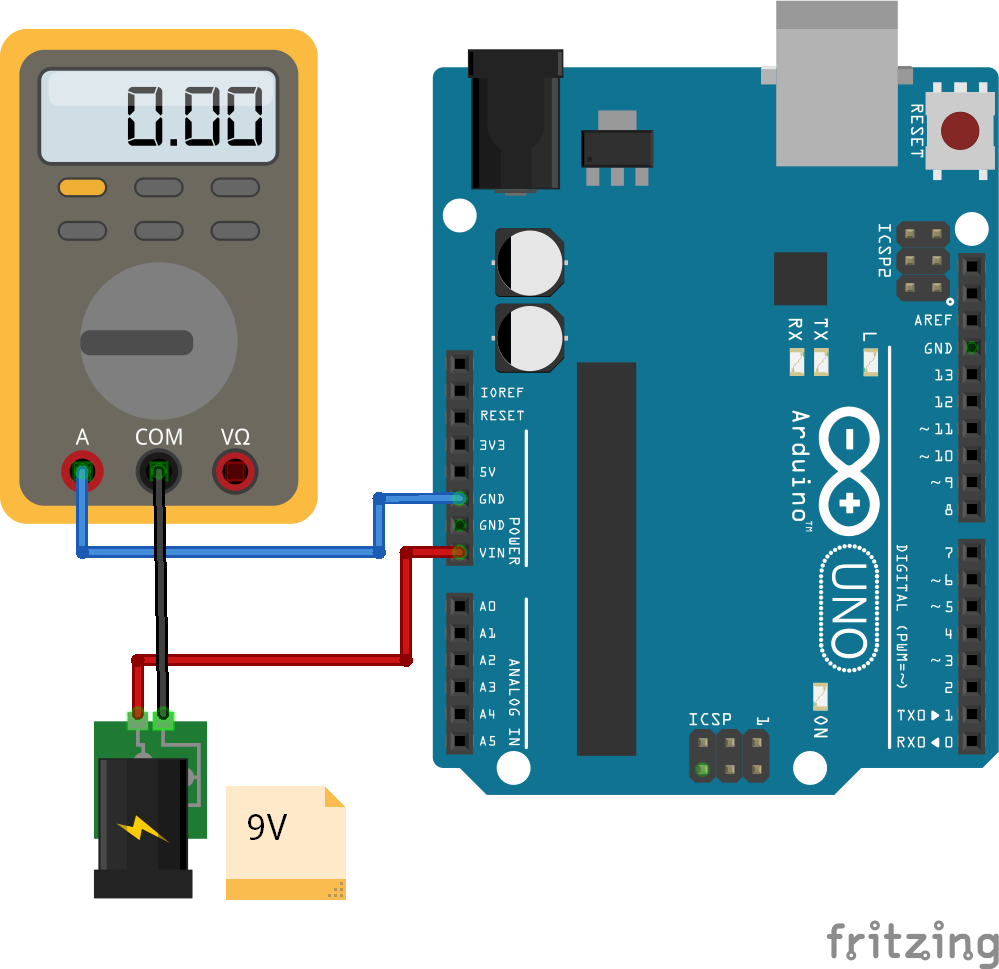
The measurements are done with a USB multi-meter in idle state of the microcontroller after flashing an empty Arduino script to the microcontroller. The following picture shows the setup of the measurements.
Reduce Clock Speed
To reduce the power consumption further you can reduce the clock speed. The clock speed defines how many operations the Arduino can execute per second. The following table shows the default clock rate of the Arduino microcontrollers, analyzed in this article.
The default clock speed for most Arduino microcontroller is 16 MHz crystal that equals 16 million instructions per second. But in most cases you do not need the full operation speed and therefore you can change the clock speed.
Reduce the clock speed from 16 MHz to 8 MHz
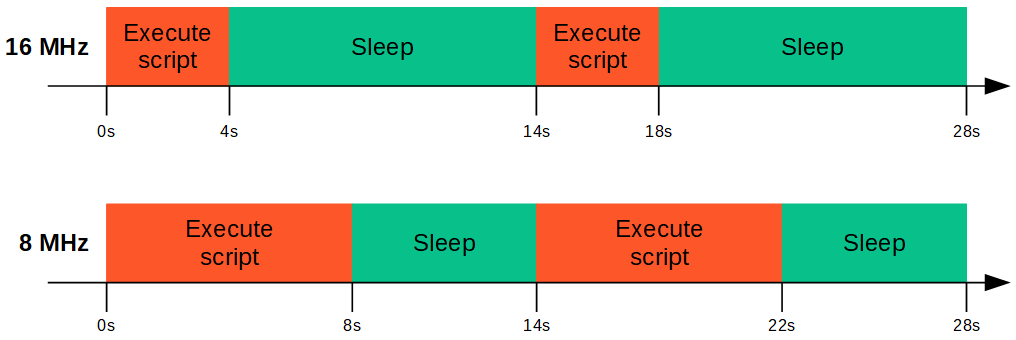
But there is also one downside if you reduce the clock speed. If you switch to a power saving mode for a certain time after the script is finished, the Arduino microcontroller takes a longer time to run the script and the time in the power saving mode is reduced. For example if the script runs 4 seconds on 16 MHz and you pause the script for 10 seconds in the power saving mode, the same script takes 8 seconds on 8 MHz and therefore the time in the power saving mode is reduced to 6 seconds. In exceptional circumstances the current consumption can rise when you reduce the clock speed.
The following picture shows how the execution and sleep blocks over time on 16 MHz and 8 MHz.
To reduce the clock speed you can use the system clock prescaler that reduces the clock speed by a dividing factor. The reduced clock frequency affects the CPU and all synchronous peripherals like I/O pins, analog to digital converter (ADC) and the flash.
Because there is a locking mechanism that prevents the change of the clock frequency, there is a special two step write procedure that must be followed to change the frequency by the CLKPS bits:
- Write the clock prescaler change enable (CLKPCE) bit to one and all other bits in CLKPR to zero.
- Within four cycles, write the desired value to CLKPS while writing a zero to CLKPCE.
You can find the detailed explanation in the datasheets of the microcontrollers (for example for the ATmega328P on page 32) In the table above I linked the datasheet for every ATmega microcontroller:
The following table shows how the Clock Prescale Register (CLKPS) is build so that we know which bits do we have to set to 0 or 1.
Now we have to know how to set the CLKPS bits in order to define the clock division factor. The following table shows the possible prescaler and their CLKPS3 bit combination.
The last step is to transfer write procedure that must be followed into the setup function of the Arduino Code.
void setup() {
  CLKPR = 0x80; // (1000 0000) enable change in clock frequency
  CLKPR = 0x01; // (0000 0001) use clock division factor 2 to reduce the frequency from 16 MHz to 8 MHz
}

void loop() {
  // put your main code here, to run repeatedly:

}
Reduce Clock Speed - Measurement
Reference Operation Voltage Arduino Nano
Reference Operation Voltage Arduino Pro Mini
Reference Operation Voltage Arduino Uno

Reference Operation Voltage Arduino Mega
Every microcontroller is supplied with 9V due to a laboratory power supply. The digital multi-meter is connected in series to measure the current consumption. All measurements are inserted into the table on top of the article and also shown in the following bar-chart.

The reduction in clock speed shows the following results:
- The highest relative reduction in current consumption sees the Arduino Uno with a reduction of 56.56% (from 98.43mA to 42.76mA)
- The lowest relative reduction has the Arduino Mega with 15.62% (from 73.19mA to 61.76mA).
- On average the reduction of current consumption for these Arduino microcontrollers is 29% but strongly depends on every individual Arduino board.
Reduce Clock Speed and Operation Voltage
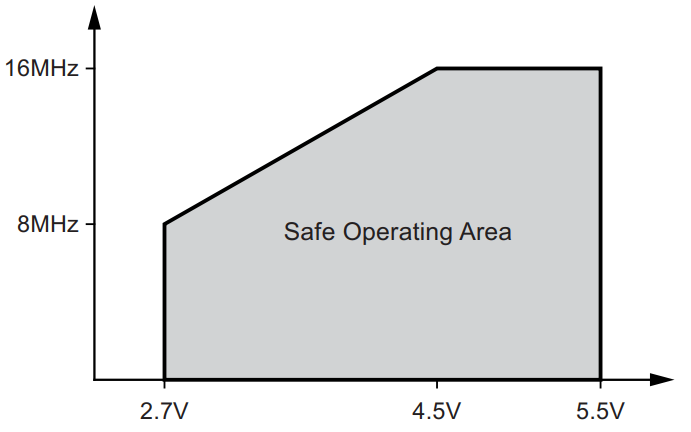
The last step of the hardware actions is to reduce the operation voltage. When the operation voltage is reduced, the power consumption is also reduced (P=V*I). But if you want to reduce the operation voltage you have also to reduce the clock speed, that we already did in the previous section.
The dependency between the operation voltage and the clock speed can be found in the datasheet of the Arduino microcontrollers. The following pictures shows this dependency for the ATmega328 and ATmega2560.
ATmega328
ATmega2560
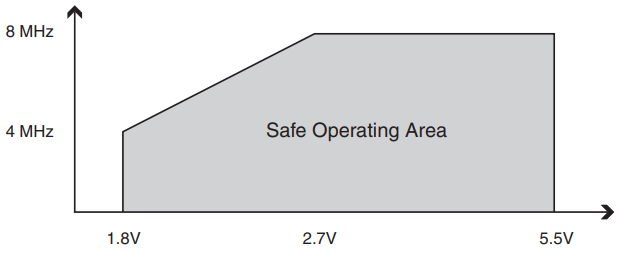
The following table gives you an overview about the considered Arduino boards, the build in microcontroller, the reduced minimum supply voltage with the belonging clock speed and also the normal minimum supply voltage with the standard clock speed.
Reduce Clock Speed and Operation Voltage - Measurement
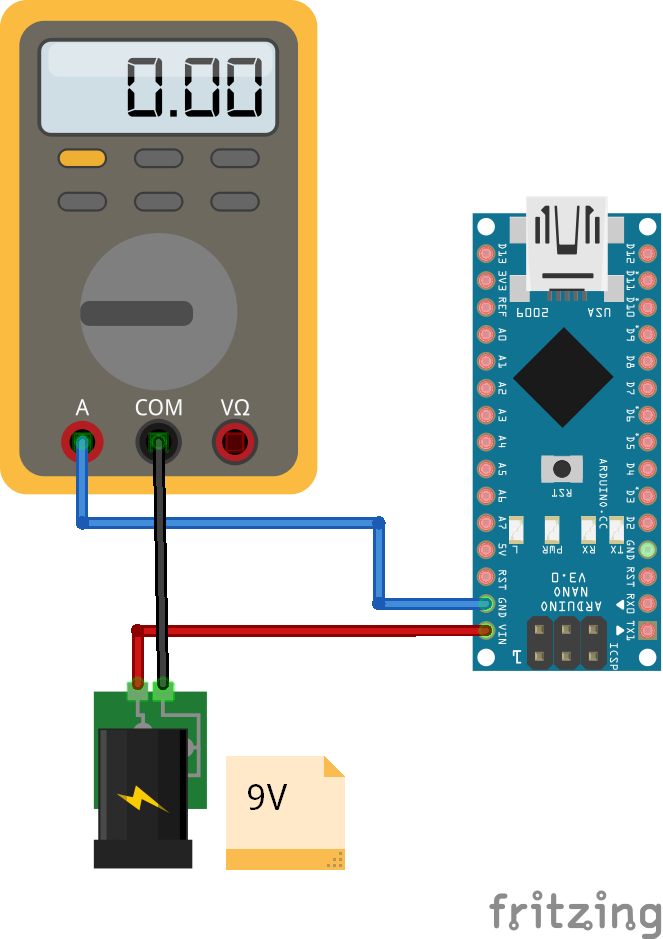
For the measurement of the current consumption, I connect the Arduino boards on the 3.3V pin directly to the power supply and reduce the supply voltage from 9V to 3.3V. The following pictures show the different wiring for the 3.3V setup.
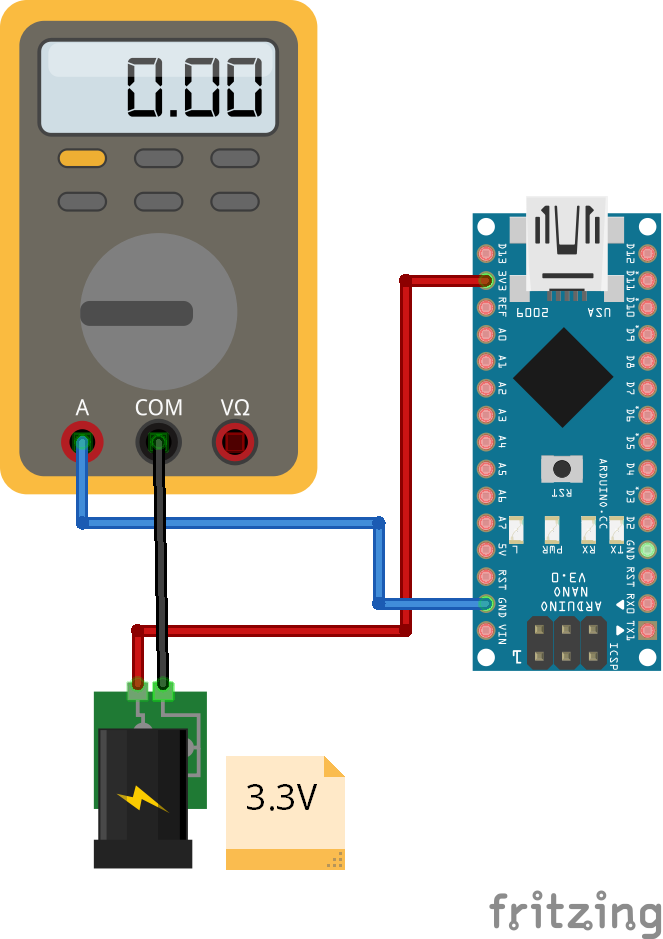
Reduce Operation Voltage Arduino Nano
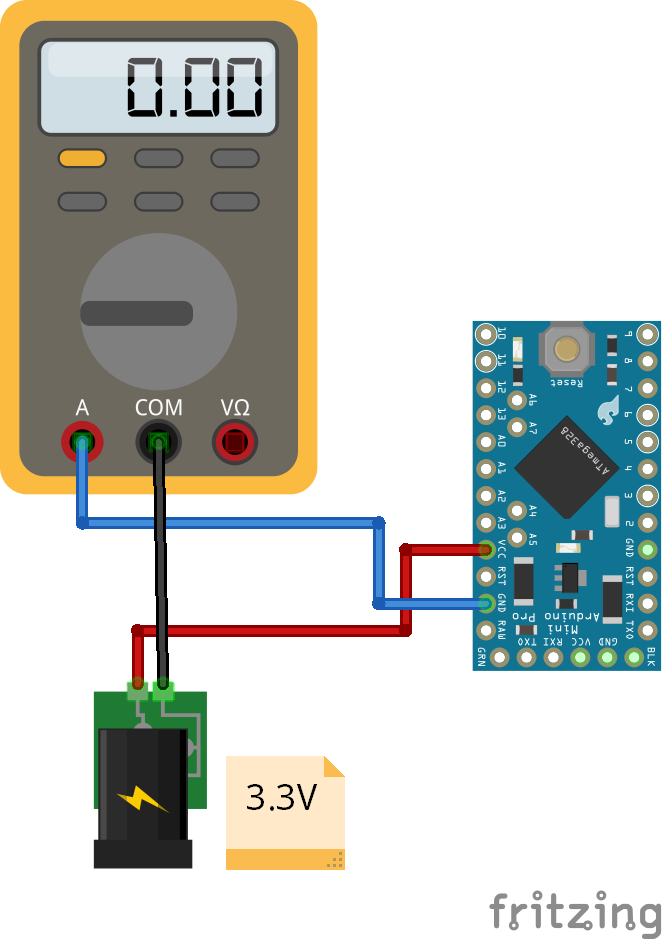
Reduce Operation Voltage Arduino Pro Mini

Reduce Operation Voltage Arduino Uno
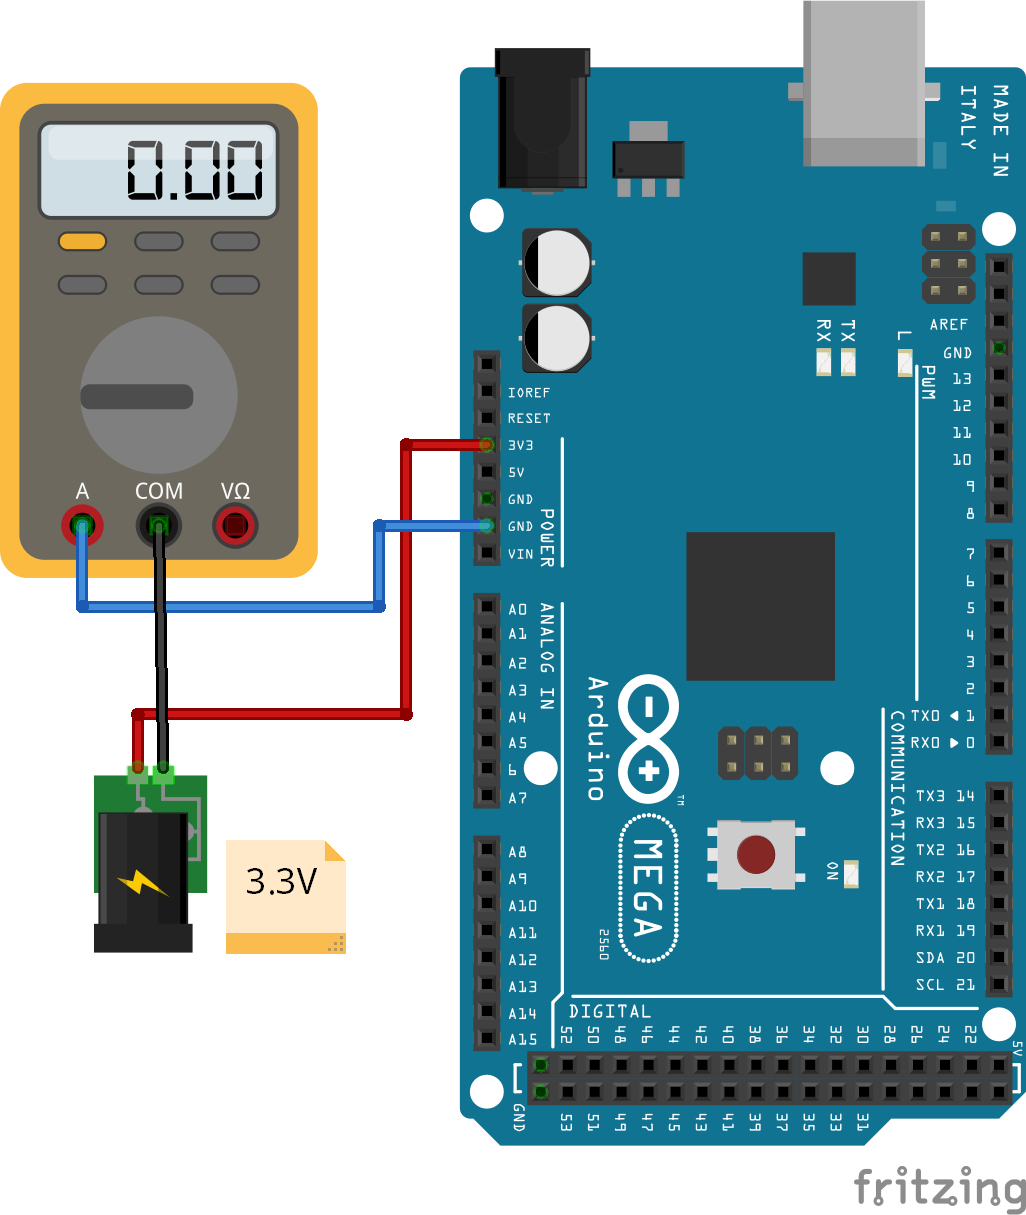
Reduce Operation Voltage Arduino Mega
Because the inbuilt voltage regulator need a higher voltage to operate, you have to bypass the external voltage regulators and connect the power supply directly to the 3.3V pin. If you want to know how to bypass the voltage regulator or use an external voltage regulator with a lower minimal voltage, visit the Arduino battery power tutorial.
I use the same Arduino script like for the reduced clock speed. The following bar-chart shows the measurements of the power consumption for the reduced clock speed and operation voltage.
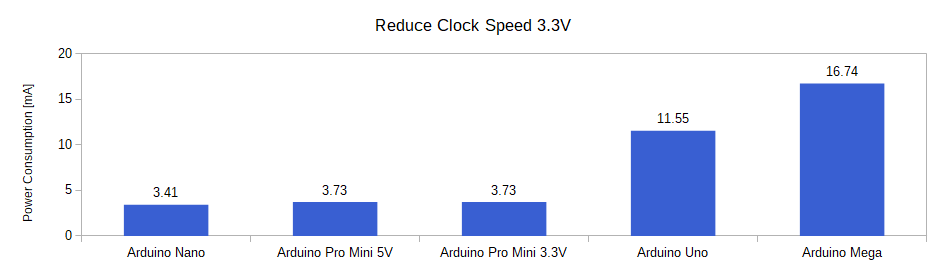
With the reduction of the operation voltage we see that the current consumption is further reduced for the Arduino microcontroller boards.
- The reduction of the operation voltage has the highest impact on the hardware site, because you can reduce the voltage on average by over 70% in combination with the reduction of the clock speed.
- The Arduino Nano and Arduino Mega had only a small reduction by the reduced clock speed with around 16% decrease in current consumption but saw a high reduction after the supply voltage drops to 3.3V. Therefore the current consumption reduces by 84.54% for the Arduino Nano and by 77.13% for the Arduino Mega.
- Because the only difference for the Arduino Pro Mini in the 5V and 3.3 version is the clock speed and the operation voltage, the current consumption is the same after the measures with 3.73mA.
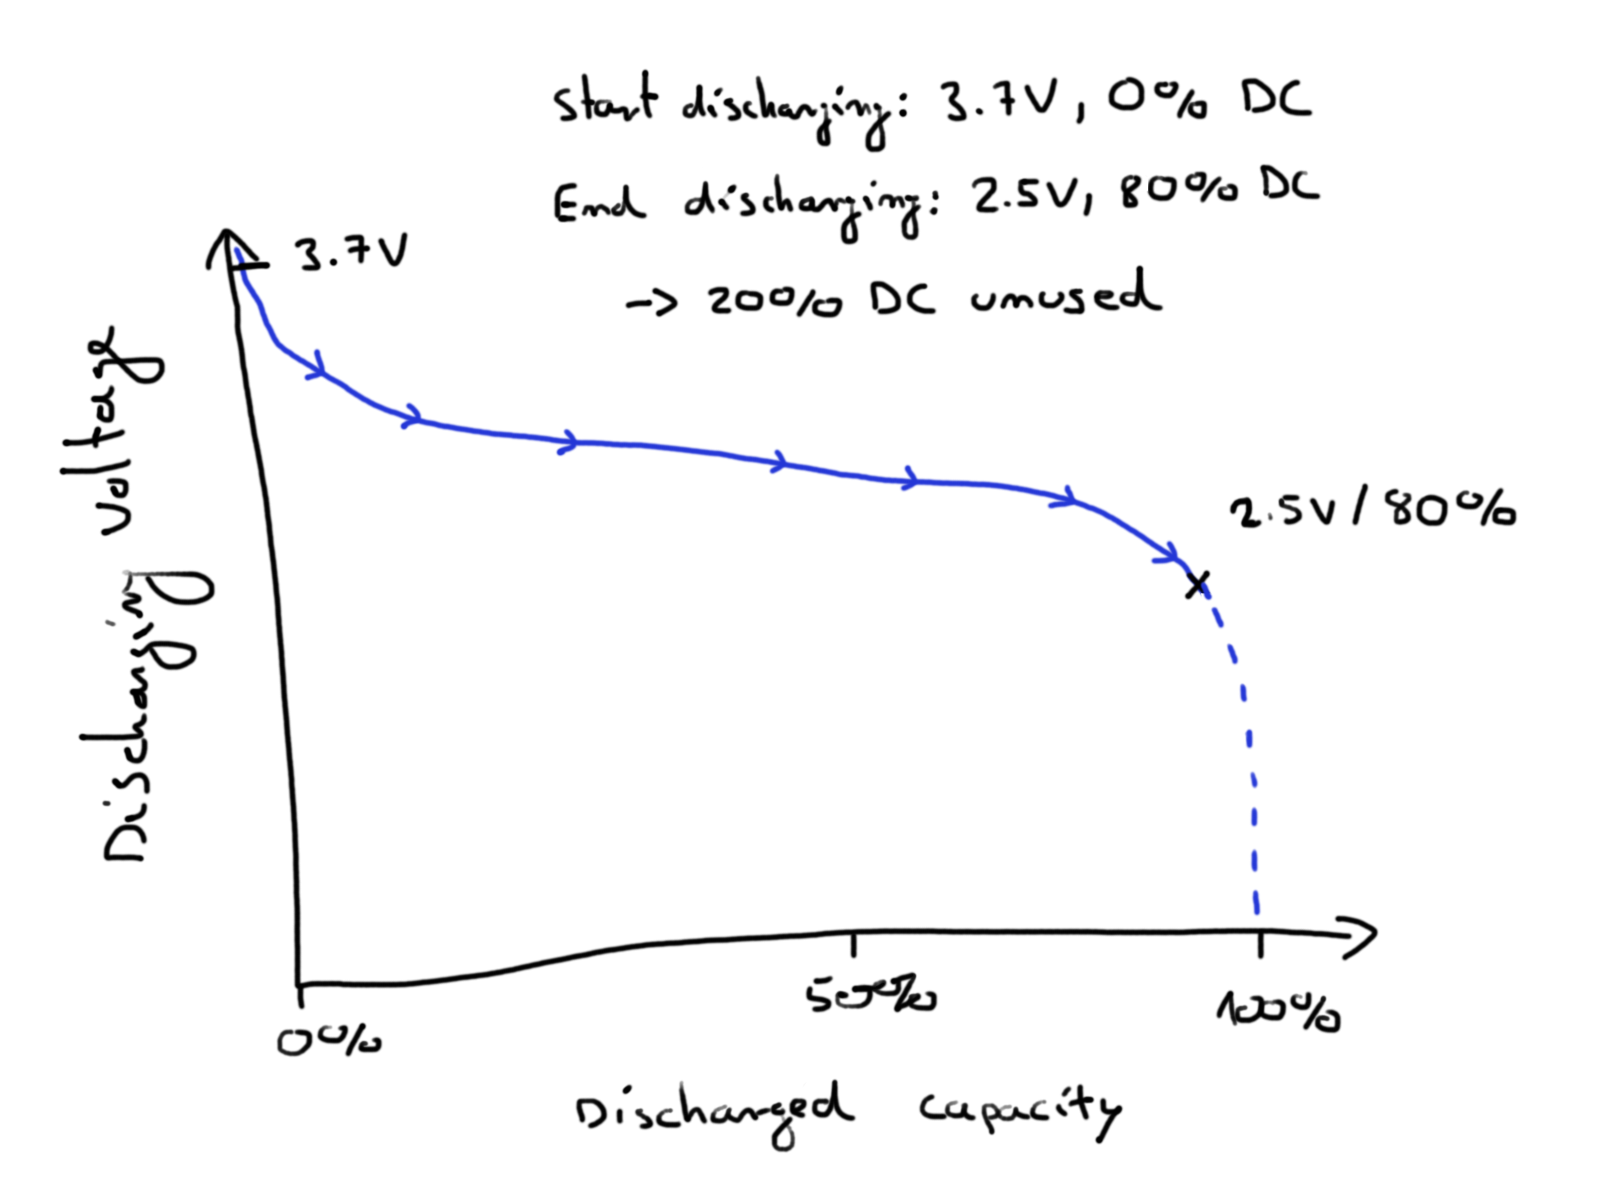
Influence of the reduced operation voltage on battery powered systems
The reduction of the supply voltage has also another positive effect, if your power source for the Arduino microcontroller is a battery. The battery voltage is reduced until the minimal voltage of the microcontroller is reached. If you reduce the operation voltage of the microcontroller, the time until this threshold is reached is extended, see the following picture.
Use the Arduino Low Power Mode
After the three hardware techniques to reduce the Arduino power consumption, we use the Arduino Low Power Mode to reduce the power consumption even further. The Low Power Mode disables all of the following functions that use power to run:
Inactive
Timer 0,1,2
SPI and UART Communication
External Oscillator
Active
Two-wire interface
Watchdog
External Interrupt
You can also disable two other features of the ATmega microcontroller but the settings of the library that we use lets you decide if you want to enable or disable the functionality.
- Analog to digital converter (ADC): The analog to digital converter are used at the digital I/O pins of the Arduino board. An analog input voltage between 0V and VCC is converted to a digital value by a 10-bit converter for example. Therefore the voltages are converted to a digital value between 0 and 1023.
- Brown-out detector (BOD): The brown-out detector monitors the system voltage and makes sure that in case the system voltage drops under a threshold, the Arduino microcontroller is powered down until the system voltage increased above the threshold.
To enable the Low Power Mode we use the Low-Power library from rocketscream. You can not add the Low-Power library like a standard library in the Arduino IDE but the following 3 steps add the library manually to the Arduino IDE.
- Download the library as ZIP folder from the official github page from rocketscream.
- Unzip the downloaded folder and add the folder to the library root folder
- Rename the folder so that there is no version name
Low Power Mode Arduino Code
The following lines show the Arduino code for the Low Power Mode. We want to measure the power consumption for the Low Power Mode with an operation voltage of 9V and 3.3V. Therefore we have to differentiate in the Arduino code, if we have to reduce the clock speed or not. For the 9V measurement comment out the two lines in the setup function.
#include "LowPower.h"

void setup()
{
  CLKPR = 0x80; // (1000 0000) enable change in clock frequency
  CLKPR = 0x01; // (0000 0001) use clock division factor 2 to reduce the frequency from 16 MHz to 8 MHz
}

void loop()
{
  delay(4000);
  LowPower.powerDown(SLEEP_2S, ADC_OFF, BOD_OFF);
}
In the first line we include the low power library from rocketscream. You already know the setup function where we reduce the clock frequency. In the loop function I wait for 4 seconds until the Arduino board enters the low power mode for 2 seconds where we also disable the analog to digital converter and the brown-out detector to further reduce the current consumption.
There is also the possibility to configure the low-power library that the microcontroller wakes up by an external trigger. But if you define a time for the sleep time, you can’t just arbitrarily choose how long to sleep for. The watchdog timer only has specific periods (defined by dividing the clock by a set amount) that it can sleep for:
enum period_t
{
    SLEEP_15MS,
    SLEEP_30MS,
    SLEEP_60MS,
    SLEEP_120MS,
    SLEEP_250MS,
    SLEEP_500MS,
    SLEEP_1S,
    SLEEP_2S,
    SLEEP_4S,
    SLEEP_8S,
    SLEEP_FOREVER
};
Low Power Mode - Measurements
Because we want to test the influence of the operation voltage on the Low Power Mode, we have to make two different measures per microcontroller.
Lower Power Mode with 9V
If we only want to test the low power library we connect the VIN pin to the power source and in the code we comment the lines that reduce the clock speed.
The following bar-chart shows the current consumption of the Arduino boards in the Low Power Mode with an operation voltage of 9V.
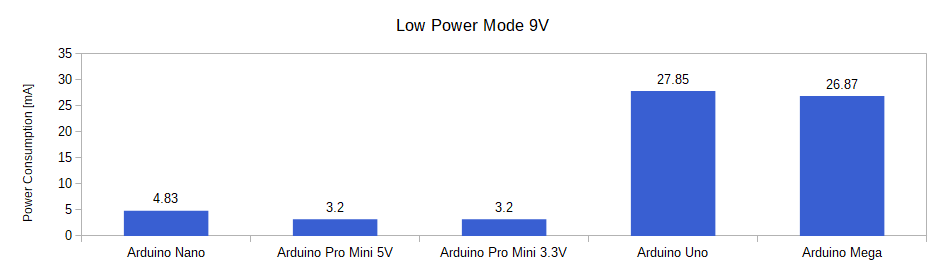
Now it is the first time in this tutorial where we see that the current consumption increases due to the increased operation voltage of 9V compared to the 3.3V from the previous chapter.
The power consumption of the Arduino Nano increases from 3.41mA in the measurement with the reduced clock speed and operation voltage of 3.3V to 3.83mA. Also the Arduino Uno and Arduino Mega have a higher power consumption in the Low Power Mode with 9V compared to the reduced clock speed and operation voltage of 3.3V.
But for the Arduino Pro Mini, the power consumption is reduced to 3.2mA from 3.73mA.
But it does not only depends on the Arduino board if you should use the Low Power Mode with 9V voltage supply over the reduced clock speed with 3.3V operation voltage. If you have a sensor or any other electronic component connected to the Arduino board that needs a supply voltage of 5V, then you have to choose the Lower Power Mode with 9V supply voltage to provide a stable 5V supply voltage to the sensor.
Lower Power Mode with 3.3V
If we can reduce the supply voltage, we have to combine all measures that we did before. Therefor we connect the power supply to the 3.3V pin and reduce the clock frequency in the Arduino code.
The following bar-chart shows the current consumption of the Arduino boards in the Low Power Mode with an operation voltage of 3.3V.
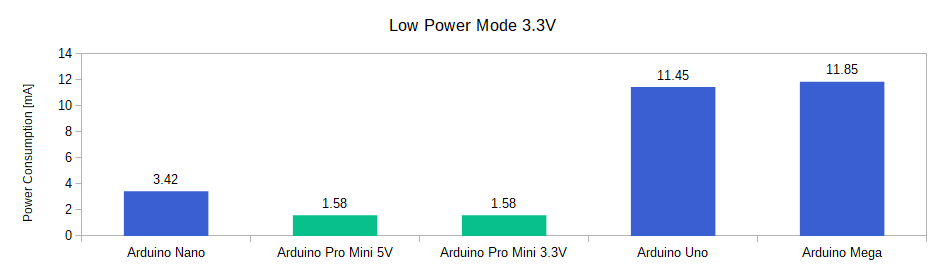
If we do not need any 5V supply voltage in the circuit, the combination of Lower Power Mode, reduced clock speed and therefore 3.3V supply voltage has the lowest power consumption of all measurements.
The power consumption of the Arduino Uno is reduced by 88.37% from 98.43mA to 11.45mA. Also the Arduino Mega has a very low power consumption of 11.85mA for the size of the board.
The lowest current consumption has the Arduino Pro Mini with 1.58mA. We could reduce the consumption for the Arduino Pro Mini 3.3V by 69.20% and for the Arduino Pro Mini 5V by 89.19%.
The following picture shows the current measurement for the Arduino Pro Mini directly from the multimeter.
From the screenshot you see that the Arduino Pro Mini 3.3V enters periodically the power down mode and reduces the current from 5.25 mA to 1.58 mA.
If you have any questions regarding the reduction of current consumption for Arduino boards, please use the comment section below to ask questions. I will answer them as soon as possible.
All I can say “WOW you are so good at what you are doing to help us !”
Thank you, Thank you, Thank you so very much.
I wish I could do as well as you do.
Stay well.
Dave
Hi Dave,
I created all this in around one year and since then I am constantly learning, also from comments unter the articles. It takes some time but if you are constantly learning, you make progress.
Great tutorial. My question is, if you set the value of Sleep_Forever how would you wake the MCU again? For example, if I wanted a battery powered system to read values off an IIC sensor once every hour, write the values to an SD card, transmit the values to the cloud and then go to sleep for an hour. It seems like Sleep_Forever is the best option for power savings. Would an external timer be able to trigger the mcu to wake or is there a better way to handle long duration sleep cycles?
Hi Brain, you got 2 options for your use case that are in my mind.
1) Use an external real-time clock (RTC) that is able to generate an interrupt after one second. Then you have to define that the Arduino wake-up reason is external
2) Use a for loop that loop XX times over the 8 seconds.
// 1 hour = 60x60x1 = 3600 s
// 14400 s / 8 s = 450
unsigned int sleepCounter;
for (sleepCounter = 450; sleepCounter > 0; sleepCounter–)
{
LowPower.powerDown(SLEEP_8S, ADC_OFF, BOD_OFF);
}
Thanks for a great tutorial.
I have only tried changing the clock speed so far, but I found that I had to change the baud rate on the serial monitor by the same amount, e.g. half the clock speed, half the baud rate.
Cheers
Andrew
Hi,
Should the for statement above be;
unsigned int sleepCounter;
for (sleepCounter = 3; sleepCounter > 0; sleepCounter–) {
LowPower.powerDown(SLEEP_8S, ADC_OFF, BOD_OFF);
}
?
Thanks
Andrew
Hi Andrew,
SLEEP_8S sets the deep sleep time to 8 seconds. In your for loop you will loop 3 times that results in 3×8 seconds = 24 seconds.
Hi,
Very good tutorial. Is it possible to combine low power mode with external interrupts? Reason is use low power mode with an RTC to awake arduino. What would be the best configuration for doing this?
Im thinking maybe the consumption of an RTC+arduino in sleep mode es bigger than only an arduino in low power mode like you describe here? if this is the case, the RTC will only be recommended when precission for doing something is required, if not, i suppose you can use function sleep(time) in low power mode.
Thank you