Infrared Sensor Tutorial for Arduino, ESP8266 and ESP32
In this tutorial we will see how to use an infrared sensor. We take a look at three different types of infrared modules.
- Infrared sensor for object detection.
- Passive infrared sensor to detect a person in front of a device like a monitor.
- Infrared distance module which can be used in robotic use cases where a car follows a line.
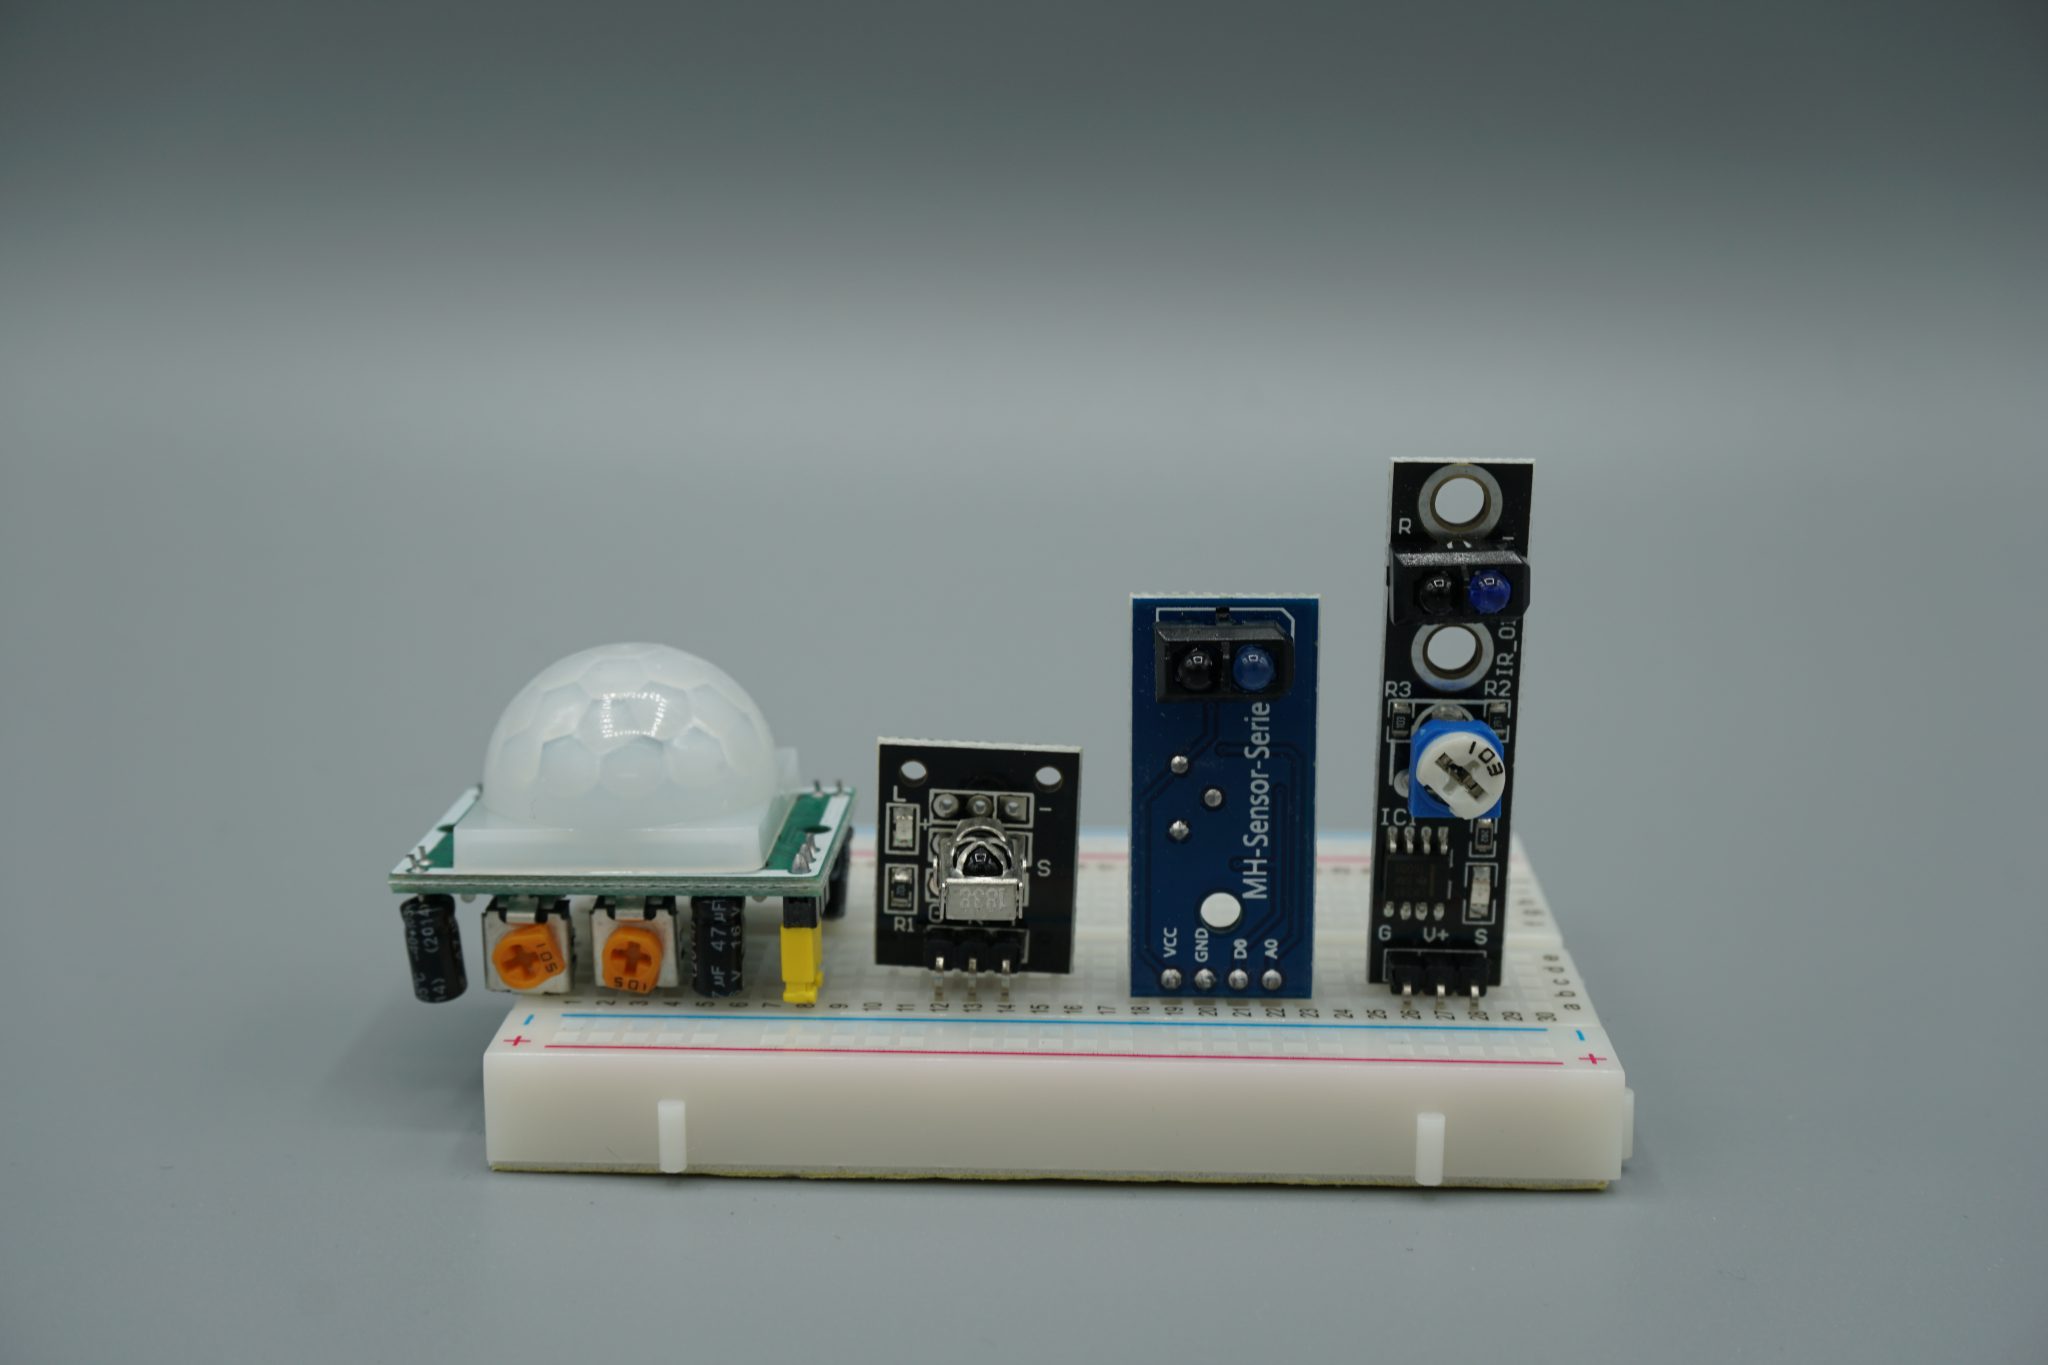
Table of Contents
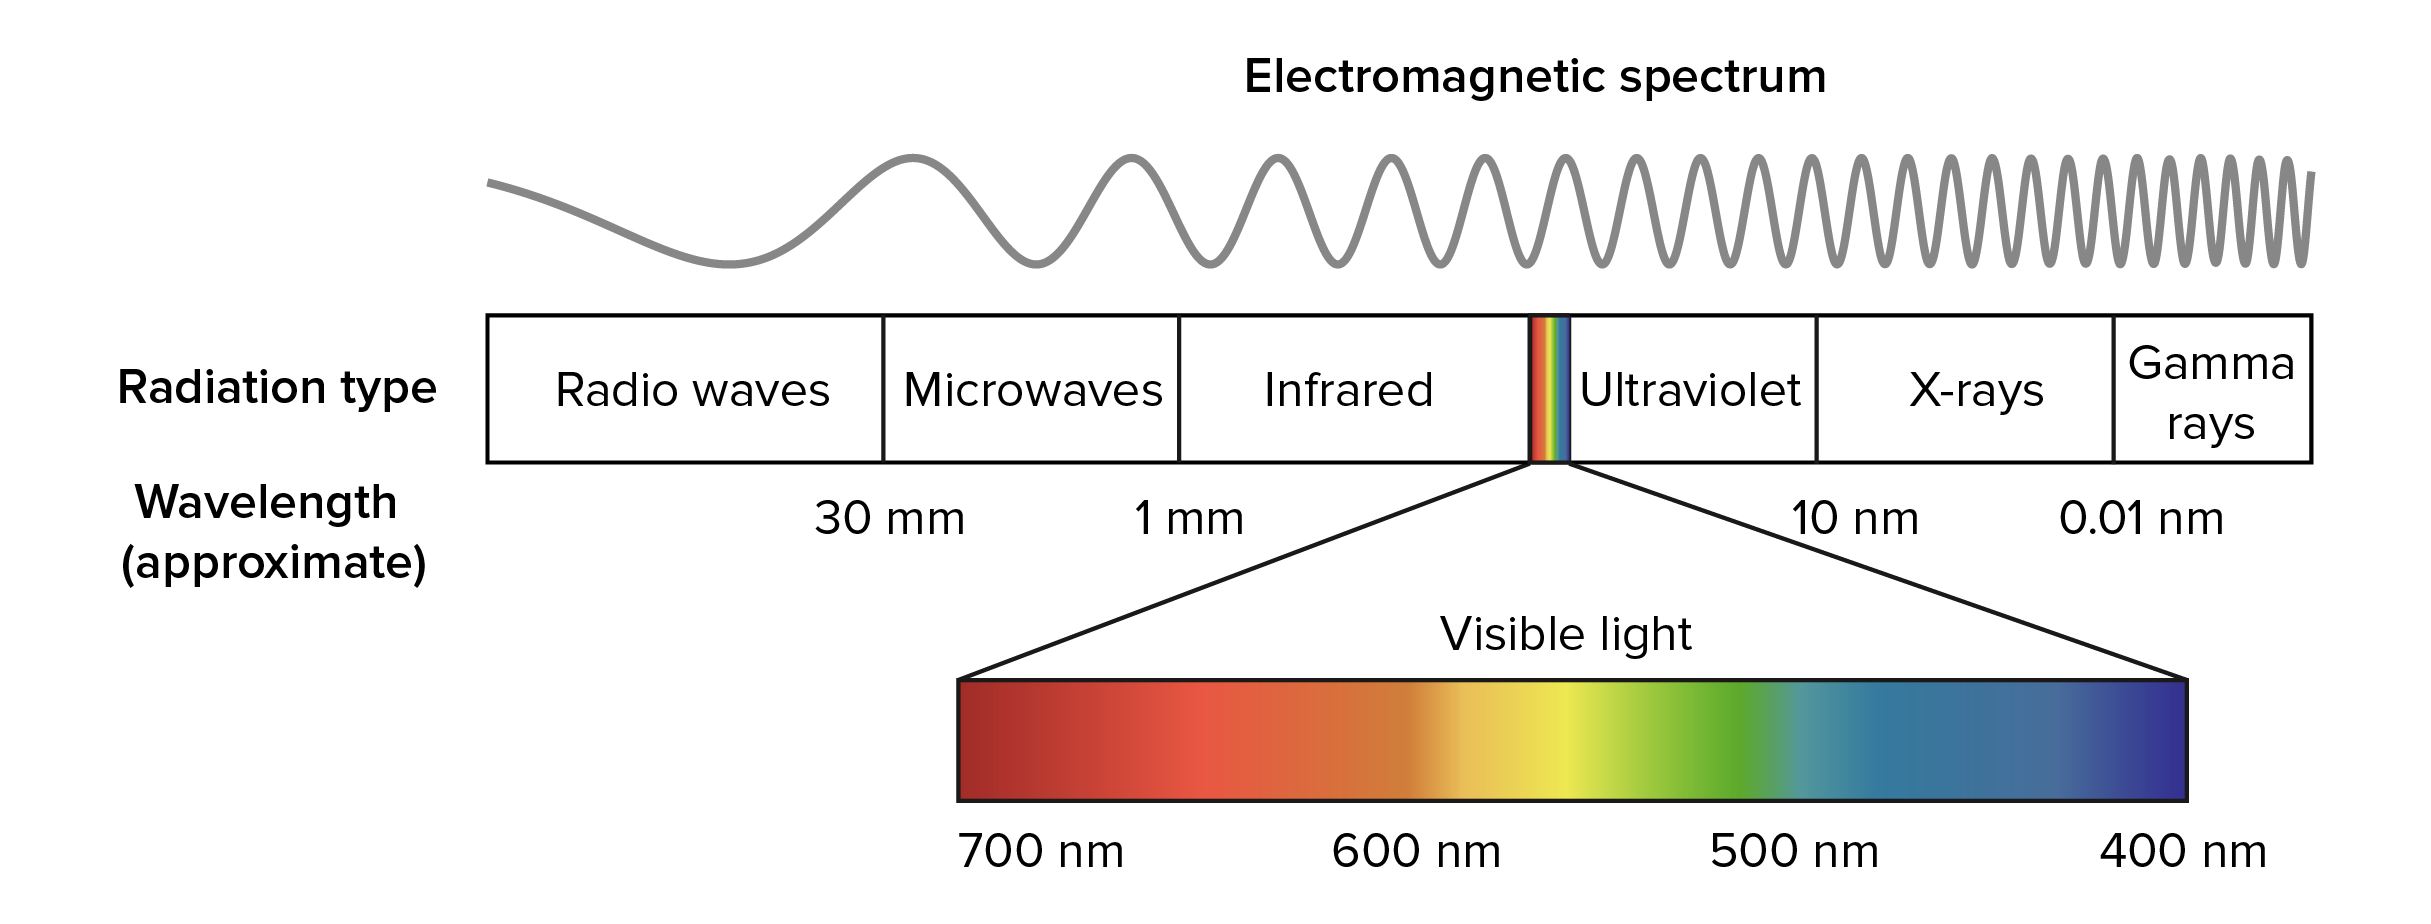
Infrared radiation (IR) or infrared light is an electromagnetic radiation (EMR) and carries radiant energy like all EMR. Although IR behaves both like a wave and like its quantum particle, the photon.
Infrared light is not visible for humans because of longer wavelength as the human eye is capable to see:
- Wavelength infrared: 700nm to 1000nm
- Human visible wavelength: 400nm to 700nm
The following pictures gives you an overview about the electromagnetic spectrum.
But there is a possibility to see the infrared light. You can see the light via your mobile phone, because the camera of you mobile phone see the light emitted by the infrared diode. You will see that the light is flickering because the infrared diode will turn on an off very fast. There is a rhythm behind this behavior which is necessary to encode the information sent from the diode.
Therefore we can use the IR by sending information as analog signals and encode these signals with a sensor. The following chapters describe normal infrared sensors and passive infrared sensors. Moreover we will discuss the use of infrared distance modules.
NEC Infrared Transmission Protocol
The NEC IR transmission protocol uses pulse distance encoding of the message bits. Each pulse burst (mark – RC transmitter ON) is 562.5µs in length, at a carrier frequency of 38kHz (26.3µs). Logical bits are transmitted as follows:
- Logical ‘0’ – a 562.5µs pulse burst followed by a 562.5µs space, with a total transmit time of 1.125ms
- Logical ‘1’ – a 562.5µs pulse burst followed by a 1.6875ms space, with a total transmit time of 2.25ms
When a key is pressed on the remote controller, the message transmitted consists of the following, in order:
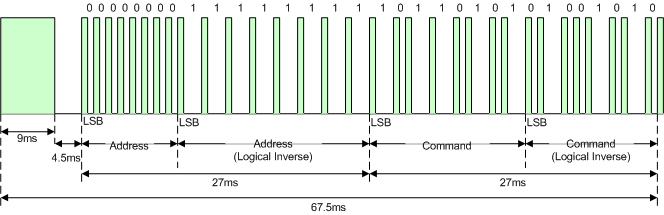
- a 9ms leading pulse burst (16 times the pulse burst length used for a logical data bit)
- a 4.5ms space
- the 8-bit address for the receiving device
- the 8-bit logical inverse of the address
- the 8-bit command
- the 8-bit logical inverse of the command
- a final 562.5µs pulse burst to signify the end of message transmission
The following table gives you an overview of all components and parts that I used for this tutorial. I get commissions for purchases made through links in this table.
| Arduino Uno | Amazon | Banggood | AliExpress | |
| OR | ESP8266 NodeMCU | Amazon | Banggood | AliExpress |
| OR | ESP32 NodeMCU | Amazon | Banggood | AliExpress |
| AND | VS1838B Infrared Sensor | Amazon | Banggood | AliExpress |
| AND | HC-SR501 passive Infrared Sensor | Amazon | Banggood | AliExpress |
| AND | TCRT5000 Infrared Distance Module | Amazon | Banggood | AliExpress |
Infrared Sensor
With the help of an infrared sensor the Arduino board is able to receive information from an infrared remote and take action based on the button you pushed on the infrared remote. Therefore the sensor scans specific frequency ranges, defined by standards, and convert these signals to the output pins of the sensor. The most basic infrared sensor is the VS1838B.
For operation the sensor receives and IR signal which have to be encoded.
There is the library “IRremote” from Ken Shirriff which encode the light pulse and will output a HEX code depending on the information sent by the infrared diode. I suggest to use the library because the decoding of the different manufacturer is quite difficult. You find here the article how to install a library in your Arduino IDE. You find the regarding library in the search field with the keyword “irremote”.
Sadly the library “IRremote” does not support boars based on the ESP8266 like the NodeMCU. But there is another library called “IRremoteESP8266” you have to use.
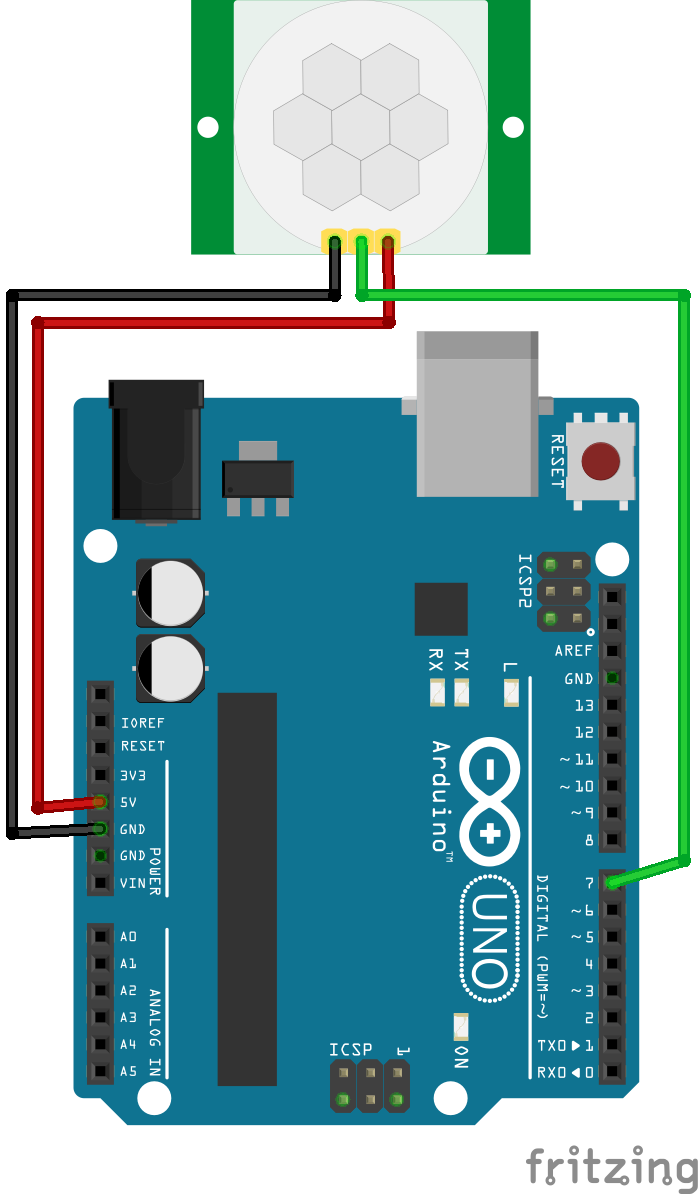
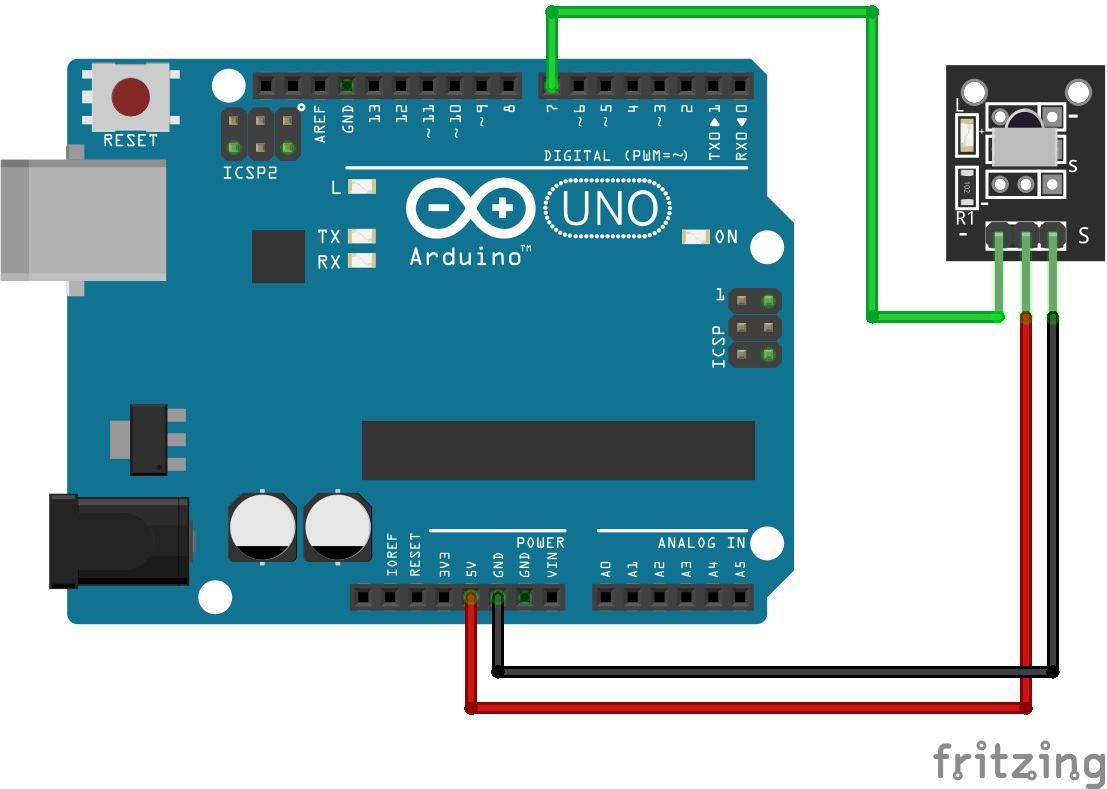
The following picture shows the connections between the infrared sensors and the Arduino Uno and the NodeMCU.
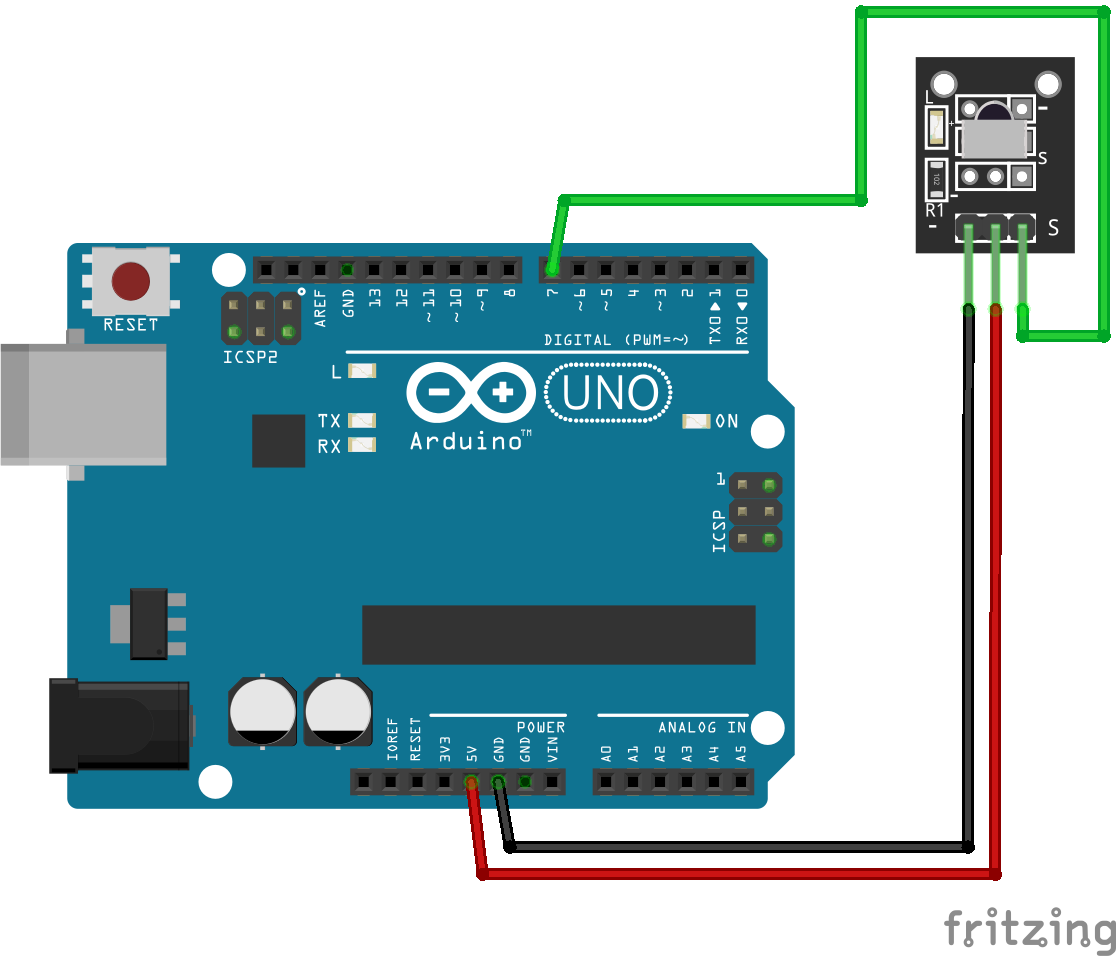

After we connect our devices we will go into the code. Our objective is to print out the code in HEX and Decimal (DEZ) when we push different buttons on the infrared remote control. In this example I use my TV remote control.
#include "IRremote.h"

const int RECV_PIN = 7;
IRrecv irrecv(RECV_PIN);
decode_results results;

void setup(){
  Serial.begin(9600);
  irrecv.enableIRIn();
  irrecv.blink13(true);
}

void loop(){
  if (irrecv.decode(&results)){
        Serial.println(results.value, HEX);
        Serial.println(results.value, DEC);
        irrecv.resume();
        Serial.println();
  }
}
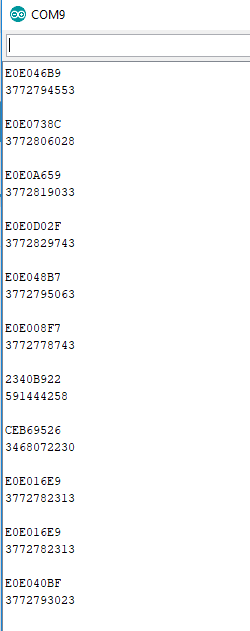
With the help of this example you can identify all key codes of the remote control. After the identification you are able to react to different buttons on the remote control. On example could be that you want to turn on a red LED when you press volume up and you turn on a green LED when you press volume down on you remote control. Feel free to think about different use cases and try to program the corresponding sketch.
What if I do not know which protocol to use?
#include "IRremote.h"

const int RECV_PIN = 7;
IRrecv irrecv(RECV_PIN);
decode_results results;

void setup(){
  Serial.begin(9600);
  irrecv.enableIRIn();
  irrecv.blink13(true);
}

void loop(){
  if (irrecv.decode(&results)){
        switch (results.decode_type){
            case NEC: Serial.println("NEC"); break ;
            case SONY: Serial.println("SONY"); break ;
            case RC5: Serial.println("RC5"); break ;
            case RC6: Serial.println("RC6"); break ;
            case DISH: Serial.println("DISH"); break ;
            case SHARP: Serial.println("SHARP"); break ;
            case JVC: Serial.println("JVC"); break ;
            case SANYO: Serial.println("SANYO"); break ;
            case MITSUBISHI: Serial.println("MITSUBISHI"); break ;
            case SAMSUNG: Serial.println("SAMSUNG"); break ;
            case LG: Serial.println("LG"); break ;
            case WHYNTER: Serial.println("WHYNTER"); break ;
            case AIWA_RC_T501: Serial.println("AIWA_RC_T501"); break ;
            case PANASONIC: Serial.println("PANASONIC"); break ;
            case DENON: Serial.println("DENON"); break ;
          default:
            case UNKNOWN: Serial.println("UNKNOWN"); break ;
          }
        irrecv.resume();
 }
}
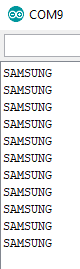
Because I used for my example the TV remote control, you see that I have a Samsung TV.
Passive Infrared Sensor
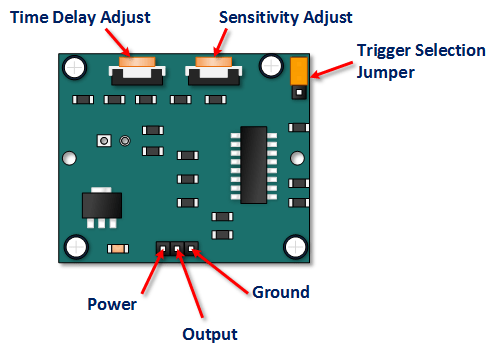
The HC-SR501 has a build in voltage regulator on the PCB. Because the HC-SR501 is designed for Arduino boards, the sensor requires an operation voltage of 5V. However there is a possibility to get the HC-SR501 running for NodeMCU. You have to connect the Power Pin with the middle pin of the voltage regulator.
Passive infrared sensors are often used in systems when a device like a monitor should come back from energy save mode. Also these kind of sensors are used in motion alarm detectors.
All objects above a temperature of absolute zero emit heat energy in form of infrared radiation. Passive infrared (PIR) sensors like the HC-SR501 convert these infrared radiation into output voltage. Therefore the movement of an object results in a change in the infrared radiation level is detected by the PIR sensor.
After switching the sensor on, the PIR sensor requires 60 seconds to stabilize the current level of radiation. The HC-SR501 sensor has a 110 degree field of view and an operating range of 6 meters because of the Fresnel lenses. After a movement is detected the output is HIGH for 2.5 seconds after the movement is detected and switches back to LOW after the time.
With the use of the build in potentiometer you can adjust the time delay and the sensitivity of the sensor. The following table shows both maximum position of the potentiometer and the resulting settings.
| Position of potentiometer | Degree of sensitivity | Time delay | Distance range |
| Most counterclockwise | High sensitivity | 2.5 seconds | 3 meters |
| Less counterclockwise | Low sensitivity | 5 minutes | 7 meters |
int inputPin = 7;               // input pin (for PIR sensor)
int pirState = LOW;             // we start, assuming no motion detected
int val = 0;                    // variable for reading the pin status

void setup() {
  pinMode(inputPin, INPUT);     // declare sensor as input
  Serial.begin(9600);
}

void loop(){
  val = digitalRead(inputPin);  // read input value
  if (val == HIGH) {            // check if the input is HIGH
    if (pirState == LOW) {
      // we have just turned on
      Serial.println("Motion detected!");
      // We only want to print on the output change, not state
      pirState = HIGH;
    }
  } else {
    if (pirState == HIGH){
      // we have just turned of
      Serial.println("Motion ended!");
      // We only want to print on the output change, not state
      pirState = LOW;
    }
  }
}
Infrared Distance Module
The ultrasonic distance sensor is not the only sensor to detect if an object is in a predefined range in front of a sensor. There is also the infrared distance module. As sensor the TCRT5000 infrared distance module includes an infrared emitter and receiver and a potentiometer and is most often used. The module has also a potentiometer to define the threshold when an object is detected.
If the sensor is connected to the power source, the infrared diode is emitting the infrared light continuously. The distance measured by the sensor depends on the color of the surface. Different colors are measured by the reflecting factor because a black surfaces reflects less light than a white surface. Therefor the sensor is often used in follow the line robot projects. In our example we will investigate the impact of different colors on the sensors measurement.
If the received signal is greater than the threshold then the TRCT500 D0 pin state changes from LOW to HIGH and the onboard LED shows that an object is located.
Infrared Distance Module without analog output
Infrared Distance Module with analog output
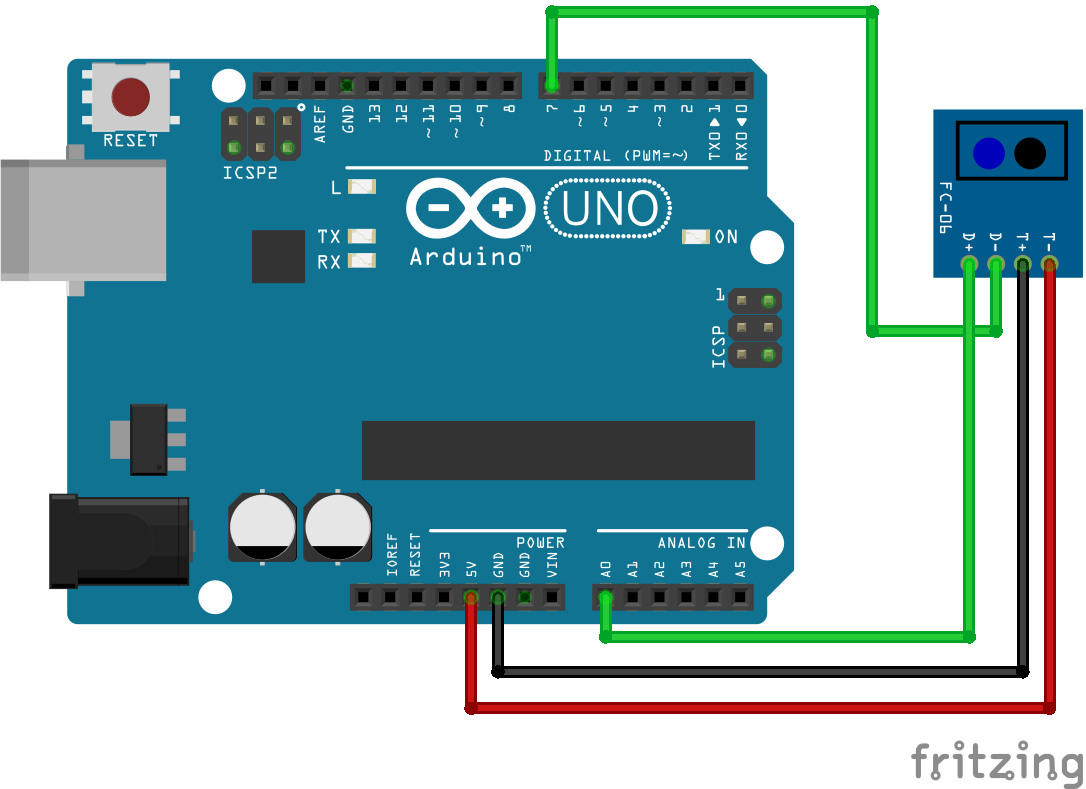
| TCRT5000 infrared distance module with analog output | TCRT5000 infrared distance module without analog output | Arduino Uno / NodeMCU |
| VCC | VCC | 5V / VIN |
| GND | GND | GND |
| D0 | D0 | Digital I/O |
| A0 | A0 |
After we connect our devices we will go into the code. Our objective is to measure different distances the sensor is able to receive and we will test the influence of different colors.
Infrared Distance Module without analog output
The distance module without analog output can not measure the distance because therefore the sensor needs the analog values. But the sensor has the digital output to detect an object.
const int trackingPin = 7;
const int ledPin = 13; //pin13 built-in led
void setup()
{
  pinMode(trackingPin, INPUT); // set trackingPin as INPUT
  pinMode(ledPin, OUTPUT); //set ledPin as OUTPUT
}
void loop()
{
  boolean val = digitalRead(trackingPin); // read the value of tracking module
  if(val == HIGH) //if it is HiGH
  {
    digitalWrite(ledPin, LOW); //turn off the led
  }
  else
  {
    digitalWrite(ledPin, HIGH); //turn on the led
  }
}
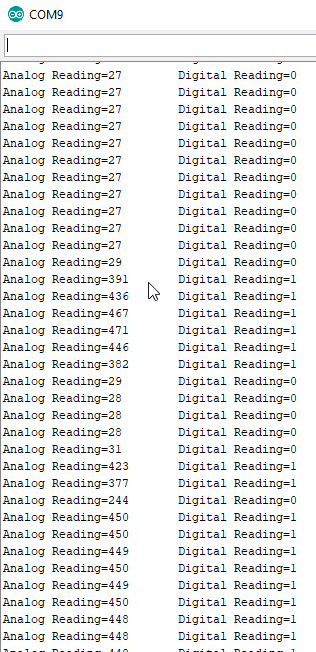
Infrared Distance Module with analog output
The infrared sensor with analog output can measure the distance to the target object and also the color of the target object.
const int pinIRd = 7;
const int pinIRa = A0;
int IRvalueA = 0;
int IRvalueD = 0;

void setup()
{
  Serial.begin(9600);
  pinMode(pinIRd,INPUT);
  pinMode(pinIRa,INPUT);

}

void loop()
{
  IRvalueA = analogRead(pinIRa);
  IRvalueD = digitalRead(pinIRd);

  Serial.print("Analog Reading=");
  Serial.print(IRvalueA);
  Serial.print("\t Digital Reading=");
  Serial.println(IRvalueD);
  delay(1000);

}
Conclusion
In this article we took a look at three different types of infrared modules. First we saw how we can detect an object with an infrared sensor. With the help of a passive infrared sensor we build a sketch how we can detect a person in front of a device like a monitor. The last sensor was the infrared distance module which can be used in robotic use cases where a car follows a line.
Do you have any further questions about the different infrared modules? Use the comment section below to ask your questions. And what are projects you would like to use the sensors in this article? If you plan to use a distance sensor for a DIY project, check out the article about the ultrasonic distance sensor.
I have a problem with my IRrecv and my decode_results in my program.
When I trie to upload I get 3 errors:
‘IRrecv’ does not name a type
‘decode_results’ does not name a type
‘class IRrecv’ has no member named ‘blink13’
can you help?
Hi Daan, IRrecv and IRrecv are classes of the IRremote library. I guess either you did not install the IRremote library from Ken Shirriff or you did not include the library in your Arduino code with #include “IRremote.h”