Ultrasonic Sensor Tutorial for Arduino, ESP8266 and ESP32
In this tutorial you learn how to use the ultrasonic distance sensor HC-SR04.
In the first part we see how ultrasonic works.
The second part extends the theoretical part with two practical examples how to use the ultrasonic sensor.
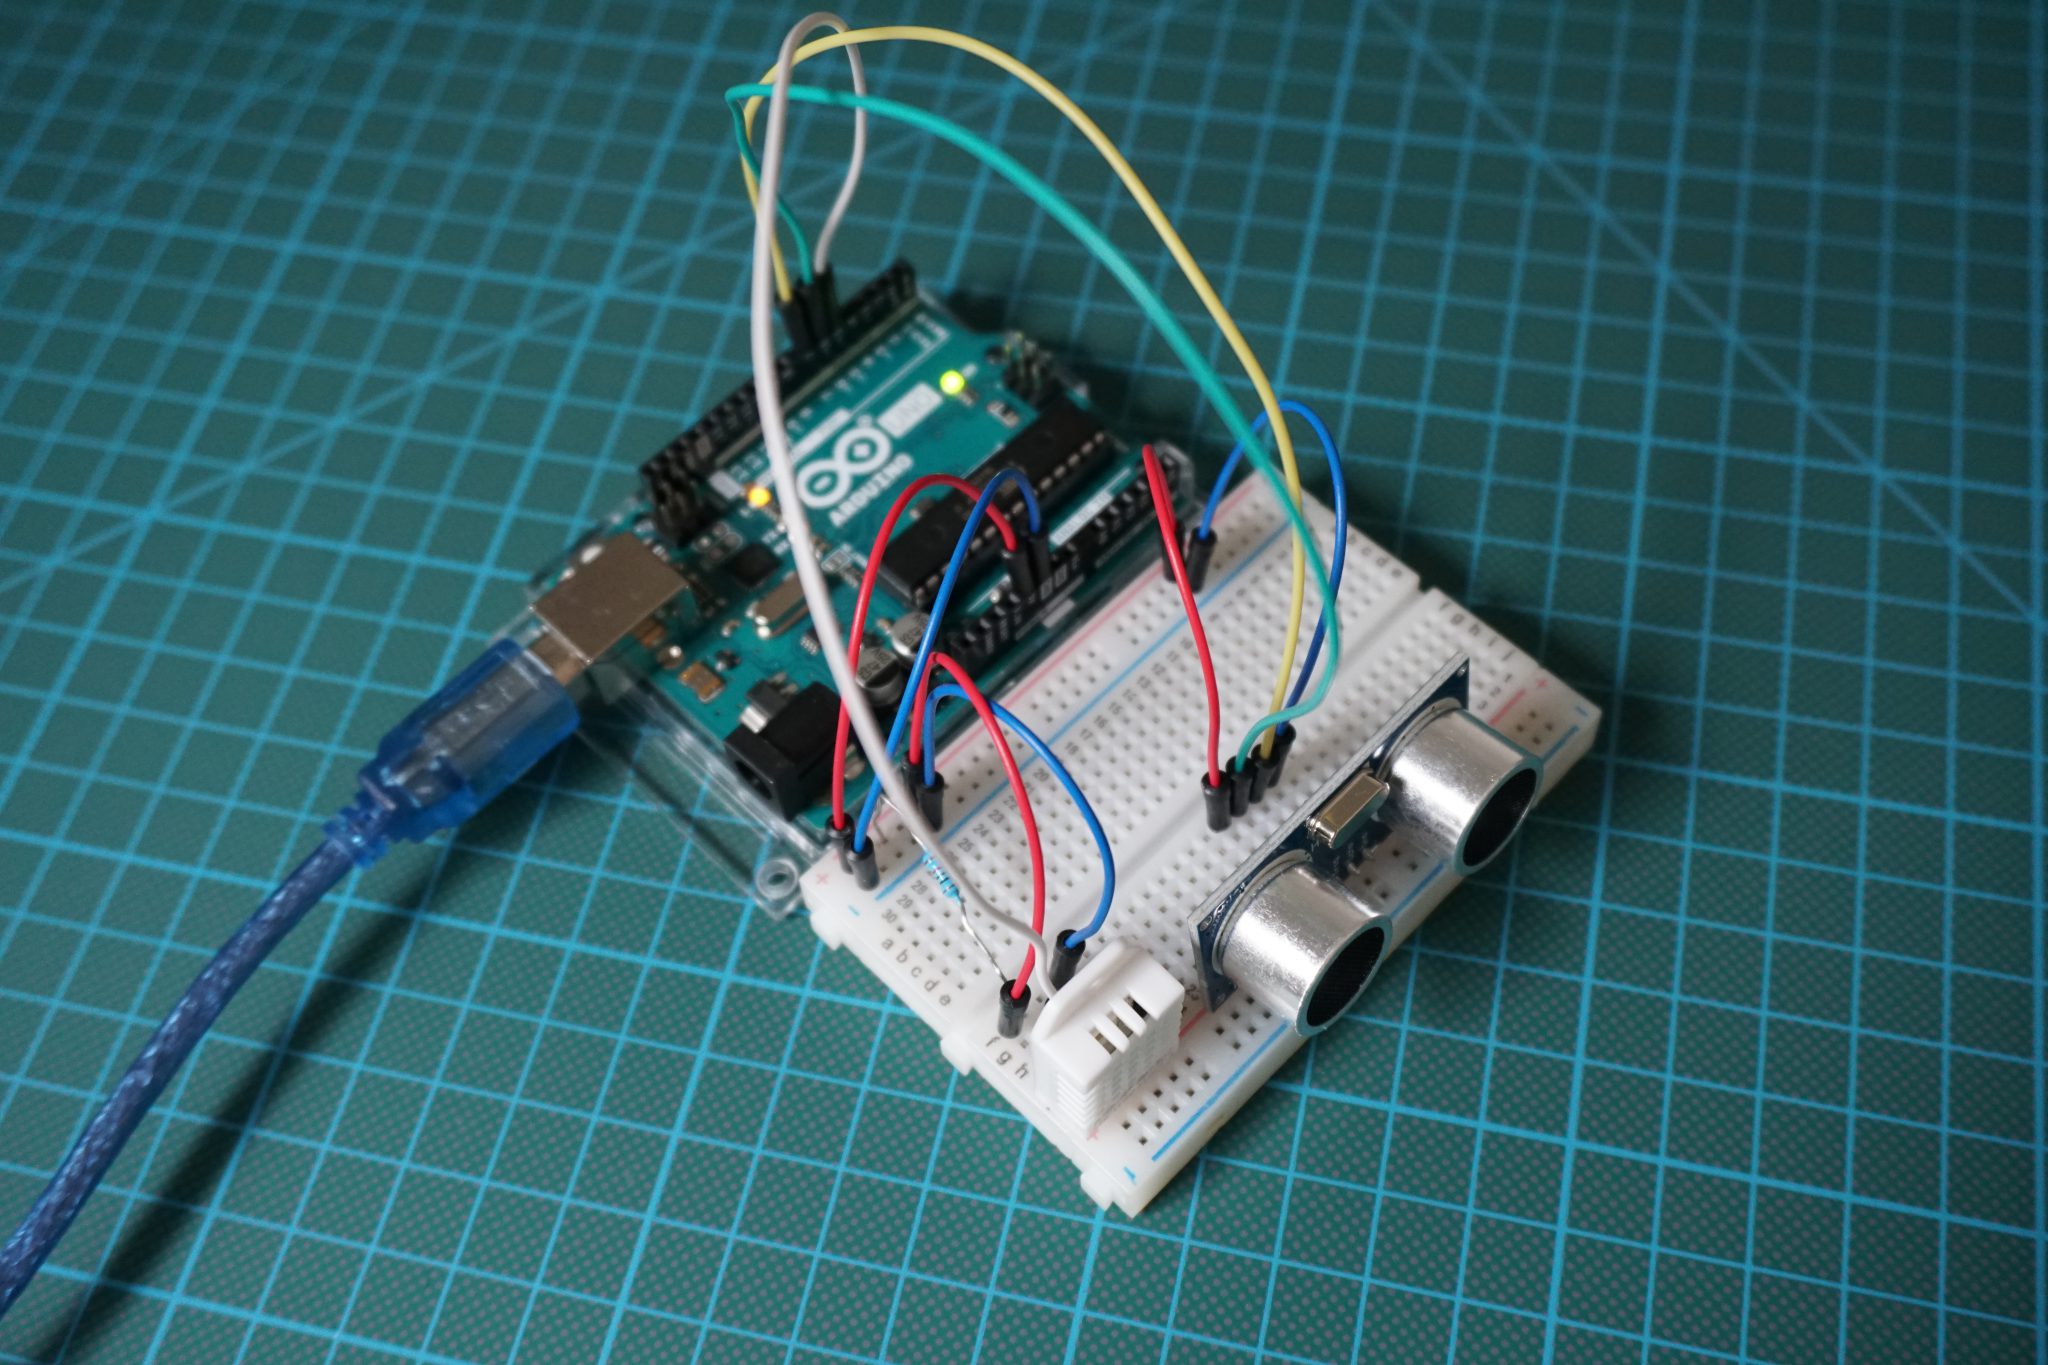
Table of Contents
Functionality of an Ultrasonic Distance Sensor
The ultrasonic distance sensor is used to measure the distance between the sensor and an object. There are a lot of robotic projects which use the sensor to identify a wall in a labyrinth and rotate the robot with the objective to find a way out of the labyrinth.
The most used sensor is the HC-SR04 ultrasonic distance sensor. This sensor can measure distances between 2cm and 4m. The measuring is done by the time taken to receive the echo of a 40 kHz ultrasonic sound wave emitted by the sensor.
For reliable measurements ultrasonic distance sensor should be perpendicular to the scanned surface horizontally and vertically. Also the scanned surface should be flat.
The following table gives you an overview of all components and parts that I used for this tutorial. I get commissions for purchases made through links in this table.
| Arduino Uno | Amazon | Banggood | AliExpress | |
| OR | ESP8266 NodeMCU | Amazon | Banggood | AliExpress |
| OR | ESP32 NodeMCU | Amazon | Banggood | AliExpress |
| AND | HC-SR04 Ultrasonic Distance Sensor | Amazon | Banggood | AliExpress |
| AND | DHT11 Module (blue) | Amazon | Banggood | AliExpress |
| OR | DHT22 Module (white) | Amazon | Banggood | AliExpress |
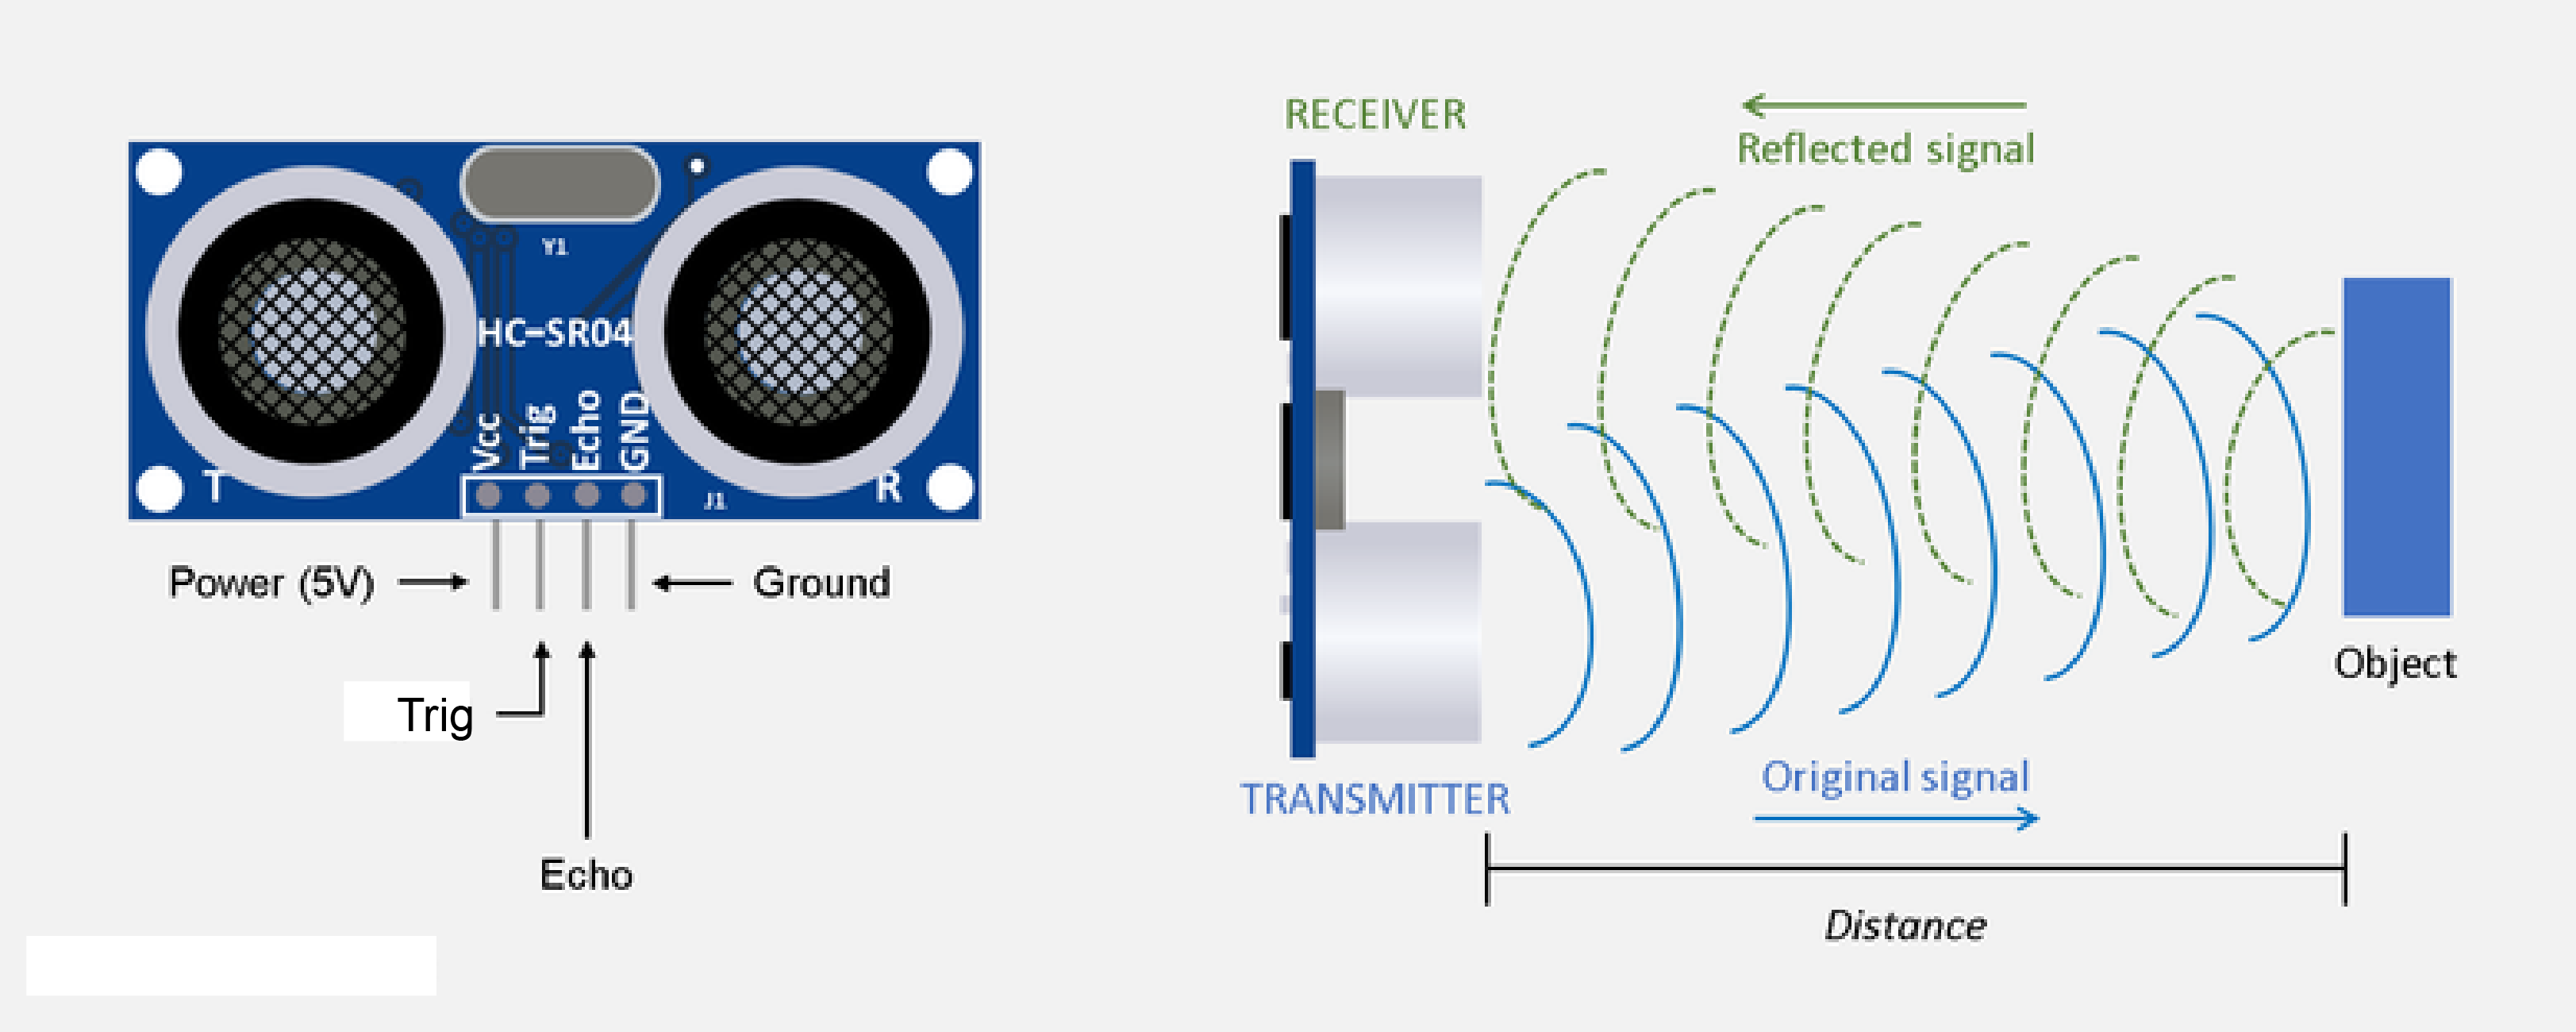
The HC-SR04 ultrasonic distance sensor has the following specifications:
- Power Supply :+5V DC
- Quiescent Current : <2mA
- Working Currnt: 15mA
- Effectual Angle: <15°
- Ranging Distance : 2cm – 400 cm/1″ – 13ft
- Resolution : 0.3 cm
- Measuring Angle: 30 degree
- Trigger Input Pulse width: 10uS
- Dimension: 45mm x 20mm x 15mm
Example of Ultrasonic Distance Sensor without Temperature and Humidity
The following example will give you a quick overview of the equations how to measure the distance with an ultrasonic distance sensor. The sensor send an eight-cycle signal at 40 kHz. After time_1 the signal will be reflected by the object and after time_2 the signal return back to the sensor and is measured. Therefore the distance between the sensor and the object is the speed of the sound multiplied by half of the time the signal was send, reflected and received. In the equation the speed of sound is 343 m/s or 0.0343 cm/μs converted to cm and the echo time measured in μs.
The following picture shows the connections between the sensors and the Arduino Nano.
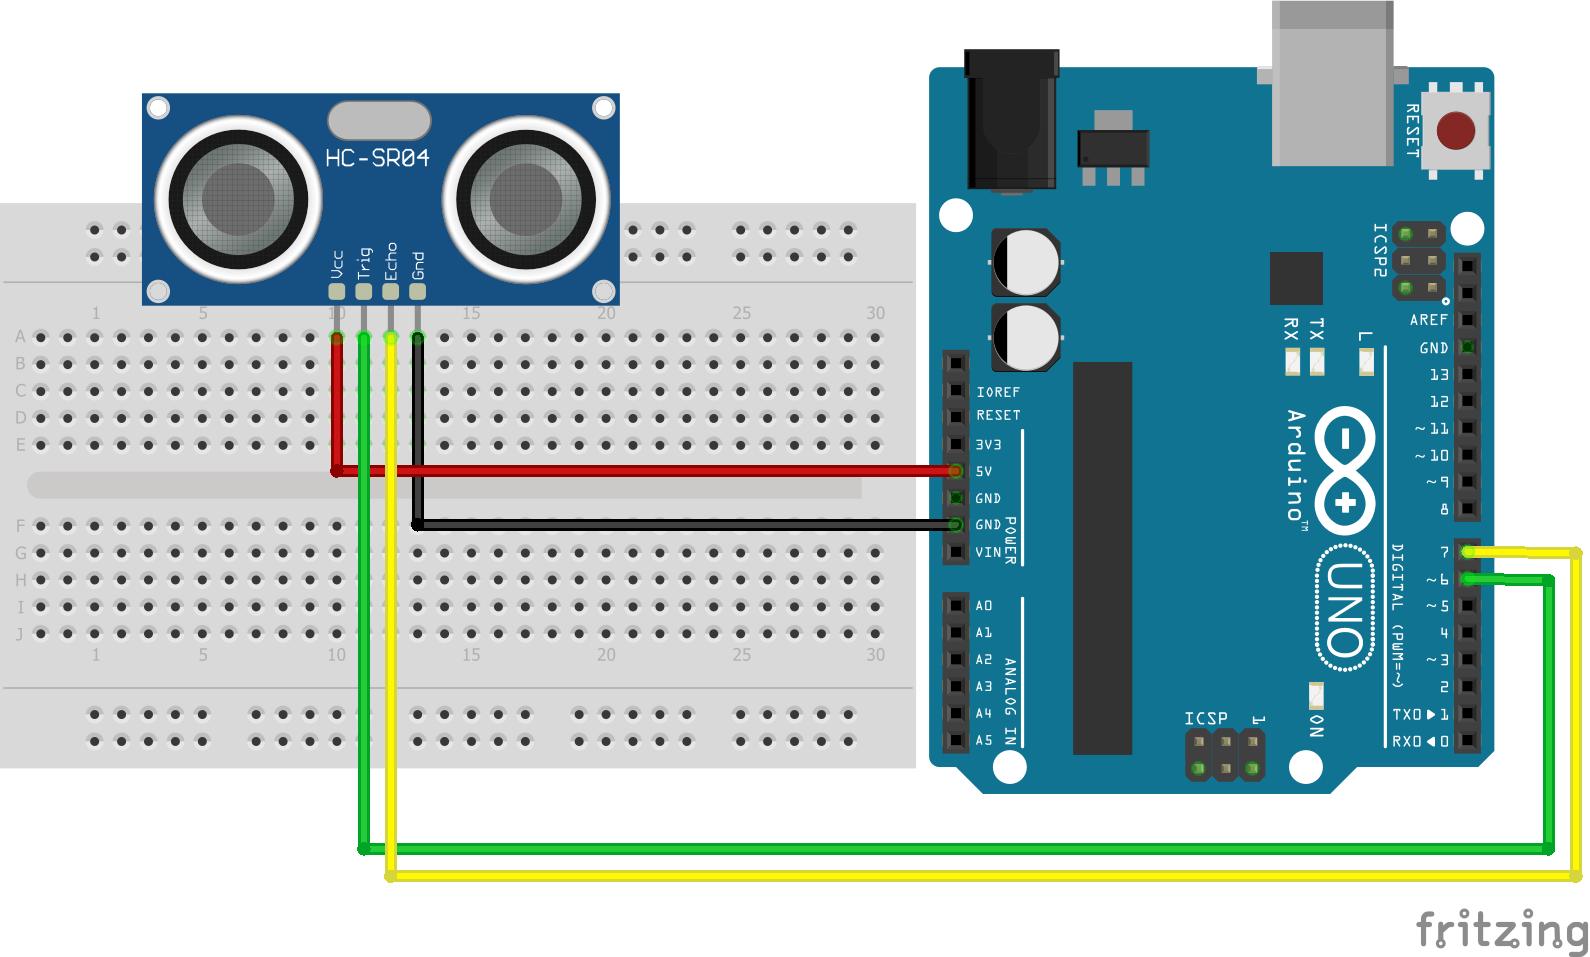
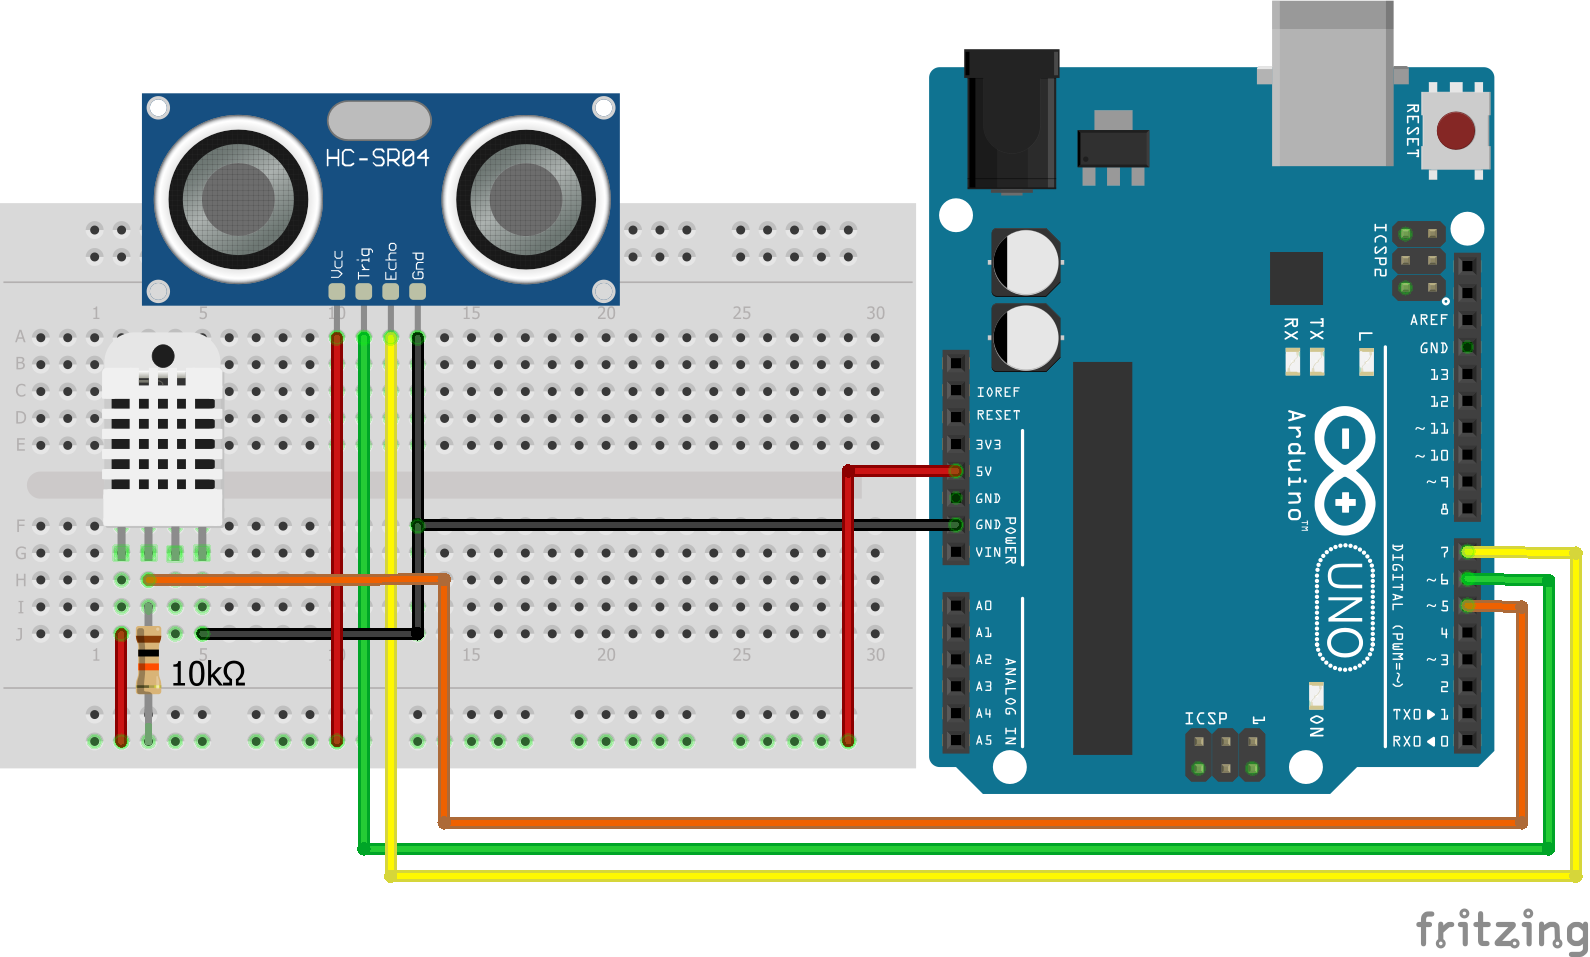
| HC-SR04 ultrasonic distance sensor | Arduino Uno | ESP8266 |
| VCC | 5V | VIN |
| Trig | Digital I/O Pin 6 | Digital I/O Pin |
| Echo | Digital I/O Pin 7 | Digital I/O Pin |
| GND | GND | GND |
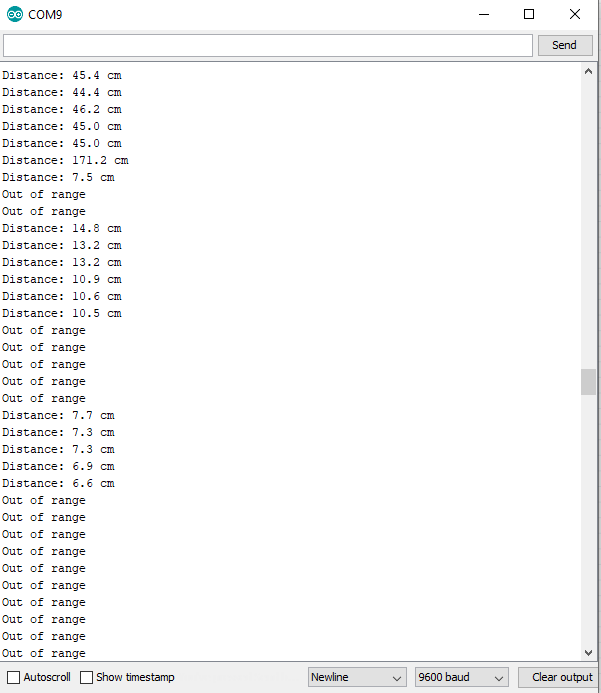
After we connect our devices we will go into the code. Our objective is to measure the distance between the sensor and our hand and print the distance to the serial monitor output. If the distance is out of range (< 2cm or > 4m) we will print an error.
int trigPin = 6;            // HC-SR04 trigger pin
int echoPin = 7;            // HC-SR04 echo pin
float duration, distance;
void setup()
{
  Serial.begin(9600);
  pinMode(trigPin, OUTPUT); // define trigger pin as output
}
void loop()
{
  digitalWrite(echoPin, LOW);   // set the echo pin LOW
  digitalWrite(trigPin, LOW);   // set the trigger pin LOW
  delayMicroseconds(2);
  digitalWrite(trigPin, HIGH);  // set the trigger pin HIGH for 10μs
  delayMicroseconds(10);
  digitalWrite(trigPin, LOW);
  duration = pulseIn(echoPin, HIGH);  // measure the echo time (μs)
  distance = (duration/2.0)*0.0343;   // convert echo time to distance (cm)
  if(distance>400 || distance<2) Serial.println("Out of range");
  else
  {
    Serial.print("Distance: ");
    Serial.print(distance, 1); Serial.println(" cm");
  }
}
Example of Ultrasonic Distance Sensor with Temperature and Humidity
If you want to measure the distance more exact you can calculate the speed of sound in dependence of the temperature and the humidity: v_sound = 331.3 + (0.606 * temp°C) + (0.0124 * humidity) m/s.
The following example we will use an Arduino Nano and also we use a temperature sensor to optimize the distance measurement. Moreover we will use a library for the HC-SR04 ultrasonic distance sensor called NewPing by Tim Eckel.
If you do not know how to install a new library in your Arduino IDE, I wrote a step by step article. You find the article with this link.
The NewPing library has some very nice function. Here are the top 3 of them:
- sonar.ping_cm(): Returns the distance between the sensor and the target, but there are no digits after
the decimal point. - sonar.convert_cm(echotime): Returns the distance given the echo time, but outlier values can be observed.
It is more robust to calculate the distance between the sensor and point directly from the echo time. - sonar.ping_median(number of observations): Returns median echo time for the number of observations, with a minimum of five observations, after excluding out-of-range values.
The next picture shows the connections between the sensors and the Arduino nano as well as the temperature sensor, the DHT22. If you want to know more about temperature sensors, there is a whole article about multiple sensors. The wiring between the Arduino and the HC-SR04 is the same as the first example.
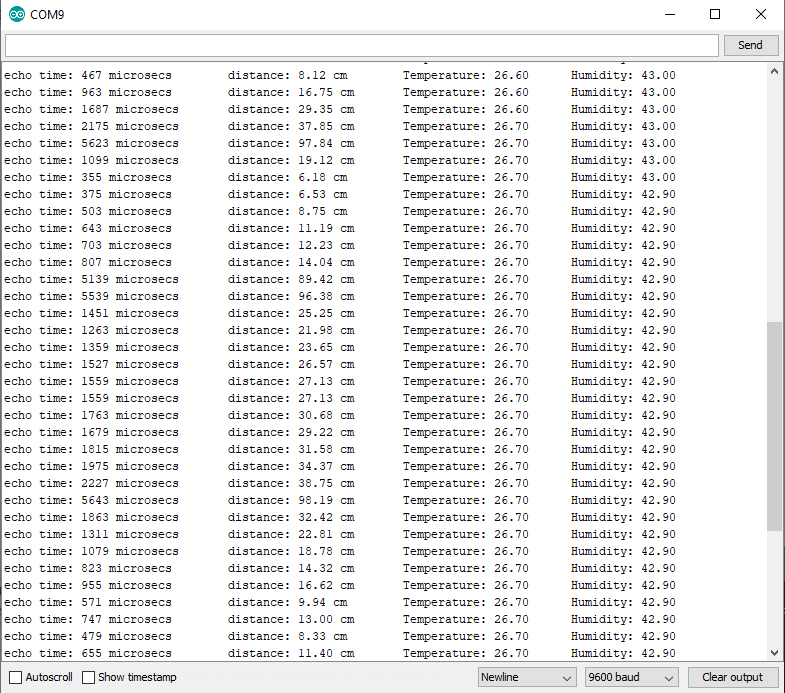
In the sketch we added the reading of the temperature sensor and we calculated the speed of sound like the equation. Also we added some variables in the serial output:
- echoTime: Raw value from the HC-SR04 ultrasonic distance sensor to calculate the distance between the sensor and the object.
- distance: The distance between the sensor and the object.
- temperature and humidity: The temperature and humidity from the DHT22 to calculate the speed of sound.
#include// include NewPing library #include "DHT.h" #define DHT22PIN 5 // DHT22 pin #define DHT22TYPE DHT22 // DHT22 type int trigPin = 6; // trigger pin int echoPin = 7; // echo pin int maxdist = 100; // set maximum scan distance (cm) int echoTime; // echo time float distance; // distance (cm) NewPing sonar(trigPin, echoPin, maxdist); DHT dht22(DHT22PIN, DHT22TYPE); void setup() { Serial.begin(9600); dht22.begin(); } void loop() { echoTime = sonar.ping(); // echo time (μs) float temperature = dht22.readTemperature(); float humidity = dht22.readHumidity(); float vsound = 331.3+(0.606*temperature)+(0.0124*humidity); distance = (echoTime/2.0)*vsound/10000; // distance between sensor and target Serial.print("echo time: "); Serial.print(echoTime); Serial.print(" microsecs\t"); Serial.print("distance: "); Serial.print(distance,2); Serial.print(" cm"); Serial.print("\t Temperature: "); Serial.print(temperature); Serial.print("\t Humidity: "); Serial.println(humidity); delay(500); }
Conclusion
Do you have any further questions about the ultrasonic distance sensor? Use the comment section below to ask your questions. And what are projects you would like to use the distance sensor? There is also a second sensor to detect objects in a predefined range, the infrared distance module.
Leave A Comment