Arduino IDE: Installation of a Library
You want to install a new library on your Arduino desktop IDE? Here is a guide for you how to install a library and also I show you the most used libraries to will need for a lot of projects.
Let’s start by open the Arduino desktop IDE.

Table of Contents
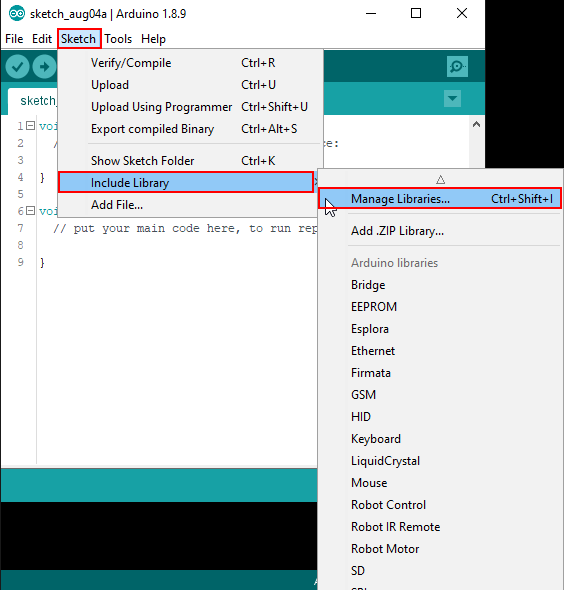
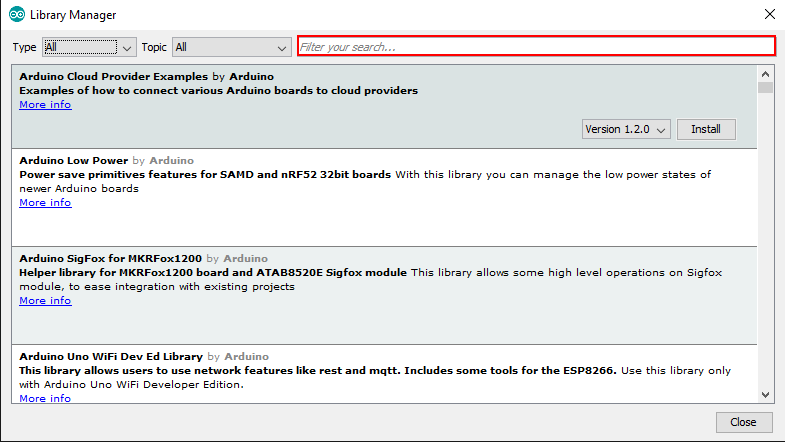
On the navigation bar at the top of the IDE you see at the third position “Sketch”. When you mouse-over the Sketch button you find in the drop down menu “Include Library”. On the right side a new window expands with the current libraries and the first entry is “Manage Libraries…”. Click on it.
Install a Library
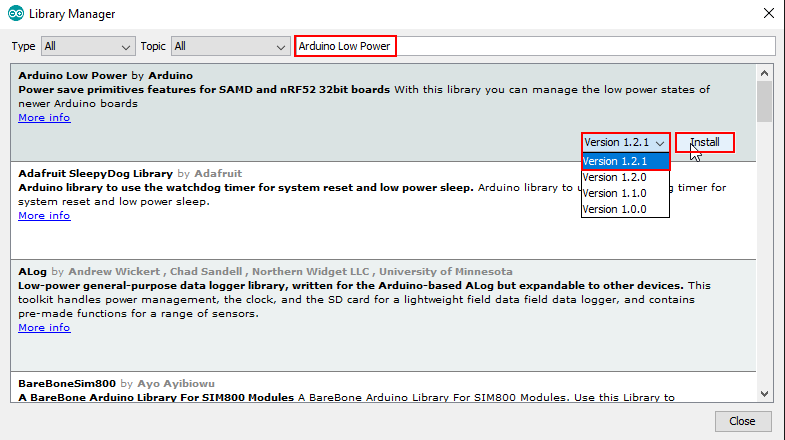
If you want to install a library just type the name of the library in the search field and select the newest version. After you selected the version just click on the “Install” button.
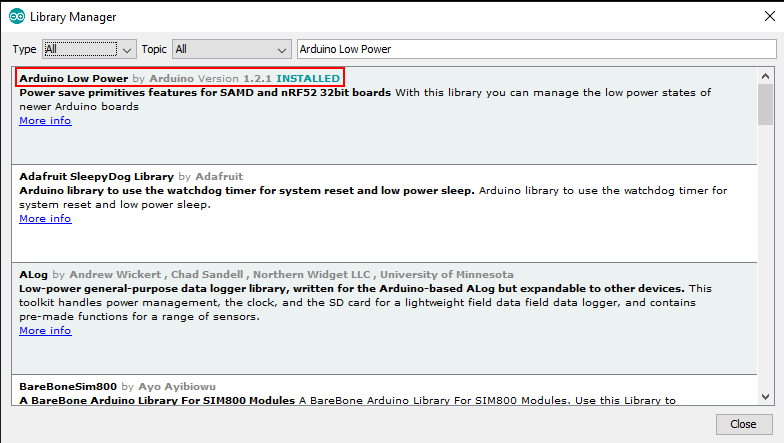
After the successful installation you see after the name of the library that the installation was successful.
Update a Library
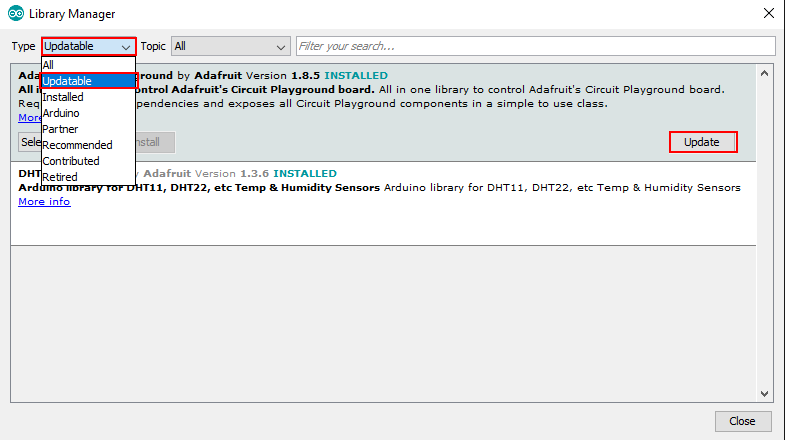
If you want to update a library you may become a popup at the main Arduino IDE. I would recommend to update a library when a newer version is available to ensure stability, security and access new functions. To update a library you can filter by libraries which are updatable. Filter after that type in the Library Manager and update the library with a click on the button “Update”.
Most used Libraries
| Library | Description | Pre-installed |
| Adafruit GFX Library | This is the core graphics library for all Adafruit displays, providing a common set of graphics primitives (points, lines, circles, etc.). It needs to be paired with a hardware-specific library for each display device we carry (to handle the lower-level functions). | |
| Adafruit NeoPixel Adafruit NeoPXL8 | Arduino library for controlling single-wire-based LED pixels and strip such as the Adafruit 60 LED/meter Digital LED strip, the Adafruit FLORA RGB Smart Pixel, the Adafruit Breadboard-friendly RGB Smart Pixel, the Adafruit NeoPixel Stick, and the Adafruit NeoPixel Shield. | |
| Adafruit Unified Sensor | Many small embedded systems exist to collect data from sensors, analyse the data, and either take an appropriate action or send that sensor data to another system for processing. | |
| Bounce2 | Debouncing library for Arduino | |
| DallasTemperature | Arduino library for Dallas temperature ICs. This library supports the following devices : DS18B20 DS18S20 - Please note there appears to be an issue with this series. DS1822 DS1820 MAX31820 You will need a pull-up resistor of about 5 KOhm between the 1-Wire data line and your 5V power. If you are using the DS18B20, ground pins 1 and 3. The centre pin is the data line '1-wire'. | |
| DHT | An Arduino library for the DHT series of low cost temperature/humidity sensors such as DHT11, DHT22, etc. You must have the following Arduino libraries installed to use this class: Adafruit Unified Sensor Library | |
| FastLED | This is a library for easily & efficiently controlling a wide variety of LED chipsets, like the ones sold by adafruit (Neopixel, DotStar, LPD8806), Sparkfun (WS2801), and aliexpress. In addition to writing to the leds, this library also includes a number of functions for high-performing 8bit math for manipulating your RGB values, as well as low level classes for abstracting out access to pins and SPI hardware, while still keeping things as fast as possible. | |
| IRremote | This library enables you to send and receive using infra-red signals on an Arduino. | |
| LiquidCrystal, LiquidCrystal I2C | This library allows an Arduino board to control LiquidCrystal displays (LCDs) based on the Hitachi HD44780 (or a compatible) chipset, which is found on most text-based LCDs. The library works with in either 4- or 8-bit mode (i.e. using 4 or 8 data lines in addition to the rs, enable, and, optionally, the rw control lines). | x |
| MAX6675 library | Arduino library for interfacing with MAX6675 thermocouple amplifier | |
| MFRC522 | Arduino library for MFRC522 and other RFID RC522 based modules. Read and write different types of Radio-Frequency IDentification (RFID) cards on your Arduino using a RC522 based reader connected via the Serial Peripheral Interface (SPI) interface. | |
| OneWirre | OneWire lets you access 1-wire devices made by Maxim/Dallas, such as temperature sensors and ibutton secure memory. For temperature sensors, the DallasTemperature library can be used with this library. | |
| PubSubClient | This library provides a client for doing simple publish/subscribe messaging with a server that supports MQTT | |
| Servo | This library allows an Arduino board to control RC (hobby) servo motors. Servos have integrated gears and a shaft that can be precisely controlled. Standard servos allow the shaft to be positioned at various angles, usually between 0 and 180 degrees. Continuous rotation servos allow the rotation of the shaft to be set to various speeds. | x |
| Stepper | This library allows you to control unipolar or bipolar stepper motors. | x |
| WiFi | With the Arduino WiFi Shield, this library allows an Arduino board to connect to the internet. It can serve as either a server accepting incoming connections or a client making outgoing ones. The library supports WEP and WPA2 Personal encryption, but not WPA2 Enterprise. Also note, if the SSID is not broadcast, the shield cannot connect. | x |
| WiFiManager | ESP8266 WiFi Connection manager with fallback web configuration portal |

Leave A Comment